
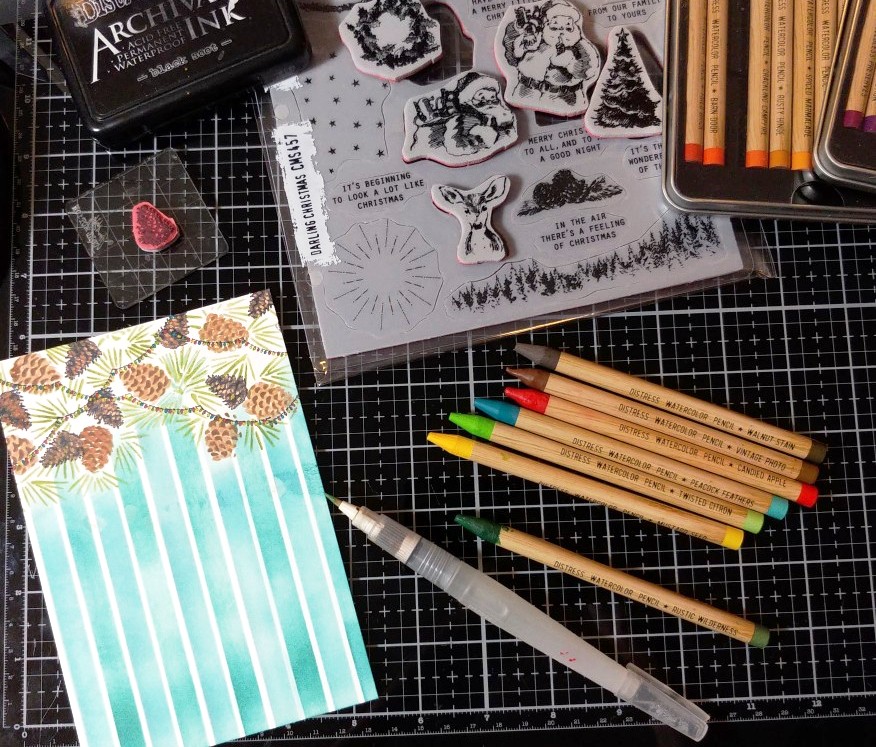
Hey Everyone!!! Wasn't that Tim Holtz Stamper's Anonymous Christmas Live so so fabulous?!! All the projects make me swoon! I am so honored to be apart of it, and I so appreciate all of your wonderful comments! Today I have my after Live make, two cards made with the Darling Christmas Stamp Set and Mini Pinecone Stencil (Set 54), and Sizzix Vintage Labels Thinlits for the ornament shape. I am absolutely in LOVE with the mini Christmas Light strand from the set of stamps...so so fun, and although a little hard to color in such a small space, I feel they made a big impact on these cards. This stamp set is just so good, and so many stamps to boot. Enjoy the tutorial!!!
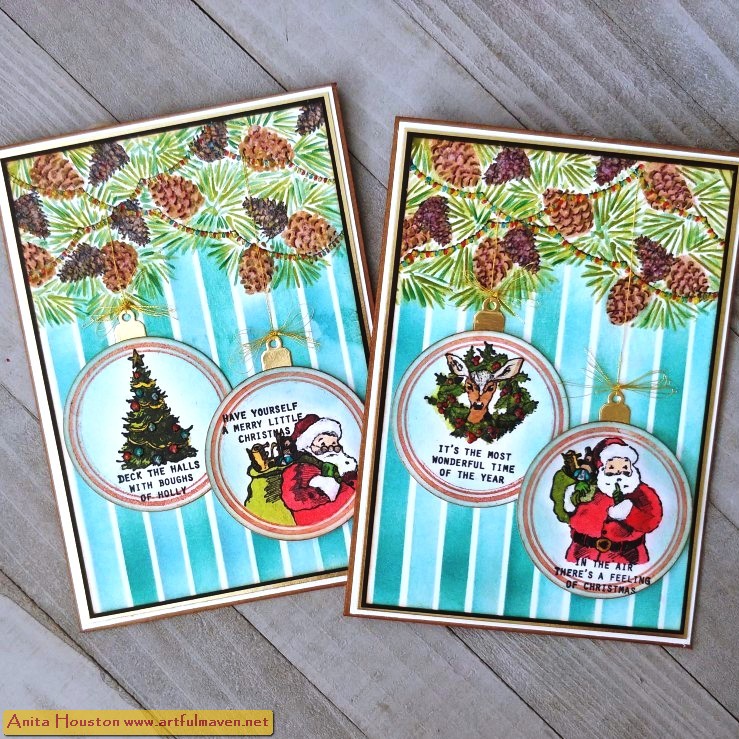

(For two cards double
this.) Cut a piece of White Heavystock to 4.5 x 6.5 inches and place into the
stamp platform. Stamp the Christmas Lights swag from the Darling Christmas
Stamp Set going across the top of the paper diagonally and then again going the
other way using Black Soot Archival Ink. Lay the pine cone and needles Mini
Layering Stencil across the top horizontally and secure with tape. Using a
Blending Brush and the Vintage Photo Distress Archival Ink from Ranger, lightly
pounce over the pine cone areas and stencil in the design. Do the same with the
Peeled Paint Archival and stencil in the pine needle areas. Remove and
carefully clean the stencil with 91% rubbing alcohol to remove the ink, but
taking care not to rub too hard to lift up the detail cut parts of the stencil.
Take the medium lined Multi Stripes Shifter Stencil, and lay it over the card,
and first stencil in Salvaged Patina Archival with an Ink Blending Tool,
working downward so you don't move the lines of the stencil. Slide it over to
finish that part of the pattern. Then cover up those lines with the solid
stripes of the stencil and ink over the open stripes with Evergreen Bough
Archival Ink. Slide it over to finish that pattern.
Take the small
pinecone stamp from the Darling Christmas set and place it onto a small
stamping block. Using Black Soot Archival, stamp the pinecone in the open areas
between the needles and pinecones already there. Using Distress Watercolor
Pencils and Detail Waterbrush (I use mine without water in it.) color in the
lights carefully using Mustard Seed, Twisted Citron, Peacock Feathers, and
Candied Apple, alternating the colors. Pick up some Vintage Photo Pencil onto
the brush and color in the stamped pinecones and open areas on the stenciled
pinecones. Add a little Walnut Stain to any of those for some color variegation.
Add more needles in the open areas of the needle parts with Rustic Wilderness
Pencil. When dry, add Glossy Accents over the top of the light strings. Let
dry.

Take the largest circle
die from the Vintage Labels Thinlits from Sizzix, and trace four of them onto
some White Heavystock using a pencil, tracing along the outside so you will
know the space you have to stamp in. I did five incase I messed up stamping.
You will need two per card, so doing only doing this once is enough for two
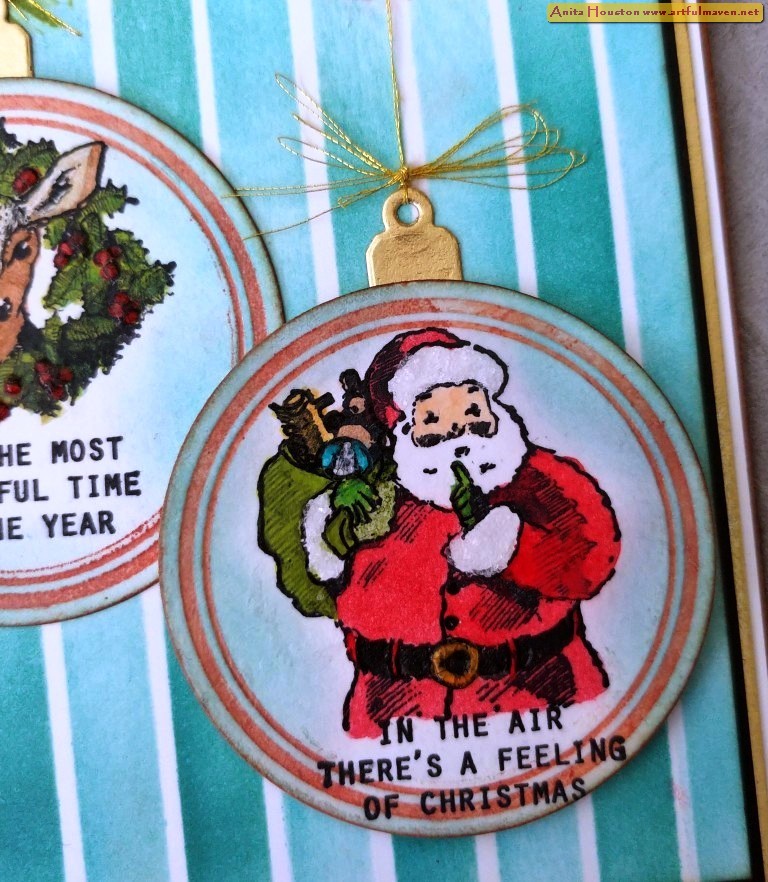
cards. Place into the platform. Take the images from the Darling Christmas set
and place one in each circle, along with a sentiment for each, and figure out
your placement. Stamp the sentiments first using Black Soot Archival. Remove
them and then stamp the images. Stamp the deer onto some sticky note and cut
around his face and ears only. Place this onto the deer and then stamp the
wreath so it looks like it's around his neck.

I decided to do this part
before coloring in, just in case I messed up, but this part takes some patience
and maybe practice. Ink over the large circle die from the Vintage Labels
Thinlits from Sizzix with Fired Brick Archival, and carefully flip it onto one
of the circled images, matching up the traced circle to the border of the
Thinlit, and add a piece of tape to hold it in place. Run it through the die
machine. Repeat with the other three, trying not to get any red ink where you
don't want it. I did try using a piece of tape to lift and place it, but I kept
getting ink on that too, so I finally just kept trying to keep things clean and
neat and go slow. If you get ink where you don't want it, you can always try to
cover it up with other ink or even paint. Color in the images with Watercolor
Pencils.

Ink around the edges
of each circle with Salvaged Patina Archival and an Ink Blending Tool, leaving
a little white around the images for a silhouette look. Ink the edges of the
circles with Gathered Twigs Distress Ink. Add two sided tape to the back of a
small piece of gold Kraftstock, and using the medium mini tag from the
Collector Thinlits, die cut four of them. Add a small piece of two sided tape
to the top of all the cirlces on the back and add the mini tags to that just
sticking up half way to look like an ornament hanging hook. Using gold metallic
thread, tie some to the tag hole for hanging, then loop some around your
fingers and tie for a bow for each ornament.

Using a small
paintbrush, add Snowfall Gritpaste to the hat and cuffs of the Santa ornaments.
Left dry. Add the Snowfall to the pinecones at the top of each card just using
your finger. Fold and cut Kraft Cardstock to 5 x 7 inches (times 2 for each
card). Trim White Heavystock to 4 7/8 x 6 7/8 inches and mount to the Kraft.
Then trim Gold Metallic Kraftstock to 4.75 x 6.75 inches and mount to the
white. Cut Black Kraftstock to 4 5/8 x 6 5/8 and mount onto the gold. Add the
card front. Add two sided tape the tree and deer ornaments and adhere those on
the middle left side. Add foam tape to the back of the Santa ornaments and add
those to the bottom right. Use Collage Medium to secure the thread so it looks
like it's hanging the ornaments, and add some to secure the bows just above the
holes. Let dry and trim the excess thread.


(Paper Trimmer, Stamp Platform, Scotch
Tape, Ink Blending Brush, Ink Blending Tool, Small Stamping Block, Detail
Waterbrush, Water Mister, Pencil, Sticky Note, Scissors, Gold Thread, Two Sided
Tape, Foam Tape)
-Ranger Tim Holtz Distress Heavystock:
White
-Stamper's Anonymous Tim Holtz Stamp Set: Darling
Christmas
-Ranger Tim Holtz
Archival Ink: Black Soot, Vintage Photo, Peeled Paint, Salvaged Patina,
Evergreen Bough, Fired Brick
-Stamper's Anonymous Tim Holtz Mini Layering
Stencils: Set 54 (Pinecones)
-Stamper's Anonymous Tim
Holtz Layering Stencil: Multi Stripes Shifter (Medium Line)
-Ranger Tim Holtz Distress Watercolor
Pencils: Candied Apple, Mustard Seed, Twisted Citron, Peacock Feathers, Vintage
Photo, Rustic Wilderness, Walnut Stain, Tattered Rose, Peeled Paint, Wild
Honey, Black Soot, Antique Linen, Picket Fence
-Ranger Glossy Accents
-Sizzix Tim Holtz Thinlits: Vintage
Labels, Collector
-Ranger Tim Holtz Distress Grit Paste:
Snowfall
-Ranger Tim Holtz Distress Resist Spray
-Tim Holtz Idea-ology: Black Kraftstock,
Metallic Classics Kraftstock
-Ranger Surfaces: Kraft Cardstock
-Ranger Tim Holtz Distress
Ink: Gathered Twigs
I want to thank you all for all the nice comments on the Live for the cards that were shown. I'll have those tutorials up in the next two weeks. Until then, I hope your hands get creatively dirty soon!


These are absolutely gorgeous and I love all the detail involved in making them! Thanks so much for sharing !
ReplyDelete