Showing posts with label Food. Show all posts

Monday, August 26, 2024

Tim Holtz Stamper's Anonymous Halloween 2024 - Boo Sheet Halloween Party Treat Sacks & Tags

And I'm back to show you the last little project to go with the Boo Sheet Halloween Party theme, using the new stamps and stencils from Tim Holtz and Stamper's Anonymous, and seen in the Live last Saturday. I really can think of several other decor pieces to make with these for a party, as the images are so stinking cute. Don't you agree? Enjoy these Treat Sacks and Tags! 

 
(NOTE: The Archival Ink takes a bit longer to dry on the glassine, so take care not to smear it, or use a heat tool to help dry.) Place a white glassine bag in the platform and take the small extra ghost stamp on the lower right side of the glassine just for placement so don't close the lid yet. Take the mini witch's hat, broom, and pumpkin pail from the Mini Bird Crazy & Things and figure out the best placement of them using the little ghost. Remove the ghost and then stamp the mini things in Black Soot from Ranger.  Place another glassine bag in and repeat and do as many as you want. Clean the stamps off by stamping the remaining ink from them onto a large sticky note, and then cut the images out. You are finished with these stamps so remove them.  Place the sticky notes on the images and then add the little ghost on and stamp it in Black Soot over the sticky notes. Place another glassine bag in and repeat and do as many as you want.  Clean this stamp off on another sticky note and cut it out. Remove the little ghost as you are 
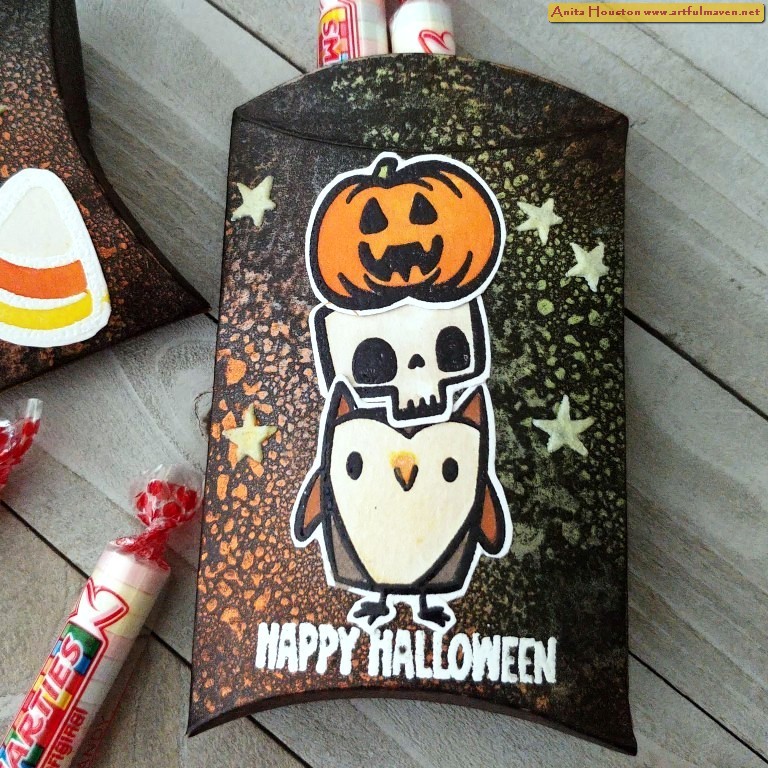
finished with it.  Take the large ghost stamp and place it next to the little witch ghost in the center area of the glassine just for placement so don't close the lid yet. Take the bowler hat and pumpkin pail from the Crazy Things and figure out the best placement of them using the large ghost. Remove the ghost  and then stamp the images in Black Soot. Place another glassine bag in and repeat and do as many as you want. Clean the stamps off by stamping the remaining ink from them onto another sticky note, and then cut the images out. You are finished with these stamps so remove them.  Place the sticky notes on the images as well as the broom sticky note,  and then add the large ghost on and stamp it in Black Soot over the sticky notes. Place another glassine bag in and repeat and do as many as you want. Clean this stamp off on another sticky note and cut it out. Remove the large ghost as you are finished with it. Place all the sticky notes on the images and then arrange the large web over them and close the lid to secure the stamp. Stamp the web in Hickory Smoke Archival Ink. Place another glassine bag in and repeat and do as many as you want. Remove this stamp and add the two sentiments or whatever you want, as well as the bow tie on the large ghost, and stamp them in Black Soot Archival Ink. Remove all the stickys and save for another time. Place another glassine bag in and repeat and do as many as you want, and don't worry about the sticky notes anymore.

 
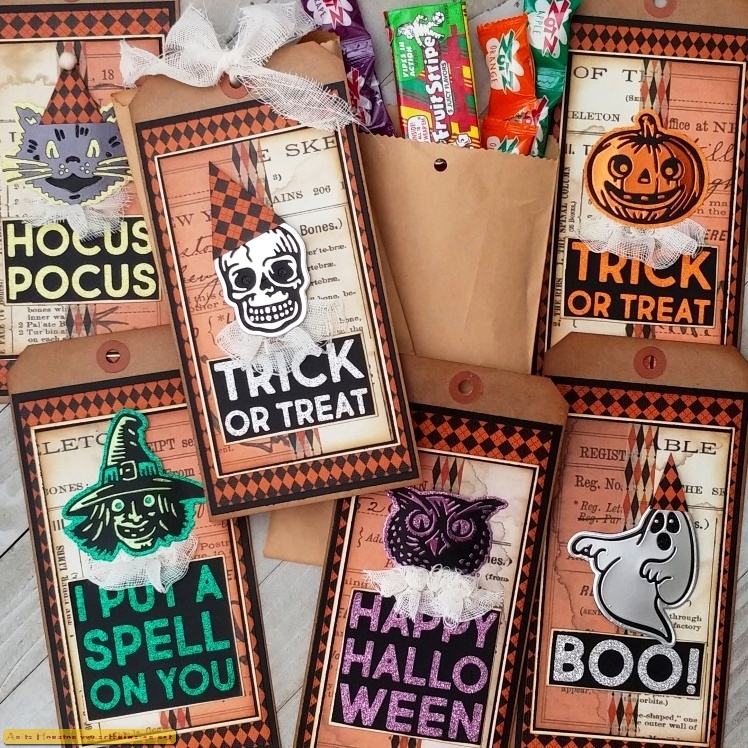
Take #8 Black Tags for as many of the treat sacks as you are making, and cut off the bottom two inches on each and save those for another project. Place a tag in the platform and add a sentiment from the Halloween Whatnots Stamp Set just below the tag holes. Speaking of the tag holes, I don't like that brownish color for these tags so I color it in with Black Soot Archival Ink, FYI. Close the lid to secure the sentiment and then stamp it with Glacier White Pigment Ink a few times to make it nice and bright. Repeat with more tags and sentiments. Let this ink dry a while or use a heat tool. Take the Mini Jacks Layering Stencil and place it below the sentiment along the bottom border of the tag so that two open pumpkins are centered along the bottom. Using a clean foam and ink blending tool, ink in the solid pumpkins with Glacier White Pigment Ink and then let dry. If you get white anywhere you don't want it use a black pen and Black Soot Archival to cover it up....the beauty of using a black surface.

 
Using Distress Watercolor Pencils and a Detail Waterbrush, color in the parts of the sentiments that you want, as well as oranges for the solid pumpkins with green stems, but I kept the center pumpkin white, as well as the accessories on the ghosts with the glassine bags.  Keep in mind that the pencils will color over the black portions, but again you can use a pen to color them back black on the tags. The water makes the glassine slightly buckle but it will flatten out when dry. See below for the colors I used. For the witch's buckle on the hats, I used Antique Bronze Distress Crayon with the Waterbrush. 
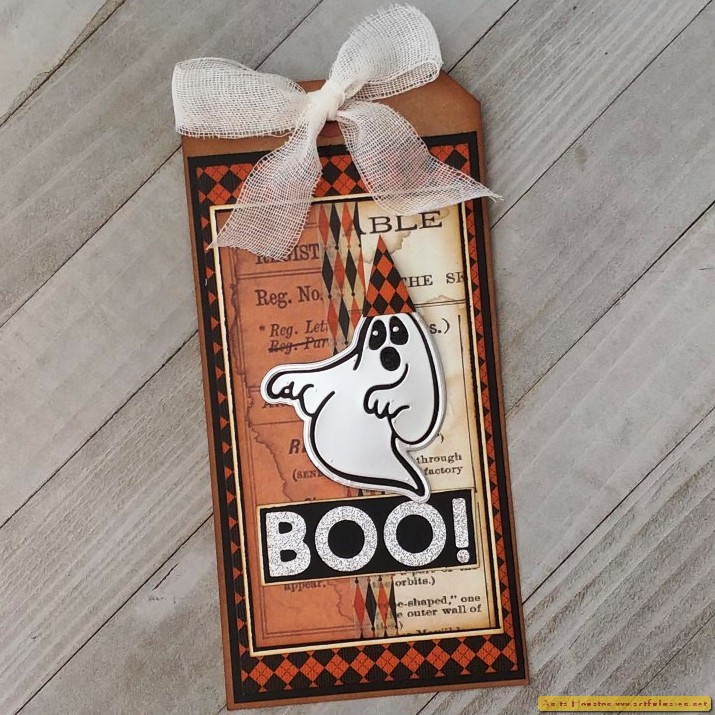
Use a white pen to add dots in each of the centers of the eyes, as well as add eyelashes to the little witch. Let the bags dry well. Place the face part of the Jacks stencil over the pumpkins and use Black Soot Archival to color them in. Select letters for a name or initials using the Halloween Transparent Tiles and secure those on to the bottom of the tag edge using two sided tape. Crinkle up some Halloween Fringe and use two sided tape to secure it on over the top of letters. Add ribbon to the tag hole and tie it onto the fold down bag through a hole made with a hole punch once your bag is filled with treats. 
 
 
Supplies:
(Stamp Platform, Scissors, Sticky Note, Water Mister, Detail Waterbrush, Paper Trimmer, Ink Blending Tool, Two Sided Tape)
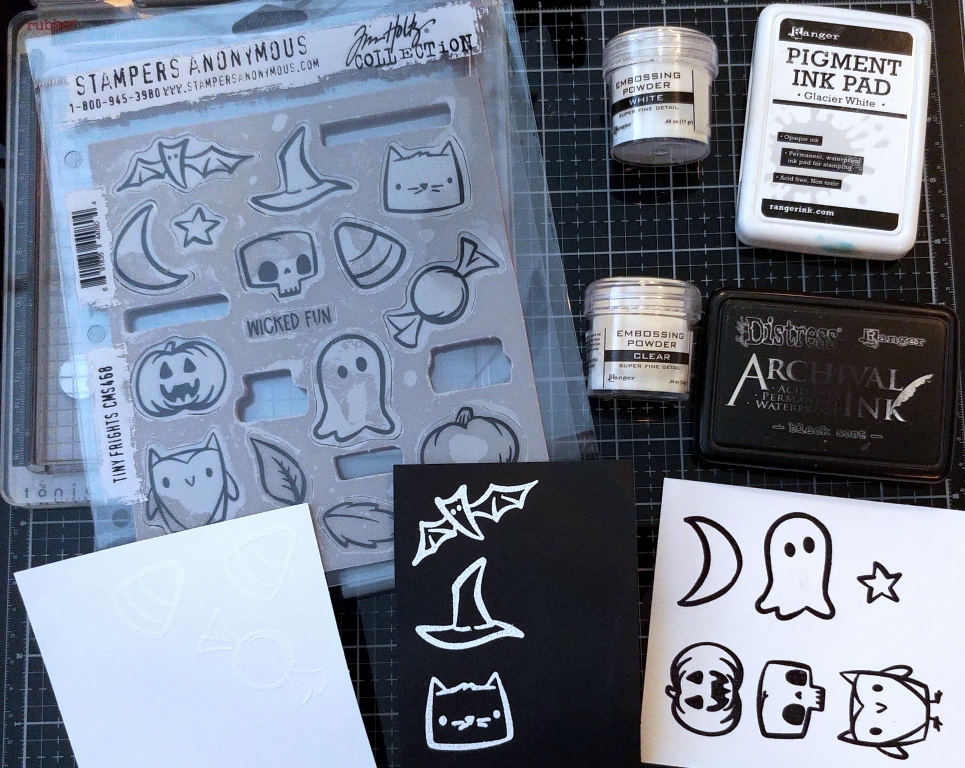
-Stamper’s Anonymous Tim Holtz Stamp Set (Halloween 2024): Boo Crazy, Halloween Whatnots  
-Ranger Tim Holtz Distress Archival Ink: Black Soot, Hickory Smoke
-Stamper’s Anonymous Tim Holtz Stamp Set: Crazy Things, Mini Bird Crazy & Things
-Ranger Tim Holtz Distress Watercolor Pencils: Spiced Marmalade, Crackling Campfire, Peeled Paint, Gathered Twigs, Hickory Smoke
-Ranger Tim Holtz Distress Crayon: Antique Bronze
-Ranger Surfaces: Black #8 Tags
-Ranger Pigment Ink: Glacier White
-Stamper's Anonymous Tim Holtz Layering Stencil: Mini Jacks 
-Tim Holtz Idea-ology: Halloween Transparent Tiles, Halloween Fringe, Halloween Trimmings
-White Glassine Sacks A2, Black Pen, White Pen 
 
I'd love to see if you make any of these or add to theme with a whole new make...let me know! Thanks again for all the comments! I'll be back again soon. Until then, I hope your hands get creatively dirty soon!

Friday, September 01, 2023

Tim Holtz Stamper's Anonymous Halloween 2023 - Tiny Frights Glow in the Dark Pillow Box Candy Holders

Hello again this week Everyone! Today, I have the Halloween Pillow Box Candy Holders seen in the Tim Holtz Stamper's Anonymous Halloween Live, made with the Tiny Frights Stamp Set along with the Mini Spellbound and large Peek-a-boo Layering Stencils. I would give these out to my special Trick-or-Treaters or use them for party favors. They also glow in the dark with the new Glow Distress Grit Paste, so they are super fun at night. Hope you enjoy!
 
 
To make embossing cleaner, make sure to pounce all papers with an anti-static pouch first. From the Tiny Frights set, and using Black Cardstock, stamp the bat, hat, and cat stamps using Glacier White Pigment Ink and then heat emboss with White Embossing Powder from Ranger. Make sure to leave space around the cat for the next part. Onto Watercolor Cardstock, stamp the jack-o-lantern, skull, owl, moon, ghost, and star using Black Soot Archival and heat emboss with Clear Embossing Powder. Onto more Watercolor, stamp the candy corn, candy, and another candy corn in Glacier White and heat emboss with White Powder.

 
For the cat only, use the Mini Stars Layering Stencil an Embossing Pen color in a small circle with three dot circles that look like a paw print just slightly to the right below the head for the cat's hand, and then quickly pour white powder over and heat emboss. Then use the pen to draw two line for the arm, two lines for the sides of the body, and the outline of a wand above the hand, pour powder on and heat emboss. Add two sided tape to the back of all the papers, then cut out all of the embossed images leaving a tiny border around each. Set aside for now. 
 
 
Take the Pillow Box w/Labels Bigz Die from Sizzix, and using Black Kraftstock, die cut five of the boxes. You will need one small label for later, so you can save all the other labels for something else.
 
 
Take two of the boxes and lay them in a spray box or on paper towels, one vertical and one horizontal. Shake up the Mulled Cider, Flickering Candle, Ominous Twilight, and Fortune Teller Distress Mica Stains until all mica is released from the bottom. Heavily spray each color in a striped diagonal pattern on both boxes alternating colors until all the paper is covered. Make sure to clean the nozzle of each so there is no clogging the next time you use these. When dry, lay the stamped images on each were they will go on the front panel, but don't stick down yet. Select the sentiments for each and see where they will go. Remove the images and put them in a safe place, and place one box in a stamp platform and secure the sentiment. Pounce the anti-static pouch over where it will be, and stamp the sentiment with Glacier White Pigment Ink and heat emboss with White Embossing Powder. Do the other the same. NOTE: On the opposite panel of the box (the back side) you will need to select a pair of Peek-a-Boo eyes from the Layering Stencil that will be stenciled in with the Glow Grit Paste, but I found out the hard way that the Mica will bleed through the Glow, so to alleviate this you need to stencil in the eyes with Glacier White Pigment Ink first to be a barrier between them. Using a Mini Detail Inking Tool and the Glacier White Pigment Ink, stencil in one pair of the eyes on the back panel of each box, and let this dry awhile. Remember the eyes will be upside down on the horizontal box so that when folded the eyes will be right side up. Set aside for now. 
 
 
Take two more of the black Pillow Boxes, and lay them in the spray box or on towels, again one vertical and one horizontal, and shake up the Empty Tomb, Wicked Elixir, and Jack-O-Lantern Distress Mica Stains, and spray those heavily, horizontally alternating colors on each box. Let dry. Lay the stamped images on each were they will go on the front panel, but don't stick down yet. Select the sentiments for each and see where they will go. Remove the images and put them in a safe place, and place one box in a stamp platform and secure the sentiment. Pounce the anti-static pouch over where it will be, and stamp the sentiment with Glacier White Pigment Ink and heat emboss with White Embossing Powder. Do the other the same. Using a Mini Detail Inking Tool and the Glacier White Pigment Ink, stencil in one pair of the eyes on the back panel of each box, and let this dry awhile. Remember the eyes will be upside down on the horizontal box so that when folded the eyes will be right side up. Take all four of the colored Pillow Boxes, and using the Glow Grit Paste and a palette knife, stencil in all the pairs of eyes, and set these aside to dry. Clean the stencil and knife.

 Take all the candy images, the owl, jack-o-lantern, and skull, and color them in with Distress Watercolor Crayons and a Detail Water Brush (Antique Linen, Vintage Photo, Walnut Stain, Spiced Marmalade, Mustard Seed, Twisted Citron). The owl's belly and shadowy spots on the skull are Antique Linen fyi. Then take coordinating Distress Mica Stain, shake them up, and pour a tiny bit out onto the white mat. Pick up with the brush and color over the other matching colors. Unraveled is on the Antique Linen. Now all the colors will shimmer.
 
 
Remove the backing on the stamped images and stick them on where they go. Take the Mini Stars Stencil and using the Glacier White Pigment Ink again as the barrier and the Mini Inking Tool, stencil in stars on the owl box and on the ghost box. Stencil in asterisk looking ones on the candy box and around the top of the wand to look like magic stars. You can also stencil in some circles around the wand like I did, but I didn't put an Glow on those. When dry, add the Glow Grit Paste over those, and let dry. Gently fold all the boxes along the fold lines, and then add two sided tape to the thin joining part, and adhere the panels together for each box. Fold the round parts in one side, fill with candy, and enjoy giving to your favorite Trick-or-Treaters. To recharge the Glowing parts just leave under a light and they will glow bright again. 
 
 
On the last pillow box, I decided to change it up and just make it a mummy. With the box vertical, stencil in a pair of eyes with the Glow on the upper left side. Let dry. Fold all the parts first, and then adhere the panels together using two sided tape, and then secure the ends to close the box. Take Mummy Cloth (probably about a yard) and wrap around the box diagonal one way and then the opposite way, finishing around the eyes. Fold the parts over if they are covering the eyes. Secure the end with Collage Medium. Using Gathered Twigs Distress Ink, ink the both edges of the strips of cloth so they look old. Brush Medium over both sides. Take about a foot long piece of cloth and wrap it around twice and tie just one to secure. Stamp the sentiment on one of the labels from the die using Glacier White Pigment Ink and heat emboss in White Powder. Punch a small hole in one end of the label. Distress the edges and ink them using the Gathered Twigs. Place the label through one of the tied strings and then tie again to make a knot. Trim off to short the strings. Ink the edges of the strings with Gathered Twigs.
 

Supplies:
(Two Sided Tape, Stamp Platform, Anti Static Pouch, Heat Tool, Scissors, Mini Detail Inking Tool, Palette Knife, Detail Water Brush, Distress Tool, Hole Punch, Collage Brush)
-Ranger Tim Holtz Watercolor Cardstock
-Ranger Surfaces: Black Cardstock
-Stamper's Anonymous Tim Holtz Stamp Set: Tiny Frights 
-Ranger Tim Holtz Distress Archival Ink: Black Soot
-Ranger Embossing Powder: Clear, White
-Ranger Pigment Ink Pad: Glacier White
-Stamper's Anonymous Tim Holtz Layering Mini Stencil Set: 56 (Spellbound)
-Ranger Embossing Pen
-Tim Holtz Idea-ology: Black Kraftstock, Mummy Cloth
-Sizzix Tim Holtz Bigz Die: Pillow Box w/Labels
-Ranger Tim Holtz Distress Mica Stain: Mulled Cider, Flickering Candle, Ominous Twilight, Fortune Teller, Empty Tomb, Wicked Elixir, Jack-O-Lantern, Unraveled, Phantom Mist, Harvest Moon, Fallen Acorn
-Stamper's Anonymous Tim Holtz Layering Stencil: Peekaboo
-Ranger Tim Holtz Distress Grit Paste: Glow
-Ranger Tim Holtz Watercolor Pencils: Antique Linen, Vintage Photo, Walnut Stain, Spiced Marmalade, Mustard Seed, Twisted Citron
-Ranger Tim Holtz Distress Ink: Gathered Twigs
 
Thank you so much for stopping over and looking, and especially for leaving a comment. I will be back soon. Until then, I hope your hands get creatively dirty soon!

Wednesday, August 24, 2022

Tim Holtz Sizzix Halloween 2022 - Bold Text and Retro Halloween Treat Bag #10 Gift Tags

I'm back and with my last project from the Tim Holtz Sizzix Halloween Live...these fun Bold Text Halloween and Retro Halloween Treat Bag Gift Tags, for those special Trick-or-Treaters.  The Retro Halloween images are so easy and fast to put together, and you can use so many substrates with them and interchange the pieces with different ones...so cool! I was lucky to find some (Although not enough so all the bags are not filled yet in the photos, but I'll be looking for more.) retro candy to fill the sacks with to match the retro feel of the tags...love that those are still being made, especially the Razzles. Enjoy!


When die cutting the Retro Halloween and Bold Text Halloween pieces, you will need glitter paper and Metallic Kraftstock in the same color family, as well as black cardstock, all with two sided tape on the back and ready to go...with the exception of the ghost and skull (they need black glitter paper as well as silver glitter paper and silver Metallic Kraftstock) and cat (yellow glitter paper but with black Metallic Kraftstock). All the faces will need two solid base pieces in glitter, one face in metallic, and one face in black cardstock. You will replace the inside pieces of black cardstock with the inside pieces of Metallic Kraftstock, then adhere each one to a glitter base with the glitter showing through to the eyes and anywhere else you think (See the next picture for some detail on this.). On the text of each one, die cut the words with black cardstock, remove the letters and save for later, and adhere the words to a glitter paper and trim around the border (see pic 3 for better details). Then you will decide which face to use on the tags and save the other for another project or make more tags with them. 
 
  
Here is a better look at what I talked about above. There are two base glitter pieces for each face (one in metallic and one in black), and you swap out the middle pieces on the faces with the other color, leaving the eyes open to see the glitter when you adhere the face on. You can also cut the two die pieces together to get a thin border trim to use on one, which is a cool thing to be able to do and that makes it like there are three dies per character instead of two. The hard part is deciding which face to use on the tag, or you can make two tags and use both. 
 
 
Here is a little detail on the sentiment. Die cut using Black Cardstock with two sided tape on back, push out the letters and use for another time, then adhere to a glitter paper and trim around. Adhere this onto Mixed Media Cardstock or Manila and trim around just leaving a tiny border, and ink the border with Gathered Twigs Distress Ink.
 
  
To make the tags, pick two Halloween Backdrops to paper piece together. Cut each into six each pieces, and then join two together (one piece from sheet) with a piece of Halloween Design Tape. Ink the edges with Gathered Twigs Distress Ink, and then mount onto Black Cardstock, just leaving a very thin edge. Mount this onto Mixed Media Cardstock or Manila, and cut and ink the edges. Mount this onto a patterned Halloween paper (I used Halloween Kraftstock...love this stash!) and leave a wider border, and ink. Then mount onto black and finally onto a #10 Kraft Tag, and ink the edges. Lots of layers, but it really makes the images pop. 
 
 
To dress up the characters, add hats cut from patterned Halloween paper, and even add a pom pom on top with Collage Medium. To make collars, cut a piece of Mummy Cloth about 5 inches long, and pull a few threads from each side opposite each other to make it ruffle up, and gently pull and slide the cloth at the same time until you get the ruffled look you want. Tie the threads into a knot behind the collar, and add two sided tape behind. Remove the two sided tape backing from the character and stick the collar in place where you want it and then adhere the character to the tag directly or add some foam tape behind to prop up the middle of the face and stick the sides of the face down like I did. Adhere the sentiment below. Add whatever else you want to dress up your character. 
 
 
Take large Kraft treat sacks that are slightly larger than the #10 tag, and ink the edges in Gathered Twigs. Fill the bags with vintage retro looking candy, and fold the top about 3/4 of an inch. Punch a hole in the middle of the fold to match up with the hole on the tag, and secure the tag on top of the sack with a Mummy Cloth bow to give to your special Trick-or-Treaters or as party favors. SO STINKING CUTE!


Supplies:  
(Scissors, Two Sided Tape, Paper Trimmer, Die Cut Machine, Die Pick, Ink Blending Tool, Foam Tape, Hole Punch)
-Sizzix Tim Holtz Thinlits (Halloween 2022): Retro Halloween, Bold Text Halloween 
-Tim Holtz Idea-ology: Metallic Colors Kraftstock, Metallic Classics Kraftstock, Halloween Backdrops, Halloween Design Tape, Halloween Kraftstock, Halloween Trimmings 
-Ranger Surfaces: Black Cardstock, Mixed Media Cardstock, #10 Kraft Tags 
-American Crafts Glitter Paper Pad 
-Ranger Tim Holtz Distress Ink: Gathered Twigs 
-Ranger Tim Holtz Distress Collage Medium: Matte 
-4.75 x 9.25 Inch Kraft Gift Sacks, Tiny Pom Poms
 
More Halloween goodness is on the way, so stay tuned! Thank you so much for coming on over. Until next time, I hope your hands get creatively dirty soon!