Wednesday, January 25, 2023

Tim Holtz Sizzix Everyday 2023 - True Love and Emporium Abstract Elements Valentine Cards

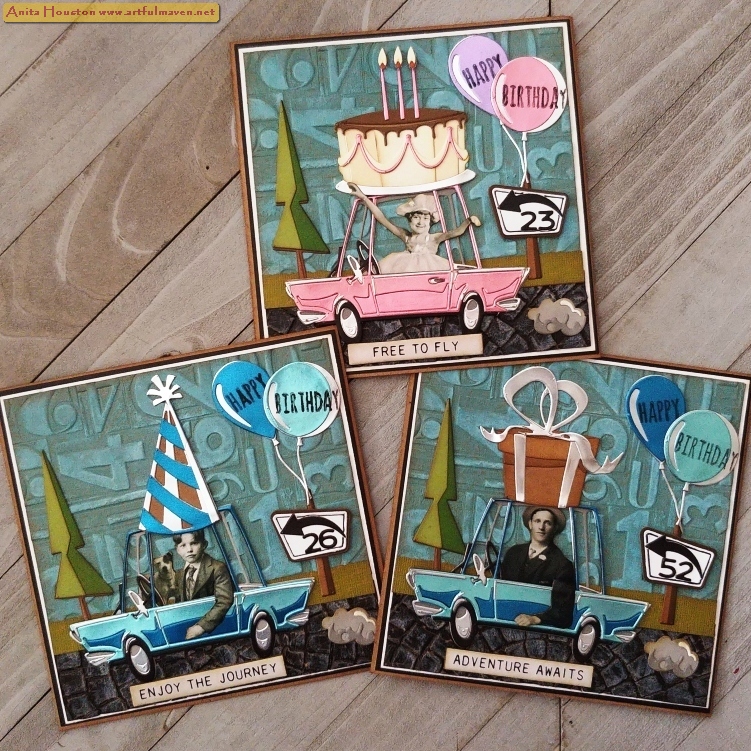
Hello Everyone, and thank you so much for all the love on the last post. Speaking of love, today I have the second project seen in the Tim Holtz Sizzix Everyday Live, which happen to be the four Valentine Cards made with the new Abstract Elements, True Love, and Emporium Alphanumeric Thinlits.  All of these were laid out the same way, but vary from simplest to more lengthy, to give you an idea of how to use the Abstract Elements in different ways. The Abstract Elements seriously have a million uses, and are so fun to create with. I totally can see these used in Mixed Media Tangle Art...might give that a try soon. Hope you enjoy!
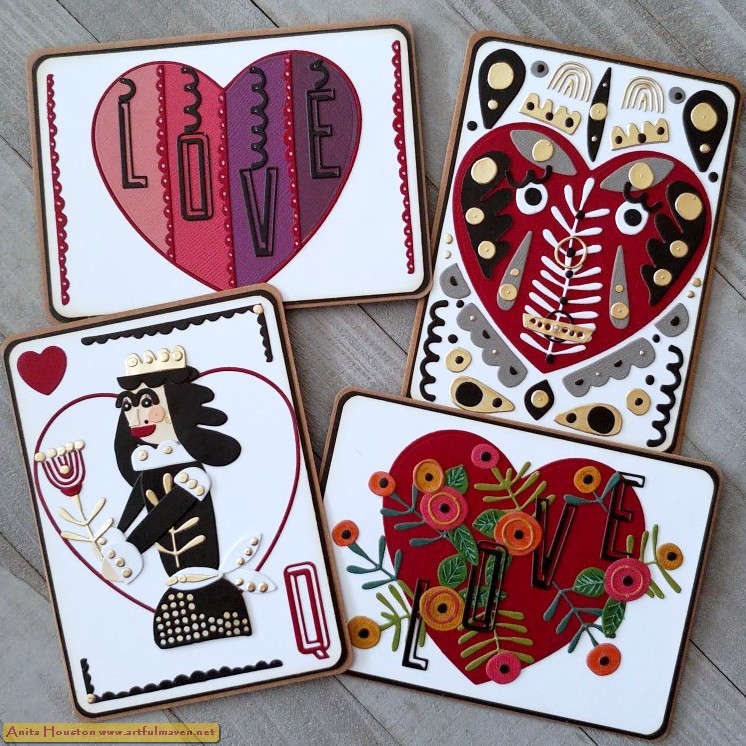
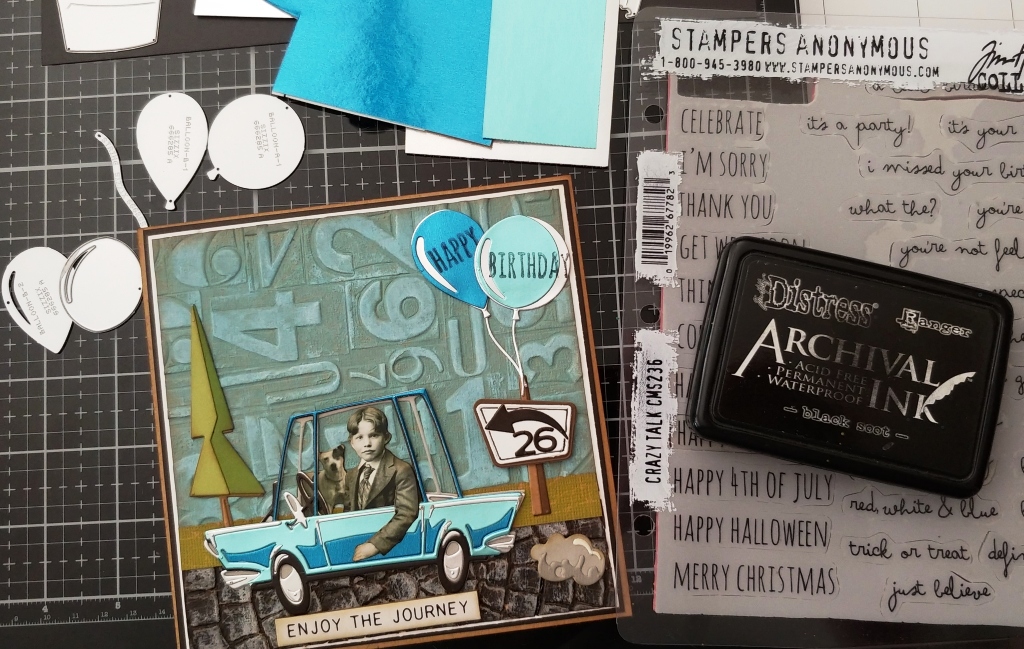
(Note: Before I got started on the card fronts, I knew I would be making four, so I cut and folded four Kraft Cardstock bases to 4 x 5.5 inches, corner rounded the corners, and inked the edges in Gathered Twigs. Then I cut four Black Kraftstock bases slightly smaller, corner rounded them, and adhered them to the card fronts with two sided tape. On all the die cut pieces for each card I added two sided tape to the back for easy adhering.) For the Love on the color blocked heart, die cut the large heart from the True Love set using dark red cardstock. Adhere only the thin heart border to the center of the card, and save the solid heart for the next card. Die cut four more solid hearts using coordinating colors like pinks and purples. Die cut the word 'LOVE' from Black Kraftstock using the Alphanumeric Emporium Thinlits.

Cut a strip from the four colored hearts so they are consecutive and fit inside the heart outline on the card front and adhere where they go. Die cut five red strips of the scalloped border from the Abstract Elements and trim to fit the color blocked borders in the heart and adhere. Adhere one border on each side of the card. Die cut three black coil looking pieces and cut them to fit inside each color block so it looks like a letter is hanging from each. Adhere those and the letters onto each one. 

Use a white pen to add dots to each scallop hump. Ink the edges of the white card with Antique Linen Distress Ink. 

For the Love on the heart with flowers, adhere the red solid heart that you had left from the last card to the center of another white base card. Die cut 'LOVE' in Black Kraftstock, but don't stick down yet. Die cut several circles, circle outlines, leaf looking pieces, and dots using different colors of Kraftstock. Start making flowers by layering the pieces of circles and outlines, and adding black dots for the centers. Layout the letters with the flowers and see how you like the arrangement and then start sticking them down on the card front.

Corner round the edges of the white card and ink the edges using Antique Linen Distress Ink, then stick the card front on the base card. Use Watercolor Pencils and a waterbrush to add some more color into each flower for a little definition. 
 
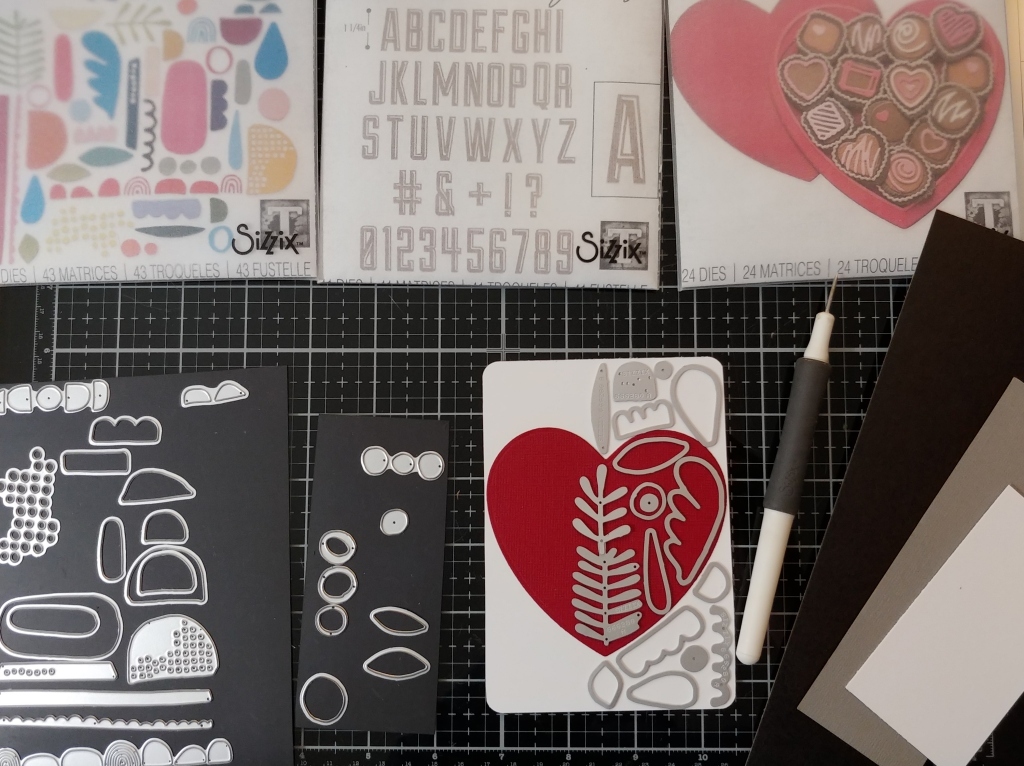
For the mosaic like heart, die cut another heart base piece using red Kraftstock, and adhere the solid part to the middle of another white card front, but this time vertically. Corner round the card. Layout piece to fill in half the card using the Abstract Elements as the other side will repeat so it's all symmetrical (except for the middle areas as those are only one piece), using gray, black, and gold Kraftstock. Then start sticking the pieces down doing each side of the card. Ink the edges of the card with Antique Linen Distress and adhere to the base card.
 
For the Queen of Hearts, adhere the outline heart cut from the last card to the center of the white card front again vertically. Corner round the edges. Die cut a 'Q' in red and use the small heart from the True Love set and die cut it in red. Adhere those to opposite corners of the card front. Starting with the face of the queen, find pieces from the Abstract Elements to design her, then the dress and arms, then her crown and the flowers, using black, white, and gold Kraftstock, with red for her lips and the flower. Stick the pieces on when you are ready. Ink the edges of the card with Antique Linen Distress and adhere to the base card.


Supplies: 
(Paper Trimmer, Two Sided Tape, Corner Rounder, Die Cut Machine, Die Pick, Ink Blending Tool, Scissors, Waterbrush, Water Mister) 
-Ranger Surfaces: Kraft Cardstock 
-Ranger Tim Holtz Distress Heavystock: White, Ivory 
-Tim Holtz Idea-ology: Black Kraftstock , Classic Kraftstock, Metallic Classics Kraftstock
-Sizzix Tim Holtz Thinlits (Everyday 2023): Colorize True Love, Alphanumeric Emporium, Abstract Elements
-Ranger Tim Holtz Distress Ink:  Gathered Twigs, Antique Linen 
-Ranger Tim Holtz Distress Collage Medium: Matte 
-Ranger Tim Holtz Distress Watercolor Pencil: Wild Honey, Spiced Marmalade, Picked Raspberry, Rustic Wilderness 
-White Pen

Thank you so much for stopping by, and I hope you enjoyed! I'll be back next Wednesday with the last project from the Live. Until then, I hope your hands get creatively dirty soon!

Wednesday, January 18, 2023

Tim Holtz Sizzix Everyday 2023 - Colorize Celebrate and Roadtrip Birthday Cards

Hello Everyone, Happy New Year, and welcome to a new year of making! I hope you were able to watch the Tim Holtz Sizzix Everyday Live on Saturday, but if you didn't try to watch the replay, because the samples were out of this world amazing and so so inspiring! I am truly honored to be apart of all the goodness, and thank you for your support and kindness! Today, I have the first of three projects shown in the Live, the trio of birthday cards made with the new Colorize Celebrate, Colorize Roadtrip, and Mosaic Bricks 3D Texture Fade. These were an absolute blast to make, super simple to put together, and although just a little time consuming, so worth it as I have a few cards in the stash now waiting to give away. You can leave the numbers off the signs until you know who the recipient is and then add the numbers, so they are great to have around for the last minute birthday card. Enjoy the pics and tut, and thank you truly for stopping by here!

The cards are 6x6 inch squares, so the first thing I did was cut and fold Kraft Cardstock from Ranger to 6x6, and cut Black Kraftstock to 5 7/8 x 5 7/8 inches, and had them ready. I used the Shattered Kraft Core from Tim's older release that is no longer available to use up some of the stash for the sky, grass, and road with two sided tape on the back of each. To make the sky, I used a light blue Shattered piece size 6x6, and lightly misted it with water, and ran it through the machine using the Numbered 3D Texture Fade that came out last year, and trimmed the edge off to 5 1/2 inches. For the three cards, I did three of these.I used the Deckle Trimmer to cut the green Shattered piece about 3/4 inch by 5 1/2, again doing three.  I cut the edge off the dark gray Shattered piece to 5 1/2 inches and ran it through the machine with the Mosaic Bricks 3D Texture Fade after I lightly misted it with water. This will be cut into three equal pieces, so I only did the one.

I rubbed Hickory Smoke Distress Oxide over the Mosaic first and then Walnut Stain Oxide and lightly misted with water. I cut them into three equal pieces. On the blue, I rubbed Tumbled Glass Oxide first, then Picket Fence Distress Ink, and lightly misted with Tumbled Glass Spray Stain. 
 
 
I cut three pieces of White Heavystock to 5 3/4 x 5 3/4. I inked the edges of all three papers with Gathered Twigs, and then removed the sticky backing and added them onto the White Heavystock, sky first, then road, and leaving a slight border, and the green goes between them to cover up any white paper, and also serves as grass. Then I mounted all three to the Black Kraftstock, and then the base card, inked as well with Gathered Twigs. I laid out the base car piece from the Colorize Roadtrip Thinlits so I could figure out the layout of the car, smoke, tree, and sign. I die cut the pieces of the sign and tree first using Classic and Neutral Kraftstock with sticky tape behind and assembled eveything after with Gathered Twigs on the edges. I die cut the arrow and numbers from the Postale Thinlits using black, and added those to the sign. I used a black marker to color in the indention in the white part of the sign for an outline. 

 I used Metallic Kraftstock and Classic Kraftstock with Black Kraftstock for the cars, all with sticky tape behind. I selected one guy from the Groups Paper Dolls and cut him away from his partner, and the other two are from the Solos Paper Dolls. I inked the edges of all of them with Vintage Photo Archival after I cut them to fit correctly in each car, and then I adhered them in with Collage Medium. I die cut the smoke with White Heavystock and gray Classic Kraftstocks. I selected quotes from the Theories Quote Chips and trimmed them some to fit better, and inked the edges in the Vintage Photo. Then I stuck all these pieces down by removing the backings with a little Collage Medium for reinforcement. 

 Next came the Colorize Celebrate Thinlits. I started with the balloons first, using White Heavystock and matching Metallic Kraftstock from the car colors. I cut apart the Happy Birthday from the Crazy Talk Stamp Set from Stamper's Anonymous to make stamping each balloon a little easier, and then stamped each word on the balloon using Black Soot Archival. I let those dry a bit as the Archival stays pretty wet on the slick Metallic surfaces. Then I stuck the balloons down like they are attached to the sign post.

Each car got a different die from the set, the girl go the cake, and the boys a present and the hat. I die cut all with Classic Kraftstock, Metallic Kraftstock, Kraft Cardstock, and  Distress Mixed Media Cardstock. I wanted the chocolate frosting to be a little shiny, so I painted over the brown bits with Distress Resist Spray using a paintbrush. Then I stuck all of this down, and added foam tape to the candle flames. 


Supplies: 
(Paper Trimmer, Two Sided Tape, Die Cut Machine, Deckle Trimmer, Die Pick, Ink Blending Tool, Scissors, Water Mister, Stamp Platform, Small Paint Brush, Foam Tape) 
-Ranger Surfaces: Kraft Cardstock 
-Ranger Tim Holtz Distress Heavystock: White, Mixed Media 
-Tim Holtz Idea-ology: Black Kraftstock , Classic Kraftstock, Metallic Classics Kraftstock, Metallic Confections Kraftstock, Metallic Jewels Kraftstock, Theories Quote Chips, Solos Paper Dolls, Groups Paper Dolls 
-Core-dinations Tim Holtz Kraft-Core: Shattered
-Sizzix Tim Holtz 3D Texture Fade (Everyday 2023): Mosaic Bricks 
-Sizzix Tim Holtz 3D Texture Fade: Numbered
-Sizzix Tim Holtz Thinlits (Everyday 2023): Colorize Roadtrip, Colorize Celebrate
-Ranger Tim Holtz Distress Ink:  Gathered Twigs, Picket Fence 
-Ranger Tim Holtz Distress Oxide: Hickory Smoke, Walnut Stain, Tumbled Glass 
-Ranger Tim Holtz Distress Archival Ink: Vintage Photo, Black Soot 
-Ranger Tim Holtz Distress Resist Spray 
-Ranger Tim Holtz Distress Spray Stain: Tumbled Glass 
-Stamper's Anonymous Tim Holtz Stamp Set: Crazy Talk 
-Sizzix Tim Holtz Thinlits: Postale 
-Ranger Tim Holtz Distress Collage Medium: Matte 
-Black Pen
 
Thank you tons for taking the time to stop by today! I'll be back next Wednesday with another make from the Live, so until then I hope your hands get creatively dirty soon!