Hello everyone crafty out there! Valentines are still reigning strong here in my little bubble, and glitter, tulle, roses, and lace have exploded and left their remains all over the place. I have found scraps even in the lavatory, which is good because it ignites an idea in my head, and we all know some of best ideas start in the restroom! I have used bits of scraps on all sorts of things for Love Day. Here is a little Valentine tag that I used
Tim's crackle resist on for Linda Ledbetter's
Grungy Monday challenge. I crackled the Valentine background paper (scrap), which is one of my favorites from Tim's Seasonal Stack, as well as the cupid. I had a few issues with Mr. Cupid though. First, when I went to stamp him with Jet Black Archival Ink and emboss him with Fired Brick Embossing Powder, the powder was lost in the ink and it heated to a brownish color. So I also did a few using Festive Berries Distress Ink and the Fired Brick powder, and alas the result was what I wanted originally. However, I still liked the look of the other so I used them both. Second, I decided Mr. Cupid needed a loin cloth or something...cover that up...so after playing with many scraps and fabrics, I went with Liquid Pearls...love that stuff!!!
I am also submitting Cracked Cupid (not to be confused with Cupid on crack) to the challenge on
Gingersnap Creations for "favorite designer paper". And speaking of "designer", I have the honor, privilege, and pleasure of now being a part of the design team at
Our Creative Corner. I am feeling really blessed at the moment!
 |
| I stamped Mr. Cupid on Grunge in Archival Ink and applied Fired Brick Embossing Powder and ended up with the dark brown images instead of red. Here is the before and after. |
 |
| Try and try again! This time I used Festive Berries Distress Ink and Grunge already coated in Gold paint and everything worked perfectly. Success! |
 |
| I still like the dark brown Cupid, so I continued and coated him with Gold Paint Dabber and then used a baby wipe to clean the gold paint from the embossed image lines. |
 |
| I cut Mr. Cupid out and applied a heavy coat of Rock Candy Distress Crackle Paint, and allowed it to dry. |
 |
| The brown and red Cupids were then inked with Pumice Stone Distress Ink. I really tried to get it into all the little cracks. |
 |
| Mr. Cupid was coated in embossing ink and UTEE and heat embossed. |
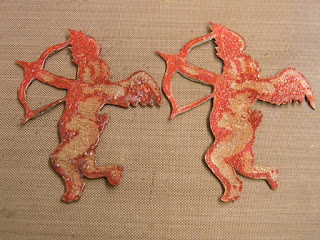 |
| This is the before (right) and after (left) the heat embossing. Mr. Cupid is shiny and thick and actually shrunk a tiny bit which I really liked...more room! |
 |
| The tag was inked in Festive Berries and Gathered Twigs, and then water drop spritz and dried. The Valentine paper was also coated in Rock Candy Crackle Paint, dried, and inked in Gathered Twigs. I stamped the heart image in Festive Berries. I stamped the sentiment in gold first then in Archival Ink. It gave it a nice shadow effect that I liked. Foil lace, metal roses (love love love), tulle, and a gold eyelet were added. Mr. Cupid was given a heart that was coated in Gold Acrylic Paint Dabber, and then clothed in Liquid Pearls. Really the pictures are not doing this little tag justice. |
Supplies:
Art Chix Studio: mini red metal roses
32 Degrees North: Dresden Foil Trim
From My Stash: tulle, metal heart and gold eyelet
I hope your hands get creatively dirty soon!


