
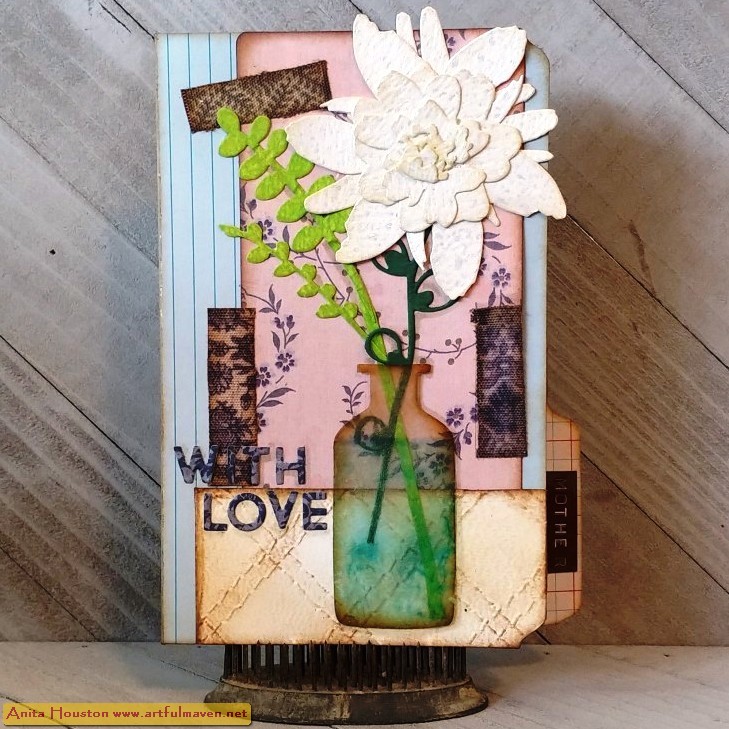
Hello Everyone! I just figured out that Mother's Day is this Sunday...I thought I had another week, so it was time to get cracking! Every year I give my Mother and Mother-In-Law a gardenia (mine and their favorite flower) corsage if we are going to be together, but this year we are not, so I decided to put their gardenia on a card. I've said so many times that the new Modern Floristry and Artsy Stems Thinlits from Tim Holtz and Sizzix can make almost any flower, so I thought I'd try with the gardenia, and presto...I think the dies did pretty good. These gardenias look wildly gorgeous, and I can almost smell them. Actually, I can smell them. I have an old perfume that is an overly gardenia scent that I rarely use, but it was the perfect accent on the flowers, so when the Moms open them they will get the sweet sweet scent of the flower! With the help of Sizzix Bigz Bottled Up Die (and Distress Crackle Paint) and the new Quilted 3D Texture Fade, and lots of new Idea-ology, I think the Moms will love their gardenia cards. Enjoy!


Using
Distress Watercolor Cardstock and the Artsy Stems Thinlits, I die cut
one of the stems with the open leaves and sunflower looking center. Since I
made two cards, I actually die cut two. The stems were inked over with Rustic
Wilderness Distress Ink from Ranger. Using the Modern Floristry Thinlits and Watercolor Cardstock, I die cut the fern looking pieces and inked those with Twisted Citron
Distress Ink. I die cut one large flower (you don't need the center part), three
leaves, three bulb looking leaves, one medium flower and all the parts, and
both small flowers with all the parts. I inked only the edges of all flower parts with Antique Linen Distress Ink.

Since I made two flowers I arranged them first in singular die cut pieces in three groups (big flower and leaves, medium flowers, and tiny center flowers) that are in the center of the picture above, so you can see which pieces you will need for each part if you want to make a gardenia. The bottom portion of the picture has the three parts layered up and adhered using Collage Medium. The leaves go around the large flower in the first group. The two smaller flowers on the larger flower in the second group. The four tiny parts layered up smallest to biggest in the last group. Once all are adhered, then you can adhere the tiny center part to the medium flowers, and that to the large flower base to create your gardenia.

I wanted to join the two fern looking pieces together on one long stem to go in the bottle better, so I used scrap Watercolor Cardstock, inked it up in Twisted Citron, and cut a long thin stem. I adhered the pieces on the stem and cut off the excess piece I didn't need at the top. It's up to you if you want to have those on one long stem. I also cut the second leaf off of the Artsy Stem so it wouldn't be in the way of the bottle top to look more natural. Do not adhere the gardenia to the stem yet. It's easier to adhere the stems first and add the flower top last, which you will do in the last step.


For the table cloth under the bottle, I decided to use the new Quilted 3D Texture Fade. I added Antique Linen Distress Ink directly from the pad to the inside of the folder (the top part) and really pushed it into the debossed areas, then I wiped the ink off that was not in the cracks. I lightly misted more Watercolor Cardstock, and placed it into the folder and ran it through the die machine three times. It was so gorgeous. I decided to give the quilted a plaid look, so I used an Ink Blending Tool and Antique Linen Distress Ink and rubbed it over the diagonal columns, skipping one, and continuing the pattern, then turning the paper and repeating the pattern. It's very light but noticeable. Then I thought it would be cool to have the table cloth at an angle and cut the paper down the middle diagonally, but when I went to see how it looked, it was a bad design. So if you do this, you can just cut the paper in half (either vertically or horizontally depending on how much you want to be seen). After cutting I inked the edges in Vintage Photo Distress Archival and thought I'd try inking over the tiny embossed sewing threads on the paper, so I used a Detail Inking Tool to lightly rub over the threads using the Vintage Photo and it worked really well, so you can see the threads much better in the design. I set this aside.

I used the new Mini Filing Folders for the base of the card (the largest size), but I liked the design inside the folder better, so I opened it up and folded it back so the inside design was now on the outside. Keep that in mind as you can pick which side to use with these cute folders. I choose patterned Pocket Cards that went with the design on the folders (the largest size) and inked the edges with the Vintage Photo, and adhered the Pocket Cards to the top right side of the card front with two sided tape.


I flipped the bottle over and added two sided tape over the water area only, and stuck both stems down on the tape the way I wanted them to look when the bottle is right side up. I added a little Collage Medium to the back of the stems and adhered the bottle and stems down. I wanted the flower to have a bit more glitz, so I misted it with Pearl Mica Spray from Wendy Vecchi and Ranger. It was now perfect, and then I adhered it over the sunflower looking part of the stem. I used a Dymo Label Maker with brown tape to make the words 'Mom' and 'Mother' and stuck those down on the tabs of the cards.


Supplies:
(Die Cut Machine, Die
Pick, Ink Blending Tool, Scissors, Glass Mat, Alcohol Ink Tool, Water Mister, Detail
Ink Blending Tool, Two Sided Tape)
-Sizzix Tim Holtz
Thinlits (Chapter 2 2022): Modern Floristry, Artsy Stems, Bold Text #2
-Ranger Tim Holtz
Distress Watercolor Cardstock
-Ranger Tim Holtz
Distress Ink: Antique Linen, Twisted Citron, Rustic Wilderness
-Ranger Tim Holtz
Distress Collage Medium: Matte
-Sizzix Tim Holtz Bigz
Die: Bottled Up
-Ranger Tim Holtz Alcohol
Ink: Cloudy Blue
-Ranger Tim Holtz
Distress Translucent Crackle Paint
-Ranger Tim Holtz Distress
Archival Ink: Vintage Photo
-Sizzix Tim Holtz 3D
Texture Fade: Quilted
-Tim Holtz Idea-ology:
Mini File Folders, Pocket Cards, Patchwork Linen Tape
-Ranger Wendy Vecchi Mica
Spray: Pearl
-Acetate, Dymo Label Maker
with Brown Tape
Thank you so much for stopping by! Happy Mother's Day to all you Moms out there. I hope it's a love filled weekend for you! Until next time, I hope your hands get creatively dirty soon!


