Wednesday, June 29, 2022

Stamper's Anonymous Summer 2022 - Noteworthy Waterfall with Bubbles Mixed Media Small Canvas Pouch

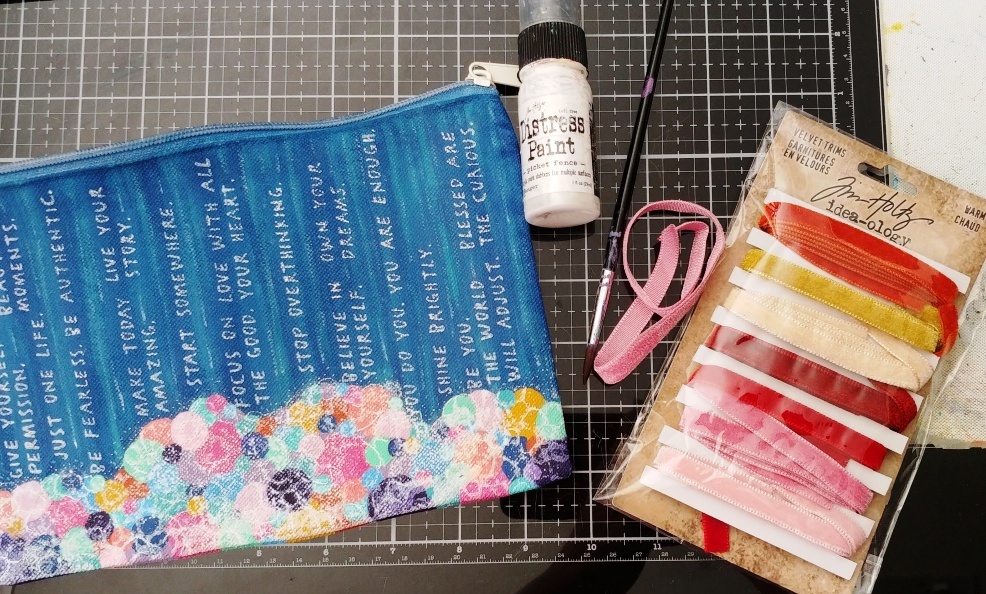
Hello again this week, and welcome to the last project tutorial from the Tim Holtz Stamper's Anonymous Summer release...yes, the one most of you have been waiting for. LOL!!! I have had so many messages and emails on this project. I never would have dreamed it, because when I designed and made this, I saw a waterfall of Noteworthy words into a rainbow of Bubbles, but half my family and several of you, saw flowers and there are no flowers on this. So to me, I just didn't do a good enough job of conveying that on this pouch. Or maybe it was just that you all liked the stamping on canvas idea. Who knows, but I can assure you that stamping on canvas is easy peasy...ONLY IF you use a stamp platform or a clear stamping block to repeat the stamping, as material soaks up the ink or paint fast, and to get the best image you need to repeat...and even heat emboss like I did. Enjoy the tut! And truly thank you so much for all the kind words!!!

 
(Note: Since you are working on a canvas bag with a zipper, it's best to turn the bag upside down with the zipper at the bottom of the platform so it closes a little better than the zipper at the top.) Place all the sentiments you want to use from the Noteworthy Stamp Set, on the large stamp platform going vertically (remember zipper at bottom so the words reading top to bottom) with a clear placement where they will start, and then staggering the words. Stamp the sentiments on a blank sheet of paper using any dark ink (I used Black Soot Archival.), and then cut around them where the bottom of the bag will be so you get a clear outline of the bottom of the waterfall, as this will be used as a guide and as a mask for later. Leave the words in the platform for later.
 
   
Using the stamped paper as your stencil, lay the paper on top of the canvas bag, with the top lining up with the zipper, and trace around the bottom with a pencil so you know where the water will stop.
 
 
(Note: Because of the color of the zipper being canvas colored, I wanted it to be blue, but I didn't want to paint it and risk coloring the zipper pull, so I thought Spray Stain would be best as it won't stick to the zipper, but will color the canvas.) Lightly mist the top of the canvas bag (the zipper area part) with water on both sides so that the stain will color evenly and be more absorbent. Spray the top of the bag with Prize Ribbon Distress Spray Stain from Ranger on both sides, and let dry. 
 
 
Cut a piece of cardboard to fit inside the bag (6 x 8.5 inches) to give it nice rigidity while painting, and to protect the paint from bleeding through to the opposite side. Paint the open top area of the bag with Prize Ribbon Distress Paint and medium paint brush, going down to the drawn line. You can use a bit of water from a mister to add to the paint to extend it, but make sure there is no canvas color showing under the paint. Let dry, and then do the other side. 
 
 
Using Peacock Feathers Distress Paint that has been watered down a tiny bit, add vertical lines of paint randomly from the top of the bag by the zipper to the drawn line, creating striations of color like in a waterfall. Let dry, and then do the same on the back of the bag. 
 
   
Pounce over the bag with the Anti-Static Pouch to prevent the powder from sticking, and then place the bag (zipper side down and zipped up) into the large stamp platform, and stamp the words on the blue area of the bag using Glacier White Pigment Ink. (Note: Make sure your Pigment Ink pad is nice and wet with the white ink...if not reink before stamping the words.). It may take a few stampings before your words are nice and crisp and white. Once nice and crisp, immediately pour Clear Embossing Powder over the words (over a blank sheet of paper for easier clean up) and then pour off, unzip the zipper,  and heat emboss the words using a heat tool while sticking your hand inside the bag to open it up to allow the air to flow through. The heat tool might make the canvas bag smoke in the corner areas, but it won't last long or catch on fire (unless you are not moving the heat tool), as the powder heats and sets quickly...just look for it to get shiny and then move the tool to a new area. Let cool. 
 
 
Gather up colorful Distress Paints. I used Prize Ribbon, Peacock Feathers, Villainous Potion, Picked Raspberry, Kitsch Flamingo, Crackling Campfire, Saltwater Taffy, Fossilized Amber, Cracked Pistachio, and Salvaged Patina. Once color at a time, paint in various sizes of circles randomly over the bottom area (below the water) of the bag, covering the side and bottom seams as well, until you've done all the colors about five or more times, using a small detail paint brush. (Note: Make sure to shake the paints before each use.)
 
 
After using all the paints and having some more open areas, I decided to add in Salty Ocean and Dusty Concord since they seemed like good bubble colors, to fill in the rest of the spaces. Let this side dry well, and then do the same to the other side of the bag. 
 
 
Place the stamped paper (the mask) over the top area of the bag and secure down with tape on the glass mat. Take the Bubbles large background stamp on the stamping block it came with, and BEFORE inking it, play with it to figure out the best way and image placement to stamp as much of the bottom area as you can. Once you figure that out, make sure your ink pad is nice and juicy as you only get to stamp once (since you are not using a platform, unless you are good enough to realign and stamp again) and ink over it with Glacier White Pigment Ink. Stamp the Bubbles along the bottom of the bag, remove the mask, and then immediately pour the Clear Powder over. Remove the excess and heat emboss. Place the mask back on and restamp the area that needs the image, pour powder and heat set. Use a White Gelly Roll Pen to add dots above the Bubbles to look like splashes of water. You can also use the pen to fix any areas that did not emboss well if you are steady handed enough. 
 
 
Using Picket Fence Distress Paint and a medium brush, add faint lines of white paint to the top waterfall area for a little more variegation between the wording. Let dry. Cut Velvet Trim ribbon to about 10 inches, and fold in half. Thread through hole in zipper pull and secure with a knot to aid in opening the zipper or to wrap around the wrist.

Supplies: 
(Sheet of Paper, Stamp Platform, Scissors, Pencil, Glass Mat, Water Mister, 5.5 x 8.5 Inch Cardboard, Medium and Small Paint Brush, Water Mister, Anti-Static Pouch, Heat Tool) 
-5.5 x 8.5 Inch Canvas Pouch
-Stamper's Anonymous Tim Holtz Stamp Set: Noteworthy, Bubbles 
-Ranger Tim Holtz Distress Archival Ink: Black Soot 
-Ranger Tim Holtz Distress Spray Stain: Prize Ribbon 
-Ranger Tim Holtz Distress Paint: Prize Ribbon, Peacock Feathers, Villainous Potion, Picked Raspberry, Kitsch Flamingo, Crackling Campfire, Saltwater Taffy, Fossilized Amber, Cracked Pistachio, Salvaged Patina, Salty Ocean, Dusty Concord, Picket Fence 
-Ranger Pigment Ink: Glacier White 
-Ranger Embossing Powder: Clear 
-Tim Holtz Idea-ology: Velvet Trims Warm 
-Sakura Gelly Roll Pen: White
 
Thank you so very much for stopping by and for all the comments here and on Instagram on this project. I sooooo appreciate it, and just know that stamping on fabric is much easier than you might think using a stamping platform. Until next time...I hope your hands get creatively dirty soon!

Saturday, June 25, 2022

Stamper's Anonymous Summer 2022 - Noteworthy Painted Floral Elements on Linked Stenciled Black Background Cards

Hey Everyone! Today, I have the first of the two projects that were on the Tim Holtz Stamper's Anonymous Summer Live. These two cards were made with the Floral Elements and Noteworthy Stamp Sets with the Linked Circles or Squares Layering Stencils in the center, and all on a solid black background (Matte Black Kraftstock). How did I get these vibrant colors on a black background??? I used Ranger's Glacier White Pigment Ink first and then colored on top...see below. This technique never disappoints.  Enjoy everyone!
 
(NOTE: It's useless to add a colored ink to black paper if you want to see it, BUT if you add a permanent white base first then you can add colorful ink on top to be able to see it. I have done this many times using Glacier White Pigment Ink and Black Cardstock from Ranger and it always works perfect, but as I now think the Black Cardstock is discontinued, I needed a replacement and decided to try Tim's Black Cardstock, and I did a comparison of the two that you will see below to help you decide which paper to use. Black Cardstock matters here. If you are using Ranger Black Cardstock which has no coating on it, ink and paint will adhere and absorb in more and therefore dry faster for less chance of smearing, but will be lighter in color and intensity, even after several coats.  If you are using Idea-ology Black Kraftstock which has a slight sheen coating on it, the colors of ink and paint will be much more vibrant and intense as they stay on the surface, but take longer to dry due to the coating on the paper. Colors also can bleed under stencils easier due to the coating, but give a great distressed look if you like that. You might want to play around with papers first to see what you like as I did. (See step 3 for the differences in looks.)).
I cut a piece of Idea-ology Black Kraftstock in half for two cards, and two pieces of Black Cardstock from Ranger 4.5 x 6 inches for two cards (for my comparison). Using a blank sheet of paper cut to the same size as the black pieces (4.5 x 6) I die cut the middle of the blank sheet using the second largest Stitched Oval from the Thinlits set from Sizzix, to use for a mask. I made a few just in case they got too messy to keep reusing. You can discard the oval part as you won't use it.
 
 
Place a black piece on the glass mat (I did two at a time with the different stencils using one of each of the black papers to see what would happen.) and place the white oval framed mask on top and secure these with whatever you usually use...I used tape. Lay one of the stencils on top (either Linked Circles or Linked Squares) horizontally and add tape on one side to act as a hinge as well as hold the stencil in place. Hinging the stencil is important with this as it makes things much easier, first so it doesn't move, and second so you can lift the stencil to dry with a heat tool and not warp the stencil. Make sure your Glacier White Pigment Ink is nice and juicy as they tend to dry up a little faster than other inks, so reink if necessary before hand. Using a clean blending foam on an Ink Blending Tool, add Glacier White to it from the ink pad, and lightly rub the ink in over the stencil on the oval opening part, working in circles as well as lightly pouncing to really get the ink in. Once covered in the oval area lift up the stencil swinging from the hinged part and dry the stenciled image with a Heat Tool, as Glacier White needs to be dry to be permanent.  (It will take longer to dry on the Black Kraftstock and you might have some ink that went under the stencil.) Do the same with the other stencil over the other piece of black paper, and dry. Take Mermaid Lagoon and Evergreen Bough Archival Inks (only a permanent ink for this technique but you can use any other colors), and ink over the white alternating the ink colors, pouncing them on for best intensity of color, then dry. You can even remove the stencil and mask to ink over the white, if using Black Cardstock, but if using the Black Kraftstock, you might notice some of the white ink moving while pouncing over the colored ink, so it's best to keep the stencil on with the Black Kraftstock. 
 
 
Here is the comparison with the Black Cardstock pieces on top and the Black Kraftstock pieces under. Although it is harder to notice in the picture, the ink colors on the Black Kraftstock are much more intense and brighter and less chalky looking, although you can see some of the ink that went under the stencil so the image is not as crisp. The Black Cardstock pieces are very crisp in image with no bleeding under the stencil, but the colors are less intense and somewhat dull and a little chalky looking. At this point I really thought I'd go with the Black Cardstock, but once paint was added later, I clearly made the choice to go with the Black Kraftstock as the paint colors were much more intense with only one coat, even though it took longer to dry, as with the ink. 
 
 
(For the next part, it's easier to do with two stamping platforms, but if you only have one you can still do it but it will take much longer.) Lay the stenciled paper in a stamp platform and using the stamps from the Floral Elements set, arrange the images that you want in the forefront around the oval border. This will be the first set, the forefront set. Close the platform to secure the stamps. Ink them with Glacier White Pigment Ink and stamp the images. Carefully remove the paper and add the other one in and stamp the images. Dry both pieces until the white ink is dry. Leave the stamps in the platform as they are and lightly clean the white ink from them with a damp papertowel. If white ink is between the raised cuts of the stamps, don't worry about it as it will not affect your next stamping and you will clean them well once you are finished with them. Stamp the images again onto sticky note using a dark ink (I used Black Soot Archival) to be used for masking. Cut the flower images out only from the sticky note, and don't worry about the leaves or buds. (Note: I used the Black Cardstock pieces here.)
 
 
(If you are only using one platform, you will need to do this part after you have painted in and embossed the first set of flowers before you can remove them to add the second set.) Using another platform, lay the paper back in and arrange the flowers and leaves that will go in the background under the first set of flowers, and close the lid to secure. Add the masks on top of the flowers on the paper, and then stamp the second set using Glacier White. Remove the paper and add the other and repeat the process. Dry both. (Note: I used the Black Kraftstock pieces here.) Leaving the stamps in place, lightly clean the white ink, and then stamp the large flowers only on sticky note to use later. 

 
Starting with the leaves, stems, and buds, paint over them using Twisted Citron Distress Paint with a detail paint brush. Cover over the white ink if you want, but that will be covered up later, so don't worry about it. The reason I used the white ink on the black was to see the images well enough to paint in. Use Rustic Wilderness paint to add the lines in the leaves, stems, and buds. For the flowers, I did the same as the leaves, a light and a dark paint in the same color family for each group of flowers, starting with the lighter for the whole flower and then the darker for the shadows and details. I used Saltwater Taffy and Abandoned Coral for the three poppies. I used Kitsch Flamingo and Worn Lipstick for the dahlia looking flower. I used Picket Fence and Antique Linen for the two larger rose looking flowers. I used Squeezed Lemonade and Mustard Seed for the last flower. Once all the flowers are painted in, use Black Soot Distress Paint in the center of the flowers on the stamen. Let dry, and do the same on the other piece. (Once dry, if using Black Cardstock, you might notice the paint color intensity weaken a lot and need another coat of paint. If using the Black Kraftstock the color of paint will remain nice and intense but take longer to dry.) 

 
Place the dry card in the second platform (the one with the background flowers). Add a sentiment from the Noteworthy Stamp Set between the budded flowers and close the lid to secure. Pounce an Anti-Static Pouch over the whole card so powder doesn't stick where you don't want it, blowing off any excess. Add the masks over the forefront flowers. Use Distress Embossing Ink to stamp the background flowers and sentiment, and then immediately remove the masks, pour Gold Embossing Powder over, pour it off, and then heat emboss. Repeat with the other card, but change sentiments only. You are now finished with these flowers and the sentiments and you can wash the stamps with soap and water to remove all the white ink and replace the stamps back on the plastic cover. (If you only used one platform, then you have to emboss the forefront flowers first and then remove and clean them, then add the background flowers, stamp and paint them, then emboss them and the sentiment.)
 
 
Add the card into the first platform with the forefront flowers. Pounce more of the Anti-Static Bag over. Take the two large flower masks and cut the sides off so that you just have the middle of the flower as that is all you need masked so the bud stems don't cover up any of the large flower, and stick it on. Ink the stamps with Distress Embossing Ink, remove the masks, pour on the Gold powder, remove, and heat emboss. 
 
 
Cut and fold a Kraft Cardstock base to 5 x 6.5 inches. Ink the edges with Gathered Twigs Distress Ink. Cut a blue piece of Classic Kraftstock (one that matches the middle stenciled area) to 4 7/8 x 6 3/8 inches, ink the edges using the Mermaid Lagoon Archival, and mount to the Kraft base with two sided tape. Ink the edges of the black piece with Black Soot Archival. Cut a Gold Metallic Kraftstock piece to 4 5/8 x 6 1/8 inches and mount the black card front onto this. Add foam tape or Foam Adhesive Sheet to the back of the gold, and then mount this onto the card base. Use Collage Medium to add three Gold Metallic Droplets in various sizes around the sentiment.
 
Supplies:  
(Sheet of Paper, Die Cut Machine, Ink Blending Tool, Heat Tool, 2 Stamp Platforms, Sticky Note, Scissors, Glass Mat, Small Detail Paint Brush, Anti-Static Pouch, Paper Trimmer, Two Sided Tape) 
-Sizzix Tim Holtz Thinlits: Stitched Ovals
-Tim Holtz Idea-ology: Black Kraftstock (or Ranger Black Cardstock), Metallic Kraftstock, Classic Kraftstock, Metallic Droplets
-Stamper's Anonymous Tim Holtz Layering Stencil: Linked Circles, Linked Squares 
-Ranger Pigment Ink: Glacier White 
-Ranger Tim Holtz Distress Archival Ink: Evergreen Bough, Mermaid Lagoon, Black Soot
-Stamper's Anonymous Tim Holtz Stamp Set: Floral Elements, Noteworthy 
-Ranger Tim Holtz Distress Paint: Twisted Citron, Rustic Wilderness, Kitsch Flamingo, Worn Lipstick, Abandoned Coral, Saltwater Taffy, Mustard Seed, Squeezed Lemonade, Antique Linen, Picket Fence, Black Soot 
-Ranger Tim Holtz Distress Ink: Embossing, Gathered Twigs 
-Ranger Embossing Powder: Gold 
-Ranger Surfaces: Kraft Cardstock 
-Sizzix Foam Adhesive Sheets 
-Ranger Tim Holtz Collage Medium: Matte 
 
I've got one more from the Live to show you...in a few days. Until then, I hope your hands get creatively dirty soon!