Showing posts with label Wendy Vecchi. Show all posts

Thursday, June 23, 2022

Wendy Vecchi Archivals and Liquid Pearls Country Flowers Card

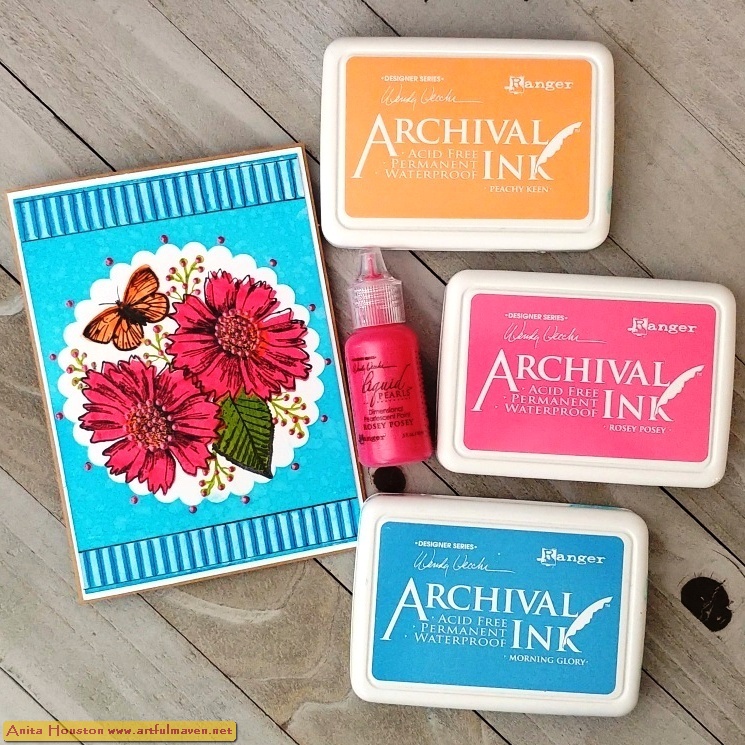
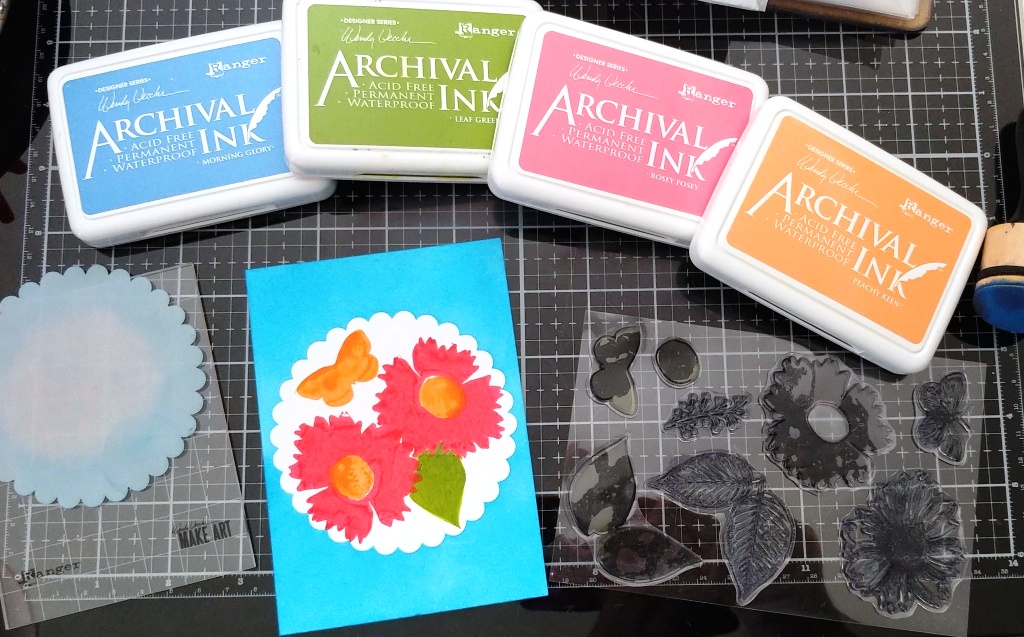
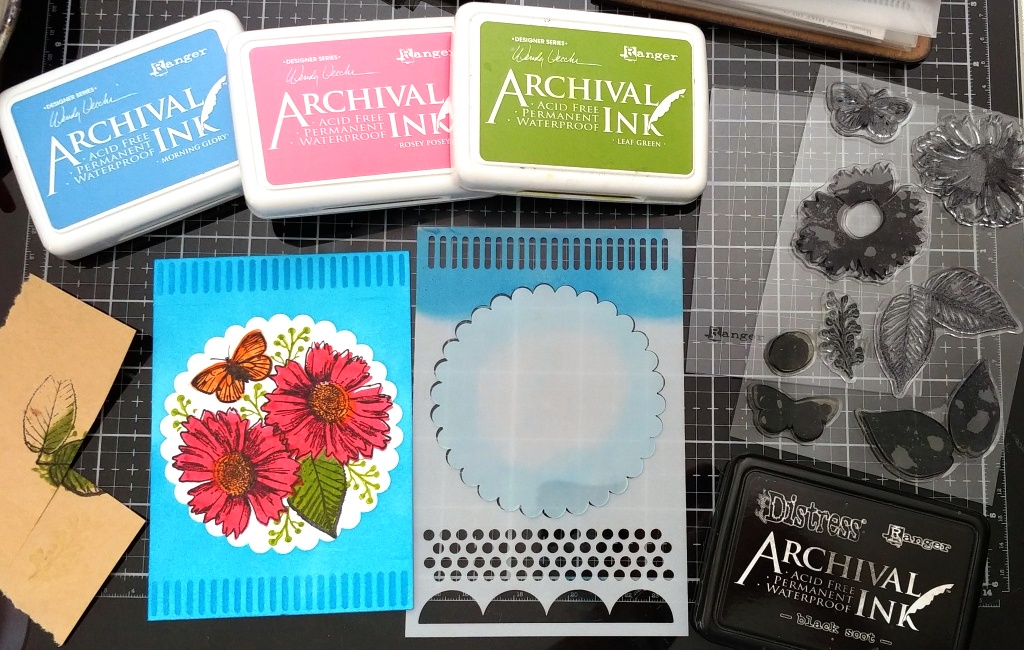
Hello All! Yesterday, Wendy Vecchi released three new colors of Archival Ink from Ranger...Morning Glory, Rosey Posey, and Peachy Keen, plus a Rosey Posey Liquid Pearls! You all know how much I love Archivals, and I love these new bright Summer colors. They called for a flowery card, so I put together this super simple and fast card using Wendy's County Flowers Stencil, Stamp, and Die Set. Enjoy!
 
Cut Specialty Stamping Paper to 3.75 x 5.25 inches. Place the scalloped stencil from the Country Flowers Set in the center of the SSP and ink over the stencil with Morning Glory Archival Ink using an Ink Blending Tool, and covering all the paper. Lightly mist over paper with alcohol to create splotches. Dry with a heat tool. You always need to dry after inking anything on SSP as it stays wet a longer time than other papers. Using Rosey Posey Archival Ink, stamp two of the solid flower parts into the scalloped circle. Dry. Stamp the solid butterfly and centers of flowers with Peachy Keen Archival. Dry. Cover up the flowers with sticky note and then stamp one of the solid leaves with Leaf Green Archival. Dry. 
 
 
Stamp all the coordinating images over the solid parts using Black Soot Archival, using the sticky note to help you not overlap. Dry. Place the striped portion of the stencil at the bottom edge of the paper and ink in the stripes with Morning Glory Archival and an ink tool. Dry. Do the opposite side as well. Stamp the dotted grassy image randomly around the flowers in Leaf Green using sticky note to mask.

Place the striped stencil (clean it first) in between the blue stripes and ink in Glacier White Pigment Ink stripes. Dry. Clean the stencil and if need be go over the blue stripes again (I had to for a better clean look.).

 
Mount the card on more SSP cut slightly bigger with two sided tape, and then mount this onto a Kraft Cardstock base folded to 4 x 5.5 inches. Using a fine permanent pen, draw lines in the striped area and tiny circles on every other hump on the scalloped circle. Fill in the circles with Rosey Posey Liquid Pearls, and add dots of the Rosey Posey to the inside of the flowers as well as to the dots on the grass. Let dry. 
 
Supplies: 
(Ink Blending Tools, 91% Alcohol In Mister, Stamping Block, Heat Tool, Sticky Note for Masking, Scissors, Two Sided Tape) 
-Ranger Surfaces: Specialty Stamping Paper, Kraft Cardstock 
-Ranger Wendy Vecchi Make Art Stamp, Die, Stencil Set: Country Flowers
-Ranger Wendy Vecchi Archival Ink: Morning Glory, Rosey Posey, Peachy Keen, Leaf Green 
-Ranger Tim Holtz Distress Archival Ink: Black Soot 
-Ranger Pigment Ink: Glacier White 
-Faber-Castell Pitt Fine Artist Pen: Black
-Ranger Wendy Vecchi Liquid Pearls: Rosey Posey
 
Thank you so much for stopping by. I will be back real soon, so until then, I hope your hands get creatively dirty soon!

Friday, April 29, 2022

Wendy Vecchi Make Art Doodle Stamps Note Card and Envelopes Set

Hi everyone!!! Wendy Vecchi has just come out with the three cutest sets of Doodle Stamps from Ranger. She has been drawing these cute little images for awhile now and even teaching people to do it, so she thought she would just come out with stamps of the images so people don't have to draw them. Perfect! I made a set of note cards and envelopes with all the stamps. Since I have a bunch of blank colored note cards and envelopes that I rarely use, I thought using Wendy's new Doodle Stamps on them would be perfect and fun too, plus I can't remember the last time that I didn't create a background on a card, so using the premade cards just freed me up to Doodle! These stamps are so stinking fun and take me back to the days of talking on the kitchen wall phone with the stretched out 10 foot cord while 'doodling' all over the back of the extra thick phone book. How I wish I would have saved the backs of all those phone books. Anyway, these stamps make it easy to just have fun and not over think anything or any set type of design...it's fun to just stamp and color in. And speaking of coloring in, I literally did just that, with markers, and I can't remember the last time I did that either. I got so lost in the coloring that I barely remember doing it. Even though these cards are super simple looking, maybe even too clean compared to what I usually do, it was so great to just go back to basics...stamp and color in. AND...these were super fast to make. Now I have a set to use or give away. Enjoy!

I used three orange and three pink colored note cards. I die cut six Ranger Specialty Stamping Paper with the largest of the Sized Ovals Movers and Shapers from Tim Holtz and Sizzix for the stamping, and saved one of the negatives to help me stamp in the next part. I die cut six of second largest oval from the Stitched Ovals Thinlits to mount behind the SSP, using black cardstock. 

I placed the negative from the die cutting to use in the platform to help hold my oval in place. I stamped the images from the Celebration set in the oval and made a few masks with Sticky Note for the images that will overlap. I used this set twice, stamping the balloons and cake vertically and presents horizontally, all using Black Soot Archival. I also stamped six of the hearts and cut those out to use later. 
 
 
I did the same here using the Doodle Town Set, except I didn't have to do any masks as all the images were spaced out. I also used Mulberry Archival for the hearts and English Ivy for the plants.  One goes vertically and one horizontally again, and the same with the next set.

No masks for this set (Floral Doodle) and no other inks besides Black Soot. 
 
I used a permanent fine black Pitt Pen from Faber-Castell to add more doodles, like the borders on all six ovals. I also added a few circles and stripes to some of the images. Doodling is fun! I didn't like the stark background (go figure) so I used the Mini Stay-tion and ruler it comes with to add lines of white and black pen, vertically for the vertical ovals and horizontal for the horizontal ovals. 

I colored in all the images with more Pitt Pens. They are permanent.  I had forgotten how much I love to color with markers. Super fun! I mounted the ovals to the black Stitched Ovals with two sided tape, and then mounted those to the card fronts. 

 
I colored in the hearts and cut them out. I used a black marker to color the white edging from the hearts as I didn't like the white showing. I added to the hearts to the lower right side of each card. I stamped matching Doodles to each envelope for it's card, and colored those in with the markers as well. I added a few white details on some of the images, like a shine mark on each heart and outlining some of the dots on the presents. 
 
Supplies: 
(Die Cut Machine, Stamp Platform, Sticky Note for Masking, Scissors, Stay-tion, Small Stamping Block, Two Sided Tape) 
-Ranger Surfaces: Specialty Stamping Paper, Black Cardstock 
-Sizzix Tim Holtz Movers & Shapers: Sized Ovals 
-Sizzix Tim Holtz Thinlits: Stitched Ovals 
-Ranger Wendy Vecchi Make Art Clear Stamp Set: Doodle Celebration, Floral Doodles, Doodle Town 
-Ranger Tim Holtz Distress Archival Ink: Black Soot 
-Ranger Wendy Vecchi Archival Ink: Mulberry, English Ivy 
-Faber-Castell Pitt Artist Pens 
-Sakura Gelly Roll Pen: White 
-Solid Color Notecards with Envelopes
 
Thank you all so much for stopping by. I'll be back soon. Until then, I hope your hands get creatively dirty soon!

Thursday, January 20, 2022

Wendy Vecchi Flowers Say It All Chippies Magnets

Hello All, and happy new year to you! This post is the start of new products launching with Ranger Ink, and there are so many more to come. Wendy Vecchi has just introduced her new Chippies! Did you catch her Live earlier today? She had so many wonderful samples using the new Chippies. They are just darling pieces of chipboard, five sets in all with Bases and Frames, Leaves, Blossoms, Wreaths, and Beverages. They all primed with gesso which allows you to use so many mediums on, and you can even dry emboss on them which I thought was the best technique using them, and that's what I've done on these magnets I made using so many of the Chippies, plus I painted on them too. I just love flowers, and I tried to coordinate these using them in different ways, and I think they will make great little Valentine or Birthday gifts. Enjoy!
Introducing Wendy Vecchi Make Art Chippies!

 
Select the Chippies you want to use for the magnets and cut if need be (I cut the wreaths for leaf swags.), and arrange the them the way you want. You might want to take a photo of your arrangements to help you in the planning.

Using Tim Holtz Antique Linen Distress Paint, paint over the cups, saucer, and tea bag tags. Paint over heart frame and spoons with Silver Metallic Paint Dabber. Ink over the solid heart with Mulberry Archival Ink and an Ink Blending Tool. Let all dry. 
 
   
Mask off stripe on the large cup with Sticky Notes, and ink in with Mulberry. Ink the flower centers or petals with Mulberry using the tool or a detail craft swab if the parts are too small. Use a Black Fude Ball Pen to color in the etched lines on the border of the stripe on the cup. 
 
 
Using the Tim Holtz Sizzix Star Bright Texture Fade, emboss the small cup (try to leave the inside of the cup not embossed by placing the cup on the edge of the fade), saucer, large tea bag tag, solid heart, and the handle of the largest spoon, doing each separately for the best image placement and run them through the machine three times each for nice detailed embossing. 
 
 Ink over all leaves with Pricky Pear first and then some parts in English Ivy Archival and the Ink Blending Tool. Ink in petals and centers of flowers with Golden Rod Archival. Leave some petal parts white. 
 
 
Ink in bow with Mulberry. Using the tip of your finger, add Mulberry Archival to the raised parts of the embossing on the little cup and saucer and large tea bag tag, by gently rubbing over the design to color it in to see it better. Do the same with the raised designs on the heart but use Antique Linen Distress Paint. Let them dry. Use a detail paint brush to paint in wispy lines over the petals of the flowers using Antique Linen. Add some more detail wispy lines to the flowers and bow with yellow and red Pitt Pens. Adhere heart to frame and some of the flowers to stems with Perfect Card Adhesive.
 
 Stamp 'Flowers Say It All' sentiment three times onto Ivory Heavystock using Black Soot Archival, from the set with the same name. Cut apart and ink the edges of the those with Gathered Twigs Distress Ink. Stamp small heart from Merci and More onto the small tea bag tag using Mulberry. Tie string to the tea bag tags. Figure out where you want the sentiments to go and add foam tape to the back of each. Assemble all three designs together using Perfect Card Adhesive, and ink any edges as you go with Black Soot or Gathered Twigs. 
 
Add sticky magnet sheet to the back of each design, making sure they stick well to the Stay-tion so you know they will work properly. Use Sunflower and Garnet Liquid Pearls to dot the centers of each flower and anywhere else you want using, and use  a stylus to help you make perfect dots by picking up the color from the Stay-tion and dotting it on with the stylus if you have a hard time controlling the Pearls straight from the tube. Let dry.
 
Supplies:  
(Stay-tion, Scissors, Ink Blending Tools, Detail Craft Swabs, Sticky Note for Masking, Embossing Machine, Detail Paint Brush, Stamping Block, Foam Tape, Stylus)
-Ranger Wendy Vecchi Make Art Chippies: Base and Frames, Beverages, Wreathes, Blossoms 
-Ranger Paint Dabber: Silver Metallic 
-Ranger Tim Holtz Distress Paint: Antique Linen 
-Ranger Wendy Vecchi Archival Ink: Mulberry, Golden Rod, Prickly Pear, English Ivy 
-Ranger Fude Ball Pen: Black 
-Sizzix Tim Holtz Texture Fade: Star Bright 
-Faber-Castell Pitt Artist Pens 
-Ranger Wendy Vecchi Make Art Stamp, Die, Stencil Set: Merci and More, Flowers Say It All 
-Ranger Tim Holtz Distress Archival Ink: Black Soot 
-Ranger Tim Holtz Distress Heavystock: Ivory 
-Ranger Tim Holtz Distress Ink: Gathered Twigs 
-Ranger Wendy Vecchi Perfect Card Adhesive 
-Ranger Wendy Vecchi Liquid Pearls: Sunflower 
-Ranger Liquid Pearls: Garnet 
-String, Sticky Magnet Sheets
 
I'll be back again soon. Thank you so much for stopping by, and until next time, I hope your hands get creatively dirty soon!