Hello Everyone! I hope you were able to catch the Tim Holtz Stamper's Anonymous Halloween Live on Saturday...if not the replay is available...because there was soooo much goodness to be shone...WOW! I am always blown away by the makes and the inspiration I have after...after my mind calms down that is. I am truly humbled to even be apart of it all, and really do thank all of you for the support and encouragement. That being said, here is my After Live make using the new Leaf Prints 2 Stamp Set and Crest Layering Stencil, and I'll have the other two projects that were on the Live here within the next two weeks, so stay tuned for those. This Autumn card has all the yummy colors of Fall that I love so much, and just makes me feel that windy chill in the air, along with that cinnamon-y smell. It was even quite fast to make, minus the drying time on the paste. There is probably a little too much going and blending on here, and so some parts are harder to see at certain angles, but I like a card that has to be stared at and touched to fully get the Seasonal impact I was going for. More is more! ;0) Enjoy!

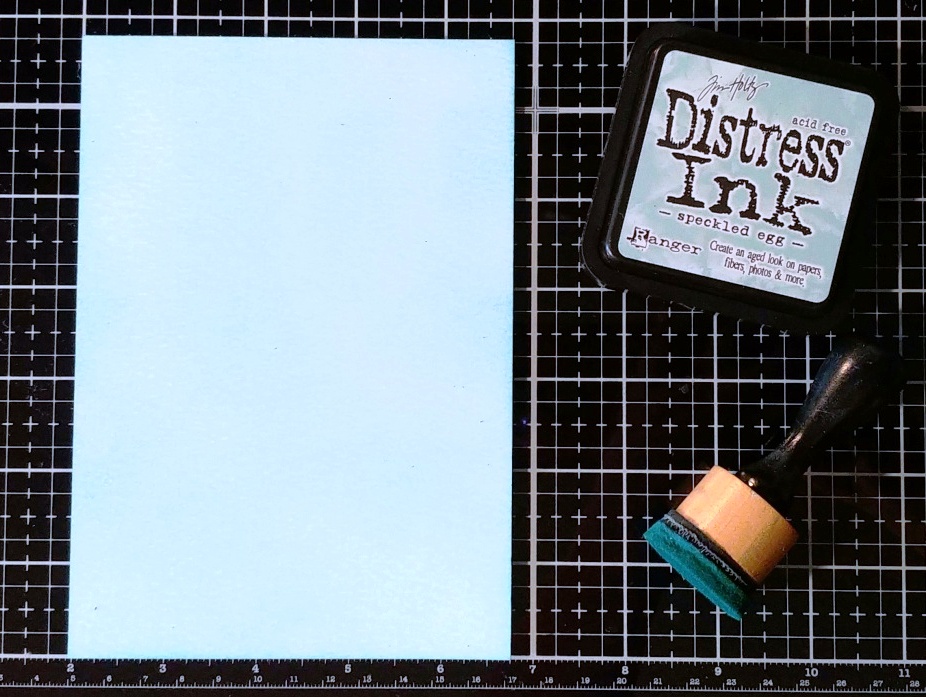
Cut a piece of Watercolor
Paper to 4.75 x 6.75 inches for card front. Ink over the whole surface of the
paper with Speckled Egg Distress Ink from Ranger with an Ink Blending Tool.

Place inked paper in
the Stamp Platform. Gather Leaf Prints 2 stamp set and plan out the arrangement
of the leaves to cover the whole surface of the card. Close the platform to
secure the stamps. Using Crackling Campfire, Spiced Marmalade, Fossilized
Amber, and Peeled Paint Distress Oxides, randomly ink portions of the leaves
with each color and stamp. Add more of any of the colors until all parts of the
leaves are stamped. Leave the leaves in place on the platform.

Remove the top portion
of the platform with the Leaf Prints. Shake up Harvest Moon, Wicked Elixir, and
Burning Ember Distress Mica Stains. Take the lid with the stamps and the three
Stains outside or place in a Splat Box, and mist each color of Stain over the
Leaf Prints. Immediately place the lid back on the platform and stamp them over
the paper. Open lid and let paper sit for a few minutes to absorb the Stain.

Lightly mist or flick
water onto the paper. Remove the paper and let dry. Remove the lid of the
platform with the stamps and run water over it until the Stain is all removed.
Pat stamps dry with a paper towel and place back on the stamp plastic cover,
and dry lid before placing back on.

Shake the Harvest Moon
Mica Stain, and lightly mist over the paper. Let dry, and then ink the edges of
the paper with Speckled Egg Distress Ink.

Have all the Distress
Embossing Glazes open and ready to go and a clean piece of paper nearby to
capture the Glazes. Place the Crest Layering Stencil over the left side of the
paper so only the top to the bottom of the vase looking part is showing and the
stencil is at the very left side of the paper, and then secure with tape. Using
a palette knife and Distress Crackle Texture Paste, apply a nice thick like
layer of the paste through the stencil. Remove the stencil and place in water
to clean later. Working quickly while the
Paste is wet, pinch a bit of the Vintage Photo Embossing Glaze and carefully
drop the powder over the parts of the stencil that look like a vase and post of
the vase going upward. Add a little Fossilized Amber to those places as well. Next
add Fired Brick and Crackling Campfire Glazes over the five roses and the dots
on the leaf vine going out to the right. Then add Rustic Wilderness Embossing
Glaze over the leaves around the roses. Randomly add Twisted Citron and Peeled
Paint Embossing Glazes over all the rest of the leaves. Lift up the paper and
place over the scrap paper and gently shake the paper to make sure the Glazes
cover all the areas of the paste and then turn the paper over and pour off the
extra powder. Save the powder if you wish in a jar for other projects or throw
away. Let the paper dry about 30 minutes to an hour and then heat emboss.

Cut and fold a Kraft
card base to 5 x 7 inches, and ink the edges with Vintage Photo Distress
Archival Ink. Cut a piece of orange Metallic Kraftstock to 4 7/8 x 6 7/8
inches, and mount on the Kraft with two sided tape. Stamp the sentiment onto
Watercolor Paper with Vintage Photo Archival, and then ink over it with
Speckled Egg Distress Ink. Cut around it, and mount onto orange metallic, cut
around that and fishtail the left end, and then mount onto Kraft, cut around
with the fishtail, and ink edges in Vintage Photo. Add sentiment to card front and
then mount the card front onto the base.


(Paper Trimmer, Glass Mat, Ink Blending
Tool, Stamp Platform, Water Mister, Palette Knife, Heat Tool, Two Sided Tape)
-Ranger Tim Holtz Distress Watercolor
Paper
-Ranger Tim Holtz Distress Ink: Speckled
Egg
-Stamper's
Anonymous Tim Holtz Stamp Set: Leaf Prints 2, The Scarecrow
-Ranger Tim Holtz Distress Oxide Ink:
Crackling Campfire, Spiced Marmalade, Fossilized Amber, Peeled Paint
-Ranger Tim Holtz Distress Mica Stain:
Harvest Moon, Wicked Elixir, Burning Ember
-Stamper's
Anonymous Tim Holtz Layering Stencil: Crest
-Ranger Tim Holtz
Distress Texture Paste: Crackle
-Ranger Tim Holtz
Distress Embossing Glaze: Vintage Photo, Fossilized Amber, Rustic Wilderness,
Twisted Citron, Peeled Paint, Crackling Campfire, Fired Brick
-Ranger Surfaces: Kraft Cardstock
-Tim Holtz Idea-ology: Metallic Jewels Kraftstock
-Ranger Tim Holtz Distress
Archival Ink: Vintage Photo 
Thank you truly for stopping by today! I will be back real soon. Until then, I hope your hands get creatively dirty soon!