
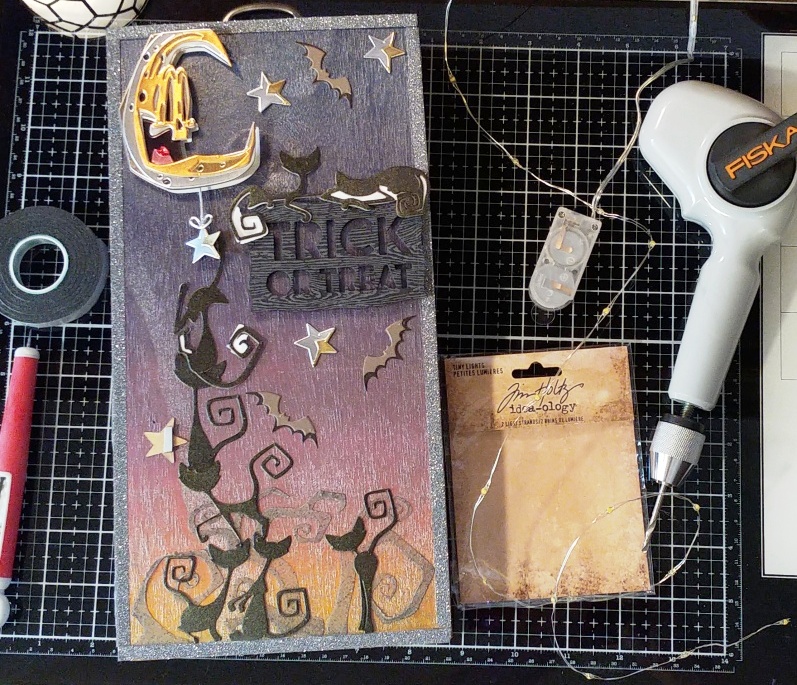
Hello Everyone! Today I have the second project I made for the after Tim Holtz Sizzix Halloween Live (the big one)...A Lighted (2 colors) Halloween Vignette Tray, made with the Colorize Otis and Mischievous Cats Thinlits. I SERIOUSLY had the best time making this...those cats and that moon are too too fun! The pics just don't do this project justice. Enjoy the tut, and grab a snack!


Using the Colorize Otis
and Metallic Kraftstock, figure out which colors to use, and then add two sided
tape to the backs of the papers and die cut the pieces. Assemble all the pieces
of the moon. Use grays from the Classic Kraftstock to die cut the bats and
assemble. Use more Metallic in gold and silver and die cut several of the stars
and assemble. Die cut two of the string pieces in silver Metallic, and then lay
them on top of each other for a little more sturdiness. Set all these aside.

Die cut all eight of
the Mischievous cats (and their faces) from Black Kraftstock with two sided
tape on the back. Leave them all inside the Kraftstock for now. Shake up Wicked
Elixir and lightly mist it over the Kraftstock, and then clean the hole in the
nozzle to be safe. Let the cats dry on the sheet and set aside for now.

Die cut the sentiment
from the Bold Text Halloween using the new Black Two-Tone Woodgrain. Save the inside
letters for another project, but keep the little bits that go inside the
letters as you will need those. Cut around it randomly to make it look tattered
leaving about 1/4 inch border. Ink the
edges and inside parts with Black Soot Archival and an ink blending tool. Add a
few thin strips of black foam tape to the back and set this aside for now.

Place Gesso in a cup and
water it down about half as much and mix. Paint over the back and sides of the
Vignette Tray with the Gesso. Let dry. Starting at the top of the tray, paint
about two inches down (and the top and sides) with Uncharted Mariner Distress
Paint. While wet add Villainous Potion Paint and blend in with the blue,
carrying it down about two inches, doing the sides as well. Continue adding
about an inch wide coat of paint (Next Wilted Violet, then Picked Raspberry,
then Carved Pumpkin, and finally Mustard Seed) and blending all the paints
where they meet, ending with Mustard Seed and painting the bottom with it. Let
dry.

Shake Iron Gate
Distress Mica Stain, and mist the Vignette Tray liberally on all sides. Use a
paper towel to blot the Stain where it is pooling up. Let dry.

This is after the Iron Gate
Distress Mica Stain...perfection!

Using the Twisted Layering
Stencil from Stamper's Anonymous, lay it at the bottom of the Vignette Tray but leave the wooden border
out from the stencil design. Use a palette knife to spread a nice medium layer
of Distress Crypt Grit Paste through the tree looking portions of the stencil.
Let dry and immediately clean the stencil and knife with water. Use the black
glitter tape from the Materialize Design Tape set and adhere to the borders of
the Vignette Tray where the pieces meet and are glued for a nice border, using
a little Collage Medium for reinforcement so it doesn't come off later.

Place the drawer pull
on top of the Vignette Tray and center it. Use a craft pick to mark the holes
in the drawer pull, then move the pull off and use a hand drill with a thin bit
and drill the holes for the fasteners to go through. Place the pull back on and
match the holes and add a little Collage Medium and then push the Long
Fasteners through and open them to secure them underneath.
Lay all the die cut
pieces on the tray and arrange them where they will go, but only adhere the six
cats at the bottom of the tray, and the three bats by removing the backing from
them. Don't add the faces of the cats yet as they will come later. You are
going to add clear Tiny Lights through the back of the tray to all the stars,
the sign, and the moon. There are 20 lights on the string, so you need to know
how you will divide them up...five will be for the stars, eight for the sign,
and the rest for the moon. Having foam tape on the back of these pieces will
allow the lights to really shine behind, so go ahead and add thin pieces of
black foam tape randomly to the back of these pieces keeping them toward the
outside border of each piece so there is room for the lights on the inside
parts. Add Velcro to the back of the battery pack on the lights and then stick
it down (on the bottom right of the inside of the tray) and have them ready to
go. Starting with the two bottom stars first to help you get the hang of the
process, lay one star where it will go (don't stick it down yet) and then use a
Craft Pick, pressing it into the wood, to mark underneath it where the there is
no foam tape. Remove the star and then use the hand drill to make a hole where
the tiny Craft Pick hole was. Drill a hole for the other star as well.

Turn the tray over, and
starting with the first light that is closest to the battery pack, fold the
wires down on each side of the light, and then push the light through the
lowest star hole so that it is just slightly above the hole on the front side
of the tray. Do the same for the other star. (NOTE: My stars where a little too
far away from each other so I had to skip a light between the stars.) Now drill
holes under where the other two stars will go, and eight under the sign where
there is no foam tape, and seven under the moon, and one behind the star
hanging from the moon. Finish pushing the lights into the holes, and secure the
wire with strips of tape to make sure they stay put. Remove the foam tape
backing for the stars, moon, and sign, and adhere them in place making sure
they are covering up the white lights. Use Collage Medium to adhere the inside
bits of the letters on the sign directly to the tray. One of my lights can be
seen in the sign because I didn't line the hole up, so be careful if you don't
want that to happen.

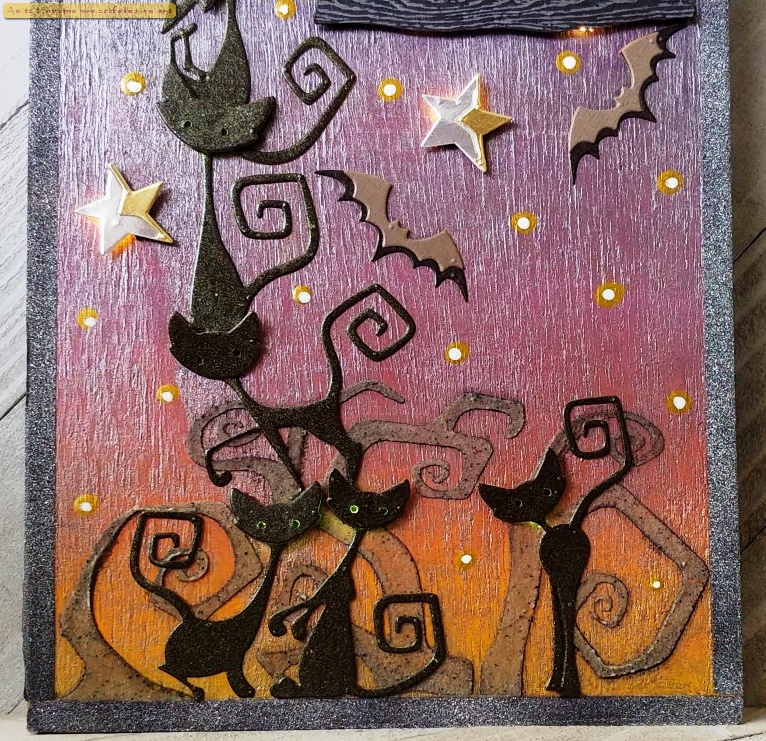
Add the sleeping cat to
the right top of the sign using foam tape on his head and rump so that he
matches the depth of the sign. Adhere the laying cat on the left of him but
with no foam tape. The green lights will be for the cats eyes, except for the
sleeping cat. Drill holes in the very center of each cat's head, except the
sleeping cat. Use velcro to adhere to green lights battery pack to the back of
the tray. Starting with the closest light to the battery pack, push the lights
into the holes as you did before. There will be holes that are too far away
from each other so you will have to skip some lights. When finished, cut off
the excess light strand and toss. Turn the tray over and add tiny squares of
black foam tape to each ear of the cats. Take the matching faces of each cat
and punch holes for eyes, keeping them about 1/4 to 1/2 inch apart because the
lights will be in the middle, using a jewelry hole punch. Remove the backing on
each face and backing on the foam tape, and adhere the matching faces on each
cat. For the sleeping cat, use a black permanent pen to add slits for sleeping
eyes. You won't be able to see it much, but that's okay. To finish apply dots
of Tarnished Brass Distress Paints for more stars randomly over the whole tray,
and when dry add smaller dots of Picket Fence Distress Paint to the centers of
the Brass. Let dry.


Supplies:
(Die Cut Machine, Die Pick, Scissors,
Two Sided Tape, Ink Blending Tool, Black Foam Tape, Glass Mat, Paint Brush, Palette
Knife, Craft Pick, Hand Drill, Jewelry Hole Punch)
-Tim Holtz Idea-ology: Metallic Classics
Kraftstock, Metallic Colors Kraftstock, Metallic Kraftstock, Metallic 3
Kraftstock, Classic Kraftstock, Black Kraftstock, Vignette Tray, Materialize
Design Tape, Mini Hardware Set, Long Fasteners, Halloween Tiny Lights, Tiny
Lights
-Sizzix
Tim Holtz Thinlits (Halloween 2022): Colorize Otis, Mischievous, Bold Text
Halloween
-Ranger Tim Holtz Distress Mica Stain: Wicked
Elixir. Iron Gate
-Ranger Tim Holtz Distress Woodgrain:
Black Two-Tone
-Ranger Tim Holtz Distress Archival Ink:
Black Soot
-Ranger Gesso: White
-Ranger Tim Holtz Distress Paint: Uncharted
Mariner, Villainous Potion, Wilted Violet, Picked Raspberry, Carved Pumpkin,
Mustard Seed, Tarnished Brass, Picket Fence
-Ranger Tim Holtz Distress Grit Paste:
Crypt
-Stamper's Anonymous Tim Holtz Layering
Stencil: Twisted
-Ranger Tim Holtz Distress Collage
Medium: Matte
-Velcro, Black Permanent
Pen
This one just might be my favorite Halloween make yet. Thank you so very much for stopping by and for commenting. I'll be back with makes from the Live next week. Until then, I hope your hands get creatively dirty soon!


Beautiful project, Anita. I had to see how you made this with the lights. Such lovely colors and great Halloween eye catcher. Super.
ReplyDeleteLovely project!
ReplyDeleteThis is awesome! great Job!
ReplyDelete