Friday, April 28, 2023

Tim Holtz Stamper's Anonymous Everyday 2023 - Everyday Brush Art Stenciled Fruit and Tiny Things Note Quotes Card Set

Hi Everybody! I'm back again this month with another make...more like a series... using the new Tiny Prints and Note Quotes Stamps from Tim Holtz and Stamper's Anonymous, along with the new Everyday Art Elements and Brush series of Stencils. So these might be a little strange, but the Brush Layering Stencils seriously had me seeing fruit. I COULD NOT STOP making the little things, and I love how all the sentiments from the Note Quotes just paired with anything I created. I even created a chart for making even more fruits using the stencils as well as veggies, so don't be surprised if you see more, LOL!  And seriously, ALL the new stencils can pretty much create whatever you want! Hope you enjoy!
For the pineapple, I used the middle Sized Oval from Sizzix to create a mask area by using the negative part, and placed it over a piece of Watercolor Cardstock from Ranger. I took the small Brush Arch Stencil and inked over the back of it with both Twisted Citron and Gathered Twigs Distress Ink and then misted it with water and placed it over the masked oval and pressed with a paper towel to create a mono-print, and let it dry.

I placed the stencil back over the oval and matched up the printing, and then inked in with Mustard Seed all the rest of the areas to really get a pineapple look. Isn't this stencil perfect for it. Using the large starburst looking portion from the Everyday Art Elements Stencils, I inked in the image several times at different angles applying light to heavier pressure with the ink blending tool using Twisted Citron to create the pokey green parts of the pineapple. 

Using Distress Watercolor Pencils and a Detail Water Brush, I added in more details on the greenery and main part.

I placed the stencil back on matching it up, and inked over that with Distress Embossing Ink, and poured Clear Powder over and heat embossed. Then I cut it out, with two sided tape on the back, inked the edges with Gathered Twigs and finished it off.

For the grapes, I created a mono-print again using Villainous Potion and the Mini Brush Hex Stencil, straight onto more Watercolor Cardstock, and let it dry.

I placed the stencil back on and inked in the hexagons with Seedless Preserves only doing in the portions to give a grape cluster look. I placed the plant looking portion of the stencil on the top of the grapes and inked on only the part I needed to create a stem using Gathered Twigs. Then using the Pencils again, I watercolored in the details. 

 I placed the stencil back on and inked over on the Embossing Ink and poured the powder on to heat set. This embossing process is used for all the fruits. Then I cut the grapes out and inked the edges. 

For the watermelon, I used that oval I cut out from above, and used the negative to help mask off the edge to keep it white and inked in Abandoned Coral on the top and Twisted Citron on the bottom edges. I used the negative again for masking and laid the Mini Brush Mark Stencil over and inked in the seeds using Black Soot Distress Archival Ink. Then I used the stencil again to apply Embossing Ink over the seeds and heat embossed. I cut the top off the watermelon, and inked the bottom edge with Rustic Wilderness and top with the Lumberjack Plaid to finish it off.
 
 For the strawberries, I used all three of the hearts on the stencils and inked those in with Abandoned Coral onto Watercolor Cardstock, and used the stars with Twisted Citron for the leaves. I used the circle on the on another stencil for the blueberries using Prize Ribbon.
 
For the top portion of the blueberries I used the circle cutout on the top of the tag stencil (where you would put in the key ring) with Villainous Potion. I used the stencil with all the dots with Lumberjack Plaid over the strawberries for the dark parts. Then I used the pencils for the details. I heat embossed the dots with clear powder for the strawberries, and the whole circle for the blueberries. I cut them all out, and inked the edges. 

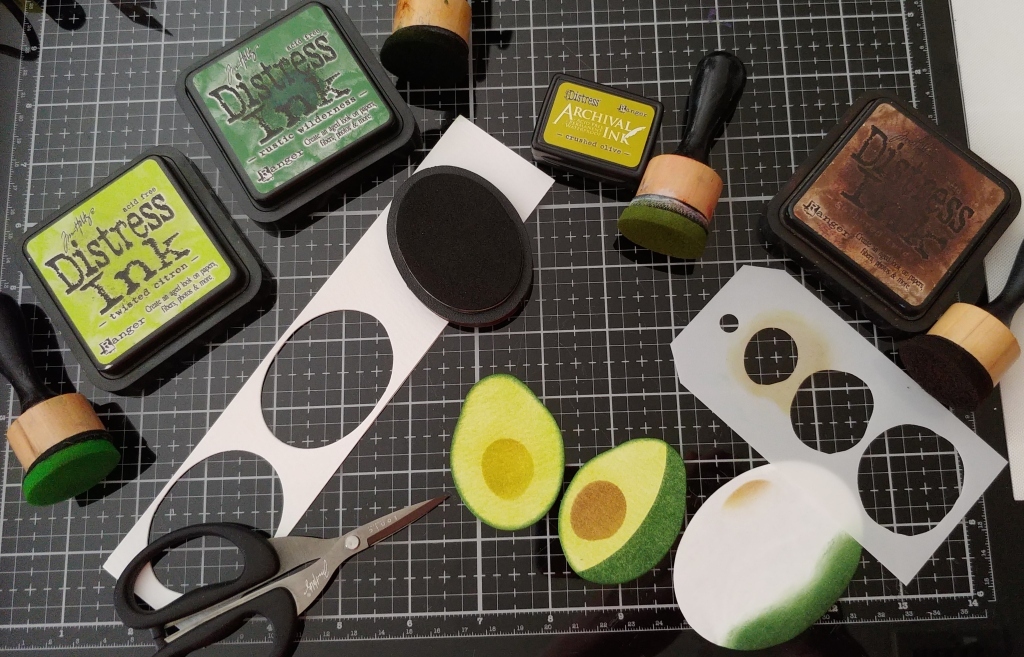
For the avocados, I cut two small Sized Ovals, and cut the top a bit freehand to give it that shape. I inked over both pieces with Twisted Citron. Using another oval as a mask, I inked in the bottom of one with Rustic Wilderness. I used the smallest circle on each with Gathered Twigs, darker on the one with the seed and lighter on the other. I also used Crushed Olive Archival on both for a more authentic color.  
 
 
I used the Rustic Wilderness Watercolor Pencils to make some dots on the avocado skin, and a few more to add some details. I inked the edges with Rustic Wilderness, and then heat embossed the seed on the avocado. 
 
 For the figs, which were my favorite ones to make I think, I inked in the largest circle first in Antique Linen, then for the other two with Seedless Preserves turning the circle each time to give the bottom a different shape, and then used the that leaf looking part of the other stencil for the top of each using the same colors and blending so you couldn't see a stencil line. I added added a bit of Twisted Citron to the top of the purple ones. Then I added the inside part on the Antique Linen one turning the largest heart upside down and inking in with Saltwater Taffy.

Using the smallest sparkle image for the very inside of the fig, I inked that in with Gathered Twigs. Using the Watercolor Pencils I added the details to figs. I heat embossed the heart on the half fig only. I cut these out and inked the edges in Villainous Potion. 

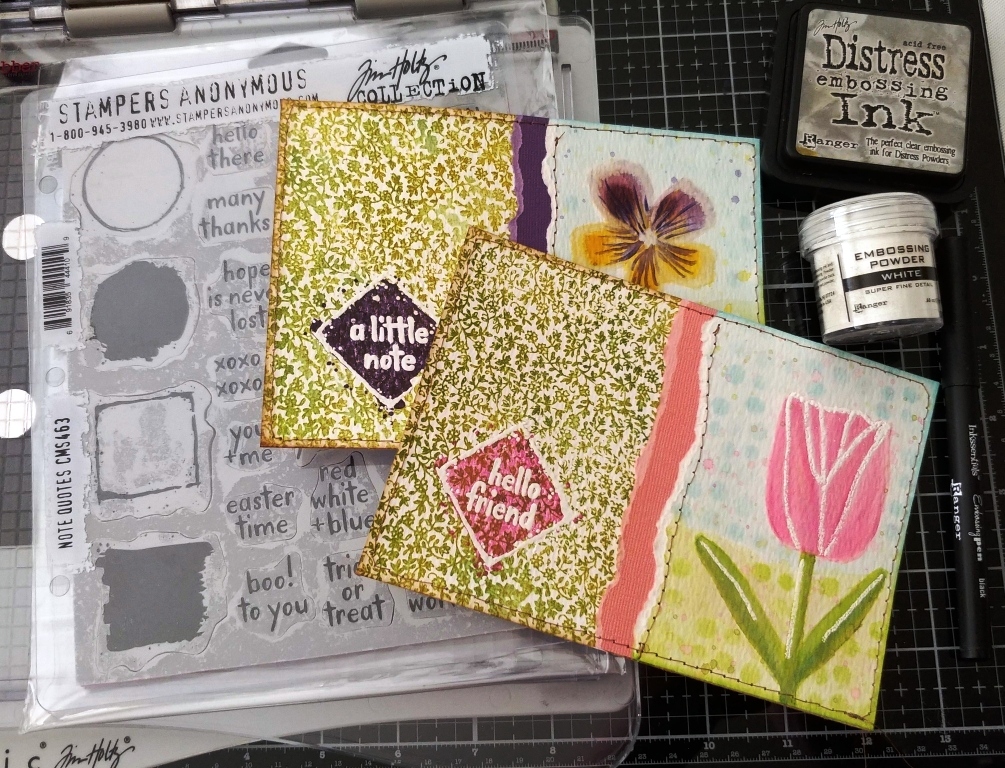
I cut and folded Kraft Cardstock bases to 4 x 5.5 inches, inked the edges with Gathered Twigs, cut Black Kraftstock for matting to 3 7/8 x 5 3/8, and then Watercolor Cardstock to 3.75 to 5.25. I stamped half the Watercolor pieces with one of the Tiny Prints images and half with the other, using both Crushed Olive and Peeled Paint Distress Archival Ink. Inked the edges with Gathered Twigs and then mounted all the pieces.
 
I stamped the background parts of the Note Quotes on each card front in a coordinating ink with each fruit, and then stamped with Black Soot and heat embossed with clear powder the sentiments from the set. I computer generated more sentiments to go with the fruits and matted those up. I waded up Mummy Cloth across the bottom of each card and added the sentiments and fruit.


Supplies:
(Ink Blending Tools, Scotch Tape, Die Cut Machine, Detail Waterbrush, Water Mister, Two Sided Tape, Scissors, Paper Trimmer, Deckle Trimmer, Stamp Platform, Heat Tool, Foam Tape)
-Ranger Tim Holtz Distress Watercolor Cardstock
-Ranger Tim Holtz Distress Ink: Lumberjack Plaid, Abandoned Coral, Mustard Seed, Twisted Citron, Rustic Wilderness, Prize Ribbon, Seedless Preserves, Villainous Potion, Saltwater Taffy, Antique Linen, Embossing Ink
-Stamper's Anonymous Tim Holtz Layering Mini Stencils:  (Brush) Mini Set 55
-Stamper's Anonymous Tim Holtz Elements Stencils: Everyday Art 
-Sizzix Tim Holtz Movers and Shapers: Sized Ovals(Large, Small)
-Ranger Tim Holtz Distress Watercolor Pencils: Fired Brick, Mustard Seed, Twisted Citron, Crushed Olive, Peeled Paint, Rustic Wilderness, Iced Spruce, Prize Ribbon, Seedless Preserves, Villainous Potion, Vintage Photo, Black Soot, Picket Fence
-Ranger Embossing Powder: Clear
-Stamper's Anonymous Tim Holtz Stamp Set: Tiny Prints, Note Quotes 
-Ranger Tim Holtz Distress Heavystock: White
-Ranger Tim Holtz Distress Archival Ink: Crushed Olive, Peeled Paint, Black Soot
-Ranger Surfaces: Kraft Cardstock
-Tim Holtz Idea-ology: Black Kraftstock, Mummy Cloth 
-Ranger Tim Holtz Distress Collage Medium: Matte
 
Thank you truly for stopping by here today....I totally appreciate all of you. I'll be back again soon. Until then, I hope your hands get creatively dirty soon!

Friday, April 21, 2023

Tim Holtz Stamper's Anonymous Everyday 2023 - Tiny Prints Everyday Art Watercolor Stenciled Blooms Note Quote Cards

I'm back again this week, with the second make from the Tim Holtz Stamper's Anonymous Everyday LIVE.  This time I used the Tiny Prints and Note Quotes Stamp Sets, along with most of the stencils from the Everyday Art Elements Layering Stencils. I had such fun with these, and those stencils have limitless possibilities....I just LOVE them! You can create just about anything with them. AND, for the first time ever, I used the stencils to watercolor....never have even tried doing that, and I love the end results. Enjoy!
 
I cut two Watercolor Cardstock pieces to about 4x4.5 inches, one for each flower. For the pansy, I applied Lost Shadow Distress Ink to the white mat and added a bit of water. Starting more on the right side, I laid the solid flower image up towards the top, and using a Broad Waterbrush, I picked up the ink and brushed it over the open flower. I did this so I could see exactly where the flower was before I started adding the color and Lost Shadow was perfect for that. I added Rustic Wilderness to the mat and added the long stem and fluffy leaf using the stencils and Broad brush. 

I used Tumbled Glass for the sky, and Twisted Citron for the grass, applying them both to the mat and picking up with the Broad Brush. 

I applied Dusty Concord over the top of the flower and Mustard Seed to the lower with the brush. Then I laid the flower sections stencil on the flower and inked in Villainous Potion to the top and more Mustard Seed but darker on the bottom, then brushed it out some with the brush. I added the half circles and oblong parts of the stencils to the leaf area and used Twisted Citron. I inked in the circles in the sky with Tumbled Glass and the grassy area with Twisted Citron.

For some more depth to the flower, I used Distress Watercolor Pencils and the Detail Waterbrush to add some details to the flower, especially the white around each petal and the center. 

For the tulip, I watercolored in the rainbow looking part with Kitsch Flamingo, and the stem and oblong part for the leaves with Twisted Citron using the Broad Waterbrush. 
 
I did the sky and grass the same as the other. I used Picked Raspberry and the Broad Waterbrush to color in the open areas on the tulip.

Using that same oblong part on the stencil, I watercolored in the leaves with Twisted Citron, and then used it again with Picked Raspberry to add some more petals to the tulip to give it depth. 

I stenciled in the circles for the sky and grass the same as above. Then using the Pencils I added more detail to the tulip, especially the white outlines on the tulip. 

 For the background, I cut more Watercolor Cardstock to 4.5 x 6.5 and added the Tiny Prints Background Stamp to the platform. I inked over it using both Twisted Citron and Rustic Wilderness, then I lightly misted the stamp with water and stamped the image. When dry, I stamped over it again using Crushed Olive Distress Archival Ink. 

I stamped the solid square (turned diamond wise) in Kitsch Flamingo several times on one and Villainous Potion just twice on the other. Then I stamped the outline in Distress Embossing Ink and poured White Embossing Powder over and heat embossed. I did the same with the Note Quote Sentiment. I also used an Embossing Pen to outline each flower, stem, and leaves, and heat embossed in the white. I mounted pink and purple cardstock to the opposite side of the stamped leaves after I torn the facing in edge. I tore the facing in edge of each flower part and then mounted those. Then I stitched around the the card in brown thread, and inked the edges in Gathered Twigs on the leaf side and Tumbled Glass and Twisted Citron on the flower side. I mounted these onto the same colored cardstock cut to 4 7/8 x 6 7/8, and then onto Kraft Cardstock base cards cut and folded to 5 x 7 inches, and inked that in Gathered Twigs.

Supplies:
(Broad Waterbrush, Water Mister, Ink Blending Tools, Detail Waterbrush, Stamp Platform, Paper Trimmer, Two Sided Tape, Scissors, Heat Tool)
-Ranger Tim Holtz Distress Watercolor Cardstock
-Ranger Tim Holtz Distress Ink: Lost Shadow, Mustard Seed, Twisted Citron, Rustic Wilderness, Dusty Concord, Villainous Potion, Kitsch Flamingo, Picked Raspberry, Tumbled Glass, Gathered Twigs, Embossing Ink
-Stamper's Anonymous Tim Holtz Elements Stencils: Everyday Art 
-Ranger Tim Holtz Distress Watercolor Pencils:  Mustard Seed, Twisted Citron, Rustic Wilderness, Kitsch Flamingo, Picked Raspberry, Villainous Potion, Picket Fence
-Stamper's Anonymous Tim Holtz Stamp Set: Tiny Prints, Note Quotes 
-Ranger Tim Holtz Distress Archival Ink: Crushed Olive
-Ranger Surfaces: Kraft Cardstock
-Core'dinations Tim Holtz Adirondack Collection Cardstock
-Ranger Embossing Powder: White -Ranger Embossing Pen
 
Thank you so very much for coming by here today. I will be back again soon with one more make using these same goodies above plus a few more stencils. Until then,  I hope your hands get creatively dirty soon!

Sunday, April 16, 2023

Tim Holtz Stamper's Anonymous Everyday 2023 - Creative Blocks Alcohol Ink Cards

Hello All! How about that Tim Holtz Stamper's Anonymous Everyday LIVE?!! WOW! The new stamps and stencils are fabulous, but the Maker's samples just elevate everything to EPIC! I am so thankful to be apart of it all, and don't even feel worthy when I see everybody's makes. I truly thank you for all your kind words. If you missed the LIVE, I believe it's already up for replay, and it's totally worth it to watch just to gain the inspiration. Today, I have the first of three makes using the new goods, and this one made with the new Creative Block Stamp Set was on the LIVE. This set is so unique and yummy, especially if you love old architecture. I find myself taking pictures of stuff like this every time I go somewhere where old buildings and details of them catch my eye, especially pediments and old doors. I decided to do two cards, one colorful and one neutral, using just Ranger Alcohol Ink and Archival Ink.  The Sizzix Square Stacked Tiles Thinlits really made this easier as well. Hope you enjoy! 

I used Silver Sparkle Alcohol Ink Cardstock for the substrates of the card fronts. I pounced Pebble, Lake Mist, Mushroom, and Ginger, Alcohol Inks on the Silver first directly with the Alcohol Ink Applicator. Then I added Smoulder Alcohol Pearl and Blending Solution to the Applicator and pounced that on while using the Blower.  I did the same with the other Silver Sparkle sheet using Watermelon, Sunset Orange, Limeade, and Aquamarine Alcohol Inks with Radiant Alcohol Pearl. 
 
 I choose the images I wanted from the Creative Blocks Set, and laid them out on the Large Stamp Platform the way I wanted them on the sheet. I stamped them several times with Black Soot Archival to make the images nice and crisp, and on the last stamping, I poured Clear Embossing Powder over, then heat embossed. I did the same for the other. 

Using the five medium sized squares from the Square Stacked Tiles Thinlits, I cut out the images, keeping them as evenly spaced as I could. I put them back in their place so I know where they needed to go. I cut four each (for each card) of Black Kraftstock, Kraft Cardstock, and White Heavystock using the next largest Square die, for the matting. 

I inked all the Silver Sparkle squares with Black Soot Archival, and then matted them onto the cardstock squares with two sided tape. I inked the edges of the Kraft with Gathered Twigs Distress Ink, and the White Heavystock with Lost Shadow. I adhered all the squares in place on top of the holes they go into EXCEPT the Kraft ones that go in the center, and then trimmed the overages off to make the sheet about 4.75 x 6.75 inches. I mounted this onto Black Kraftstock cut 4 7/8 x 6 7/8 inches. I added foam tape to the back of the Kraft pieces and then mounted those onto the card front.

I cut and folded Kraft Cardstock bases to 5 x 7 inches, inked that with Gathered Twigs, and added the card front on top. I selected the sentiments from the Metallic Sticker Book, matted with Kraft then Black, and adhered to the center of the card with two sided tape. Then I choose architectural looking pieces from the gold sheet of the Gilded Accents Remnants Rubs, and rubbed those on the open areas on the corners and top and bottom center of the card fronts. 
 
I used a Gold Leaf pen to color in some of the open images on each square.
 
Supplies:
(Alcohol Ink Applicator, Alcohol Ink Blower, Large Stamp Platform, Heat Tool, Paper Trimmer, Two Sided Tape, Die Cut Machine, Ink Blending Tool, Scissors, Foam Tape, Remnant Rub Tool)
 -Ranger Tim Holtz Alcohol Ink Cardstock: Silver Sparkle
 -Ranger Tim Holtz Alcohol Ink: Pebble, Lake Mist, Mushroom, Ginger, Watermelon, Sunset Orange, Limeade, Aquamarine
 -Ranger Tim Holtz Alcohol Pearls: Smolder, Radiant
 -Ranger Tim Holtz Alcohol Blending Solution
 -Stamper's Anonymous Tim Holtz Stamp Set: Creative Blocks 
-Ranger Tim Holtz Distress Archival Ink: Black Soot
 -Ranger Embossing Powder: Clear
 -Ranger Surfaces: Kraft Cardstock
 -Tim Holtz Idea-ology: Black Kraftstock, Metallic Sticker Book, Gilded Accents Remnant Rubs
 -Ranger Tim Holtz Distress Heavystock: White
 -Sizzix Tim Holtz Thinlits: Stacked Tiles, Squares
 -Ranger Tim Holtz Distress Ink:  Gathered Twigs, Lost Shadow 
-Marvy Uchida Deco Color Premium Gold Leafing Pen
 
Thank you so very much for stopping by here. I'll be back again this week with the second made from the LIVE. Until then, I hope your hands get creatively dirty soon!