Hello Everybody and welcome back to my last project for the
Tim Holtz Sizzix Chapter 2 release, but my second in this flower series I am doing. This painting, also made with the
Modern Floristry and Artsy Stems Thinlits, is again inspired by Vincent Van Gogh, his
Vase of Poppies, and I hope to do a few more in the series using these dies and the master as my inspiration. When I told you in my last post that these two sets could be used solely for a year of making flower canvases I really meant it. You can configure the dies so so many ways to create almost any bloom, and use so many substrates to do so. These poppies are made from tissue paper, as I didn't want to use a thicker substrate because poppies are so thin and fragile. The tissue paper worked great. Enjoy this tutorial!
This is Van Gogh's Vase of Poppies that I printed out and used for reference, but I also had several others on my phone that had different lighting for better details, so I used them all while creating mine.
I planned my attack by
numbering the flowers and figuring out which shapes I would need from the two
die sets and jotted down the numbers I would need to die cut. I did the same
with the stems, but I ended up not using the spider web looking stem as it was
a bit too large for the flower I wanted it on.
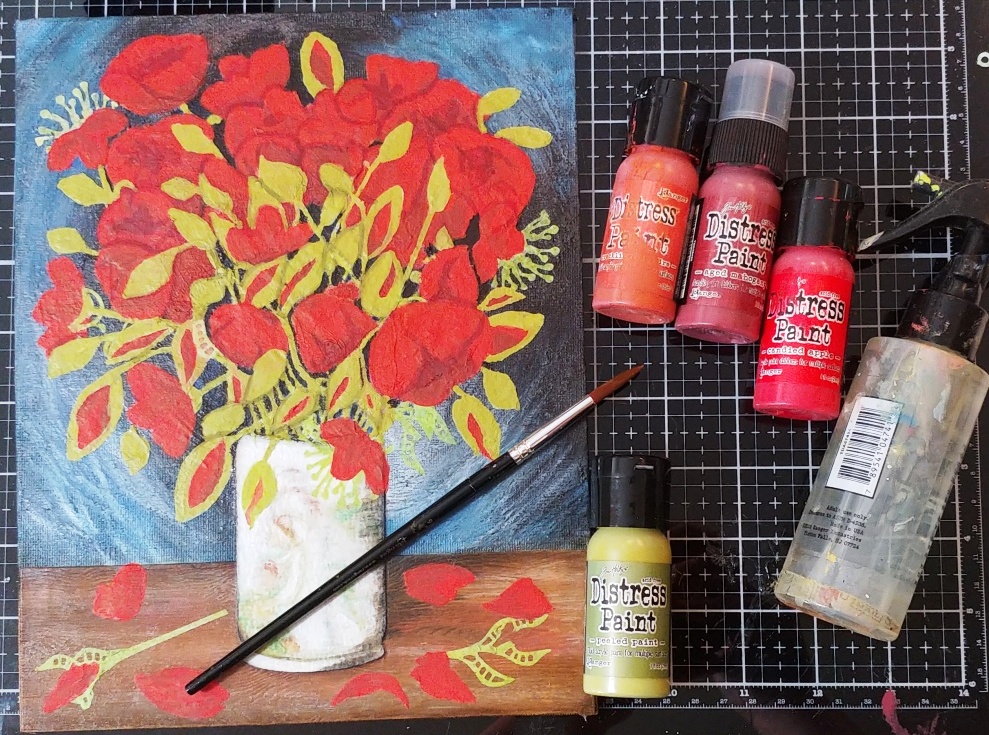
Take an 8x10 inch
Canvas Panel and using your fingers or a palette knife, apply a thin layer of Opaque
Distress Texture Paste from Ranger to the whole canvas up to where the table
part will be (table is 2.5 inches wide) working in an oval shape. Let dry about
15 minutes. Paint over the paste part using Black Soot Distress Paint, making
sure to cover all the white areas and the sides as well, and let dry
completely.
Apply Prize Ribbon and
Weathered Wood Distress Paints to the silicon mat. Pick up the Prize Ribbon
with a medium sized paint brush, and using the photo as your guide paint the
areas where the color will go working in an oval shape. Do the same with the Weathered
Wood, and then lightly mist the canvas with water and blend the colored areas
together slightly. If you cover up too much of the black like I did, add some
in where it needs to go. Let this dry completely.
Trim a piece of Woodgrain
Cardstock (pattern going horizontally) to 2.5 x 8 inches. Add a bit of the
Texture Paste here and there just slightly rubbing over the grain with your
finger to make a few smooth spots here and there. Don't worry about any drying
time with the paste as it's so thin. Paint over the whole piece with Gathered
Twigs Distress Paint, and while wet lightly mist over it with water. Quickly pick
up a bit of Aged Mahogany Distress Paint and paint it in the areas where
flowers will be dropped blending in the two paint colors as the water allows.
Mist more water and paint in a bit of Black Soot where the shadow areas from
the vase will be and along the top and bottom borders. Let this dry a bit.
Ink the edges of the
Woodgrain with Ground Espresso Archival Ink, and then adhere the Woodgrain to
the bottom of the canvas using Crazing Collage Medium (or Matte) for even more
added texture, and brush the medium over the table part and the top canvas part
so that the texture will be all over the canvas. Let dry a few minutes.
Using a small paintbrush, add a few highlight areas on the table using Picket
Fence and rub it in with your finger after to soften and blend. Add any white
line areas to the top wall portion especially the lines on the lower left of
the wall part. Let dry and set aside for now.
Using Watercolor
Cardstock, cut a rectangle piece to 2 x 3.25 inches. Use a Corner Rounder and
cut all four corners. Use scissors and at the top cut a slight downward arch
shape. At the bottom, trim off some of the rounded corners so that the shape is
more rounded. Also, cut a slight indention just above the bottom edge on each
side so that is looks like the vase has a bottom lip.
Paint over the whole vase
with Gathered Twigs Distress Ink, and let dry. Then paint over it with Picket Fence,
use a paper towel to wipe off some white paint from the top right side, and a
little on the bottom of the vase around the left, and let dry. Using the photo
as your guide, paint what you see. I actually see a woman about to pick up a
baby outside in the garden, so I used the paints in the pic to lightly paint
that in. Once painted, let dry, and then use Collage Medium to add the vase to
the canvas, in the center about an inch up from the bottom so it's now on the
table. Don't add any Collage Medium around the inside top lip of the vase, so
you can stick in stems later.
Die cut several of the
large rounded bulb looking flowers using the red tissue. I think I did about 12
but I lost count. Die cut the larger flower shape as well, several times, and cut
a few in half. Then die cut several of the small and small half flowers, all
using the red. Lay them out over the canvas in the shape from the picture, and
figure out which shapes go where and trim any that you think need to be
smaller. You might want to snap a picture of the layout before you start
collaging them. Once it is all laid out and you have your plan, die cut the
stems you think you'll need using green tissue, and die cut several of the
stems with the long stamens on them using both green and black. Die cut several
of the small looking bulb using green tissue, and a several of the leafs using
red and pink. FYI...my green and pink tissue were layers of ombre so some
portions of the tissue were lighter and almost white.

(Don't do the long stamen
parts yet as that part will be next.) Start collaging on the red flowers
starting at the top of the canvas and add in any that are kind of off by
themselves so that you get a better idea of where to put them, using the
Collage Medium and brush. Add the bulbs in (the leaf and small bulb shapes)
cutting and layering them if you need to, adding the green and then the color
to the top of the bulb like the flower is about to open up. Add the stems as
well to the flowers where you can see stems peeking through in the bouquet in
the picture. Keep layering moving down the canvas. If the canvas starts to get
too wet and sticky from the many layers of medium, let it dry a bit and then go
again. It's going to look like a jumbled mess, but as long as you know where the
main flowers are that is all that matters. and knowing where your flowers are
will make the painting part so much easier. Also, the canvas might look a little cloudy in
the middle while the medium is drying, but it will dry clear. This part is
going to take time, so don't rush it and instead enjoy the process.
Cut the three green long
stamens off of the stems, and collage them where they go, one on the upper left
on that half looking flower, one on the middle right side on the half looking
flower, and one on the half flower that is touching the vase. Cut up a few
stems and red parts off of the bulb flowers and collage those on the bottom on
the table so that it looks like they have fallen from the bouquet. Add any
bulbs or stems that you think need to go on after studying the picture, and
finish collaging any elements you want in the bouquet.

You will paint in
layers to define the flowers so there will no details yet. Use a small
paintbrush and Aged Mahogany Distress Paint to outline each flower (the main
poppies) as well as paint in the darker parts of the flower like the centers.
Clean your brush and then use Peeled Paint to outline all the bulbs, stems, and
leaves. Now you will be able to see your painting much clearer. To further
define the main poppies, paint over the areas you didn't paint in with the Aged
Mahogany (the light areas) with Crackling Campfire, and add it to the bulb
parts that you want to show a little bit of petal showing through before the
flower opens. Add Candied Apple Distress Paint to the silicon mat and mist a
little water in it to thin down the paint so it is pretty watery. Paint over
all the main poppies covering up the Aged Mahogany and Crackling Campfire.
Since the paint is watered down it will only tiny the flowers while still
leaving the darker and lighter areas, but now the flowers will be cohesive and
much more defined.

Now come the painting
details. Paint in some Worn Lipstick to some of the bulb middles. Add some
Candied Apple or Crackling Campfire there too if you want. If you see some
details to add to the poppy petals add those with any of the reds. Use Twisted
Citron to add details to the bulbs, stems, and leaves. Use it as well to paint
over the stamen that were added. Use the Twisted Citron to also add to the
middle of the poppies that are open just painting in a circular shape. Add dots
of Black Soot to those middles as well. Use Rustic Wilderness to add any dark
areas to the bulbs, stems, and leaves. Finish up any more details that you
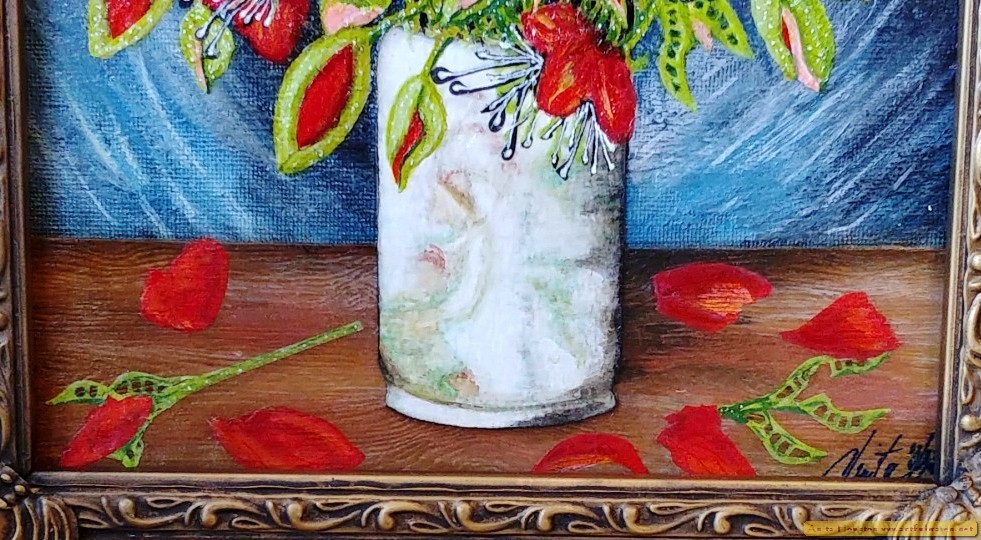
want. Remember, don't try to make it look like it's real and get frustrated. His painting doesn't have hardly any details. It's really sort of fuzzy, so as long you can tell there is a bouquet of poppies, you are finished.

To the open poppies that
you just painted the centers on, adhere white and black tissue stamen to those
centers so it looks like lots of stamen are growing. The sizing will be
exaggerated but I think that adds to the artsy feel. If you don't like the
larger stamen in the middle, you can just paint them in. Once all is dry, use a
white pen to add tiny dots on all the stems and green parts on the bulbs. (Only on one of the close up photos of Van Gogh's Poppies did I see some faint white dots on the stems and bulbs, but real poppies are thorny like that so I decided to really add them in.) Then
add lines and dots at the top of all the stamen just doodling in each stamen. Sign
your painting. You can seal the painting if you want with Spray Fixative or
some sort of acrylic sealer.

Just like my
Sunflower Painting, I did the same thing to the frame that I picked up from
Hobby Lobby during a 50% off week. I painted over it using Black Soot Distress
Paint and wiped off what was not in the recessed areas with a damp paper towel
before it dried, because I did not like the chalking gray color that was on
there. Once dried, I added a bit of Gilded Foundry Wax to the scrolly parts on
the corners of the frames and heat set those. I added the canvas in and used
Glazier Points with a hammer to hold the canvas in place. I also added the wire
holder parts on the back for hanging.
Supplies:
(Glass Mat, Medium Paint
Brush, Water Mister, Ink Blending Tool, Paper Trimmer, Corner Rounder,
Scissors, Die Cut Machine, Die Pick, Small Paint Brush, Detail Paint Brush)
-Ranger Tim Holtz
Distress Texture Paste: Matte
-Ranger Tim Holtz
Distress Paint: Black Soot, Prize Ribbon, Weathered Wood, Gathered Twigs,
Picket Fence, Antique Linen, Cracked Pistachio, Ground Espresso, Aged Mahogany,
Hickory Smoke, Candied Apple, Crackling Campfire, Peeled Paint, Twisted Citron,
Rustic Wilderness, Worn Lipstick
-Ranger Tim Holtz
Distress Woodgrain Cardstock
-Ranger Tim Holtz
Distress Archival Ink: Ground Espresso, Hickory Smoke
-Ranger Tim Holtz
Distress Collage Brush: Small
-Ranger Tim Holtz
Distress Collage Medium: Crazing
-Ranger Tim Holtz
Distress Watercolor Cardstock
-Sizzix Tim Holtz Thinlits (Chapter 2 2022): Modern Floristry,
Artsy Stems
-Sakura
Gelly Roll Pen: White
-Ranger
Tim Holtz Distress Foundry Wax: Gilded
-Red, Green, Pink, Black
Tissue Paper, 8x10 Inch Canvas Panel, Frame, Glazier Points
Once again, I thank you so much for all the lovely comments on the projects I made for this release. My cup runneth over. I'll be back again soon, and I hope your hands get creatively dirty soon!