
Another mouth full with that title, but I like including everything so you know exactly what you are gonna get here. Hi again everyone! I'm back with my second project for the Tim Holtz Sizzix Chapter 2 release, and it's a 4x12 inch cute little canvas featuring the all nine of the Silhouette Birds Thinlits on blossoming almond branches, inspired by Van Gogh this time. He painted so many Springtime canvases showing blooming trees, and I especially love the Almond Blossom painting. The Silhouette Birds fit perfectly on the branches on this little canvas, set against the paint poured sunset sky. I also used the new Brushstroke Flowers 4 leaves on the branches, but since I didn't use the bloom I didn't mention it in the title. LOL! Enjoy the tutorial, and thank you so much for all the love on my last Sizzix make.


Take a 4 x 12 x 3/4 inch
canvas and apply Distress Crackle Paste all over the top and sides lightly
using your finger or a paint brush. Let dry about 15 minutes.

Apply Tarnished Brass
Distress Paint over the top and sides of the canvas. This is to not only give
the canvas a slick surface for the next part, but also adds a hint of metallic
under the paint for the next part. Let dry about 15 minutes.

NOTE: You need a large
space cleared off space for this part, the paint pouring. I used the glass mat. It is going to get
messy, so you might want paper underneath or a throw away pan to gather paint,
but I just cleaned the glass mat after. Gather the Distress Paints you want to
use in the next part and shake them up and have them ready, and think sky
colors like in dawn or sunset. I used Speckled Egg, Salty Ocean, Prize Ribbon,
Villainous Potion, Picket Fence, Crackling Campfire, Saltwater Taffy, Mustard
Seed, and Scattered Straw. Remove the tops of the paint bottles and lightly
pour the paints on the canvas in an orderly way in each corner and center,
working quickly. When all the colors are on the canvas, mist the canvas
liberally with water, and pick up the canvas and start moving it back and forth
and circular like until all the colors start moving around. Think about paint
pouring and how Artists move the paint until it starts to run off the canvas. Distress Paints are very fluid and so this is much easier than using typical Acrylic Paint that a flow treatment has to be added. There is no oils in this technique so you won't get the cells like in typical paint pouring, but you use the same method, and it's a good way to learn the basics of paint pouring. If you have a throw away foil pan or rack that is good to use so the clean up is easier.

Keep turning the canvas
side to side until you like the look and paint has fallen off the sides. I lost
almost all my white so I added a little more Picket Fence and sprayed water
again and poured off the paint. Let the paint dry awhile this time. I let mine
dry over night, and clean up your space.

The paint will dry
dull and matte looking but there will be hints of gold metallic underneath that
you'll be able to see in some spots. To make the whole canvas shiny and add a
bit more texture, cover it with a thin layer of Crackle Accents or another
shiny glass like liquid medium. Let dry about 30 minutes. Use a Tarnished Brass
Distress Crayon to add a golden sheen to the canvas and to bring out the gold
underneath and texture on it as well, by rubbing it on and using your finger
with a little water to spread it over the whole canvas pushing it into all the
little cracks and lines. Use a lightly water misted rag or paper towel to
remove the crayon not pushed in. Your background will be so gorgeous it will be
hard to cover it up. Set the canvas aside for now.

Using Distress Woodgrain
Cardstock, die cut two of each of the branches from the Bigz Branches Die from
Sizzix. Take the new Brushstroke Flowers 4 Thinlits and use only the two leafy
stem portions and die cut several of them using the same cardstock. I die cut
seven of each and had enough.

Using Twisted Citron and
Rustic Wilderness Distress Paint, paint over the leaves on the stems with
either color or half each. I used the lighter brighter green on the smaller
leaves like they are freshly open at Spring time. Paint over the stems and
large branches with Frayed Burlap Distress Paint. Let all these dry.

Once dry, rub the pad
of Frayed Burlap Distress Archival Ink over all the branches and stems to bring
out the texture of the paper and add some shadows and highlights from the ink
over the paint. Dry with a heat tool.

Take the canvas and lay
it horizontally, and then arrange the branches across it, layering them at the
ends so that you have two long branches going across and hanging off the sides,
one branch more towards the top and one towards the bottom. Once you like the
look, take a Collage Brush and Matte Collage Medium and start adhering the
branches on the canvas, brushing over them and adhering whatever hangs over to
the sides of the canvas as well. Trim off the parts that are not touching the
sides of the canvas. Let the branches dry a bit.

Take the stems with
leaves and play with their placement on the branches so you have an even
placement of leaves. Cut some in half to fill up more space. Any where a branch
ends is a good place to add leaves. Once you like the placement, collage these
on using the Collage Medium and brush. Let dry.

Take Twisted Citron
Distress Paint and paint in the leaves that have the middles cut out, and green
dots to the stems that are cut off looking and like there might be buds coming
out. Not shown is Walnut Stain Distress Paint that I painted on the lower edges
of each branch and the lower parts of the branches coming off the main ones to
add a little shadow. Once the paint is dry a few minutes, use a golden or light
orange permanent marker to trace under each branch and branches coming off for
more shadows. Think of the sun shining from the top right of the canvas, so
it's darker underneath the parts not getting sun. Set canvas aside.

Using a half sheet of
Watercolor Cardstock (big enough to die cut all 9 birds), lightly mist the
paper with water. Working quickly, add paintbrush full swipes of Distress Paint
randomly to the whole paper. I used Mustard Seed, Crackling Campfire, Saltwater
Taffy, Prize Ribbon, and Twisted Citron. I wanted a multi colored Finch look to
the birds, so that is why I used so many bright colors. Mist the paper
liberally with water when it's all covered with paint and let the paint move
and marble. Dry. Die cut all nine of the Silhouette Birds Thinlits with the
paper.

Decide on a cohesive
color pattern for the birds, and paint their heads, back and tail, and wings
the same. I went with Prize Ribbon and Mustard Seed for mine. Paint the bellies
of each bird with Picket Fence Distress Paint, and add teardrop shaped eye
masks to the head. Paint the legs, feet, and beaks with Tarnished Brass
Distress Paint. When the eye patches are dry, draw in tiny teardrop shaped eyes
with a black permanent pen. Once the birds were dry, I decided to tone them
down a bit and I covered them with Vintage Collage Medium.
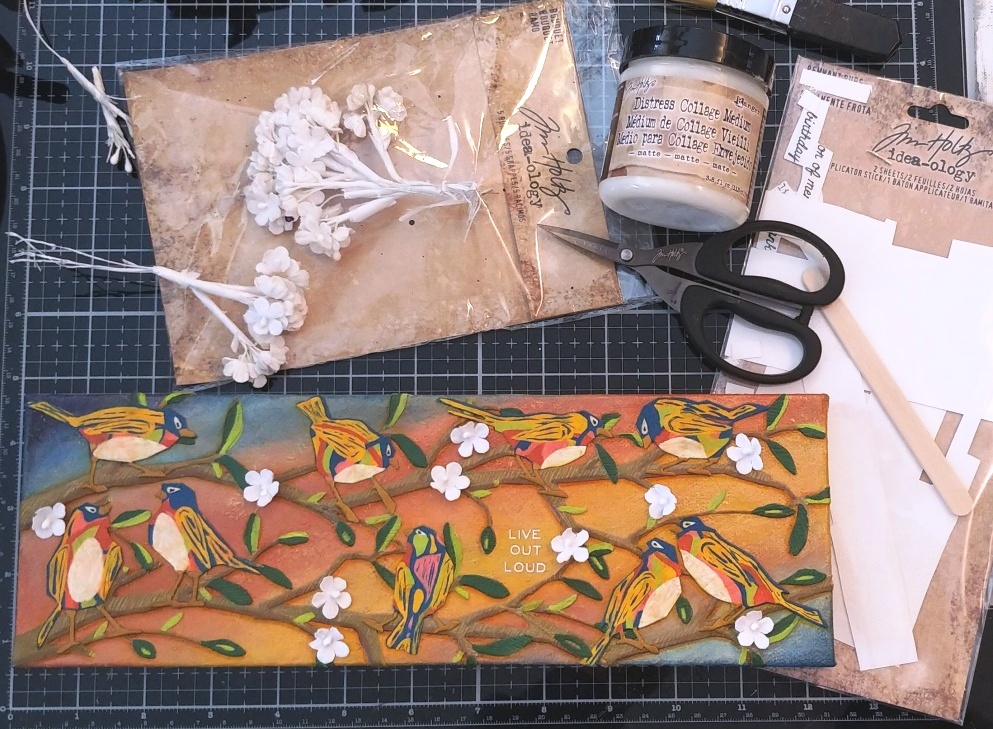
Collage the birds on
the two branches randomly and put some in groups using Matte Collage Medium.
When dry, add a rub on sentiment to a blank sky part. Cut off the flower heads
from the Bouquet flowers, and adhere them on randomly to the bud areas and
anywhere on the small twigs using Matte Collage Medium. If the flowers look a
little too bright in spots, add a little Vintage Collage Medium to the petals
to tone them down. Let dry.


 I included this one to show you how the canvas shines in the sun with the Tarnished Brass Paint and Crayon. It's yummy!
(Glass Mat, Medium Paint Brush, Water
Mister, Heat Tool, Paper Towel, Die Cut Machine, Die Pick, Small Paint Brush,
Scissors, Detail Paint Brush)
-Ranger Tim Holtz Distress Crackle Paste
-Ranger Tim Holtz Distress Paint:
Tarnished Brass, Speckled Egg, Salty Ocean, Prize Ribbon, Villainous Potion,
Picket Fence, Crackling Campfire, Saltwater Taffy, Mustard Seed, Scattered
Straw, Twisted Citron, Rustic Wilderness, Frayed Burlap, Walnut Stain
-Ranger Crackle Accents
-Ranger Tim Holtz Distress Crayon:
Tarnished Brass
-Ranger Tim Holtz Distress Woodgrain
Cardstock
-Sizzix Tim Holtz Bigz Die: Branches
-Sizzix
Tim Holtz Thinlits (Chapter 2 2022): Brushstroke Flowers 4, Silhouette Birds
-Ranger Tim Holtz Distress Archival Ink:
Frayed Burlap
-Ranger Tim Holtz Distress Watercolor
Paper
-Ranger Tim Holtz Distress Collage
Brush: Small
-Ranger Tim Holtz Distress Collage
Medium: Matte or Crackle, Vintage
-Tim Holtz Idea-ology: Bouquet, Tiny Text
Remnant Rubs
-Faber-Castell Pitt Pen: Green Gold,
Black
-4x12 Inch Canvas
I'll be back again soon with a series of two (so far) canvases using the new dies again inspired by Van Gogh. Until next time, I hope your hands get creatively dirty soon!


Just WOW! What a sensational art piece! I appreciate all the steps you took to create this, and so happy you took the time to detail them so well. I have the perfect wall for this happy work of art!
ReplyDeleteVery cheerful!
ReplyDelete#mypile....LOL. I just love this. Love your colorful little chirppies. We have quite a few resident Finches and other small birds and I feed them and fill their birdbath daily. I can go out and yell: chirppy, chirppy, chirppies and within 30 seconds I have chirppies flying in to land on the chain link fence and the shrubs behind the fence, just waiting on me to throw their food out and leave. I watch them from our kitchen window while I am washing dishes. Great entertainment. Nature is just wonderful.
ReplyDeleteWOW that is amazing !!! How do you come up with these awesome ideas
ReplyDeleteAnother stunning piece of art Anita, I love those gorgeous colourful birds and the backdrop you created for them is beautiful! xxx
ReplyDeleteOh, Anita, this is absolutely, positively breathtaking! What a gorgeous work of art - with a vibrant sky that gives the real deal a run for its money.
ReplyDeleteAutumn Zenith 🧡 Witchcrafted Life