
Hello Everyone! Sorry it's been so long. I hope you were able to catch the Tim Holtz Stamper's Anonymous Summer Live on Saturday showing all the news stamps, stencils, and projects made with them. It was a WOW, as always, and so inspiring with so many ideas using the new goods. I had two projects on the Live that I will be posting tutorials for soon, but today I have a project that was not on the Live (an After Party Project), and is for those special men in my life for Father's Day, using the new Eccentric and Bubbles Stamp Sets. These (I made two) were so fun to make, and I found another use for the Sizzix Splat Thinlits. Enjoy!

Die cut the three
smallest parts of the Splat Thinlits from Sizzix, using White Heavystock. Cut a
piece of White Heavystock to 3 x 4.25 inches. Use a paper trimmer to cut each
long side of this, starting from the top left point and angling the paper in
1/2 inch and then cutting so that you are trimming off an oblong triangle
piece. Do the same on the other side, but angling the paper out 1/2 inch and
cutting, so that now you have a cup looking piece. Set the three Splat pieces
aside for now.

Ink over the cup piece
using Mustard Seed Distress Ink and an Ink Blending Tool from Ranger. Add Wild Honey
Distress Ink to some parts creating a slight shadow. Using the Bubbles Stamp on
the stamping block it came with, ink over a portion of it that will fit the
whole cup using Fossilized Amber and Wild Honey Distress Archival Inks, and
stamp over the cup. Ink the sides of the cup using the Fossilized Amber. Mount
the cup onto a piece of acetate using two sided tape, and cut around the
acetate leaving about 1/8 inch border. Lightly mist Distress Resist Spray over
the cup, let dry, and set aside. Remove the nozzle and run under warm water
while pressing to remove any spray so it won't clog up on you next time.

Take the three Splat
pieces and have things ready to heat emboss with Frosted Crystal powder from
Ranger. Since the three pieces are so small it is easier to add the pieces on
top of the stamp rather than stamping over the pieces. Keeping that in mind,
place the large Bubbles stamp on the stamping block it came with and add
Antique Linen Distress Oxide to a portion of it that will fit the three splat
pieces. Take the splat pieces and lay them face down on the stamp and press
with your hand to transform the image. Immediately pour Frosted Crystal powder
over the wet ink and heat emboss while holding the piece with craft tweezers so
you don't burn yourself. Do the same for all three pieces. (Note: You can
always stamp the image on a larger piece of White Heavystock, emboss, and then
die cut later as that is probably easier.)

One at a time, ink over
the pieces with Glacier White Pigment Ink, really pushing the ink into all the
areas, and then immediately pour more Frosted Crystal over and then heat emboss
again.

Apply a bit of Glacier
White Pigment Ink directly to the glass mat as well as a bit of Antique Linen
Distress Oxide (both directly from the pads) and mist a bit of water over it.
Pick up the inks with a paintbrush and flick the inks over the pieces. Dry with
a heat tool so the inks meld in with the Frosted Crystal. Ink the edges lightly
with the Antique Linen. Apply Collage Medium to the back of the medium piece
and adhere to the center of the large piece.

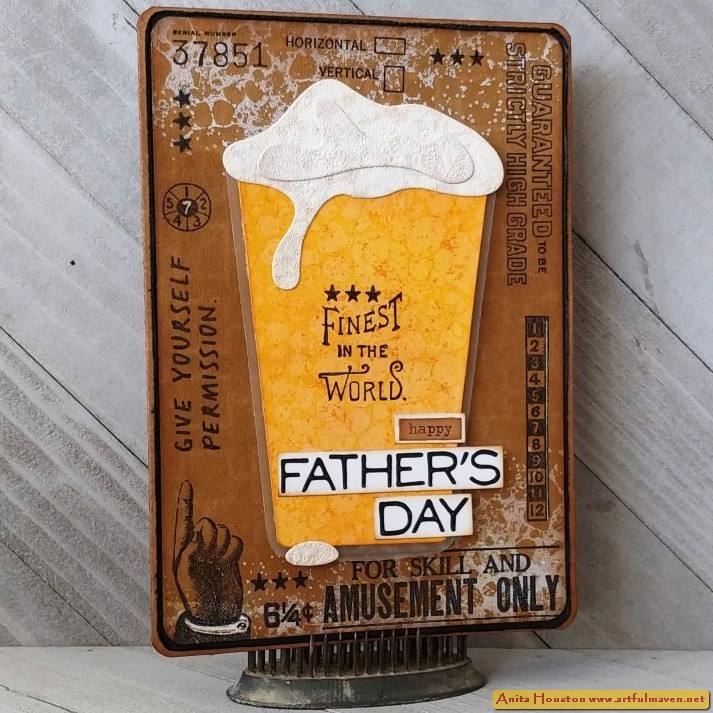
Stamp the 'Finest in the
World' sentiment from the Eccentric Stamp Set to the center of the cup using
Black Soot Archival Ink. Use Collage Medium to adhere the foam to the top
of the glass and the tiny foam piece directly below the longest drip on the
bottom edge of the glass. Set the glass aside for now.

Cut a piece of Kraft
Cardstock to 4.75 x 6.75 inches. Lay the Linked Squares Layering Stencil over
the cardstock and ink over it using Antique Linen Distress Ink (Watermark Ink
will work too.) pushing the ink into the paper, and moving the stencil to continue
the design and covering the paper, creating a light colored but detailed
background. I left a tiny uninked border on my cardstock. Corner round
each of the corners.

Using the Glacier
White Pigment Ink and Bubble Stamp, stamp a portion of the image at the top and
at the bottom of the cardstock. Dry to set the ink.

Select several images
from the Eccentric Stamp Set that will create a border around the cardstock, as
well as a sentiment from the Noteworthy set that the finger will be pointing
to. Place the cardstock into the stamp platform and arrange the stamps around
the border of the card. Close the lid to secure the stamps, and then stamp them
using Black Soot Archival Ink.
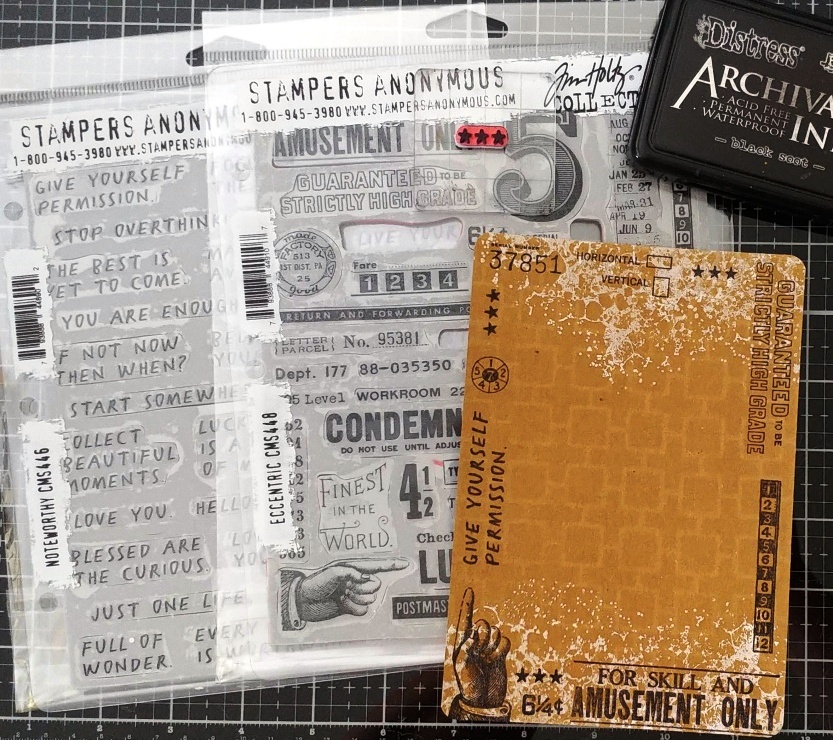
I forgot to show the
Noteworthy set in the last picture so I placed it in this picture. Take the
star trio image and add it onto a small stamping block, and stamp the stars in
any open areas along the border using Black
Soot.

Ink the edges of the
cardstock with Gathered Twigs Distress Ink. Use a white pen to color in some of
the parts of the images on the border, like the line on the number line, the 7
on the round number wheel, and the shirt on the pointing hand. Cut a piece of
Black Cardstock to 4 7/8 x 6 7/8 inches, and round the corners. Mount the kraft
cardstock onto the black using two sided tape. Use a Distress Tool to tatter up
the edges of the black cardstock. Cut and fold a kraft card base to 5 x 7 inches, round the corners, and ink the edges in Gathered Twigs. Mount the card
front onto the card base.

Use the words 'Father's
Day' from the Thin Sentiment Words Thinlits and die cut them using Black
Cardstock that has two sided tape on the back. (The pic shows the 'happy' as
well, but I did not end up using it.) Pop out the letters and mount them onto
White Heavystock. The reason I did this instead of just using the letters as they
were is because I was limited on space and needed the letters to be squeezed
tightly together to make the sentiment work, and I could not fit the 'happy'
in. I will save it and the outline die piece for another Father's Day card. Cut
around the White Heavystock and lightly ink around it using Gathered Twigs.
Mount the words onto the bottom of the glass so that they hang off some. Add
the 'happy' (ink the edges) from the Chit Chat Stickers to more White
Heavystock, and add it above the 'father's day'. Add foam tape to the back of
the glass, and mount it to the front center of the card.


(Paper Trimmer, Scissors, Ink Blending
Tool, Glass Mat, Die Cut Machine, Two Sided Tape, Craft Tweezers, Heat Tool,
Water Mister, Small Paint Brush, Stamp Platform, Corner Rounder, Small Stamping
Block, Distress Tool, Foam Tape)
-Ranger Tim Holtz Distress Heavystock:
White
-Sizzix Tim Holtz Thinlits: Splat, Thin
Sentiment Words
-Ranger Tim Holtz Distress Ink: Mustard
Seed, Wild Honey, Antique Linen, Gathered Twigs
-Stamper's
Anonymous Tim Holtz Stamp Set: Bubbles, Eccentric, Noteworthy
-Ranger Tim Holtz Archival Ink:
Fossilized Amber, Wild Honey, Black Soot
-Ranger Tim Holtz Distress Resist Spray
-Ranger Tim Holtz Distress Oxide:
Antique Linen
-Ranger Tim Holtz Distress Frosted
Crystal
-Ranger Pigment Ink Pad: Glacier White
-Ranger Tim Holtz Distress Collage
Medium: Matte
-Ranger Surfaces: Kraft Cardstock, Black
Cardstock
-Stamper's
Anonymous Tim Holtz Layering Stencil: Linked Squares
-Tim Holtz Idea-ology: Seasonal Chit
Chat Stickers
-Acetate, Sakura Gelly Roll
Pen: White

I just love that Bubbles Stamp...so many uses. Thank you so much for stopping by everyone. I'll be back with more stamp projects this week. Until then, I hope your hands get creatively dirty soon!


Great card and very creative/resourseful....What Father or FIL wouldn't love to receive this on Father's Day.....
ReplyDeleteWonderful card!
ReplyDeleteAwesome card!!!
ReplyDeleteSo cute, it reminds me of one I saw 50 years ago!
ReplyDelete