
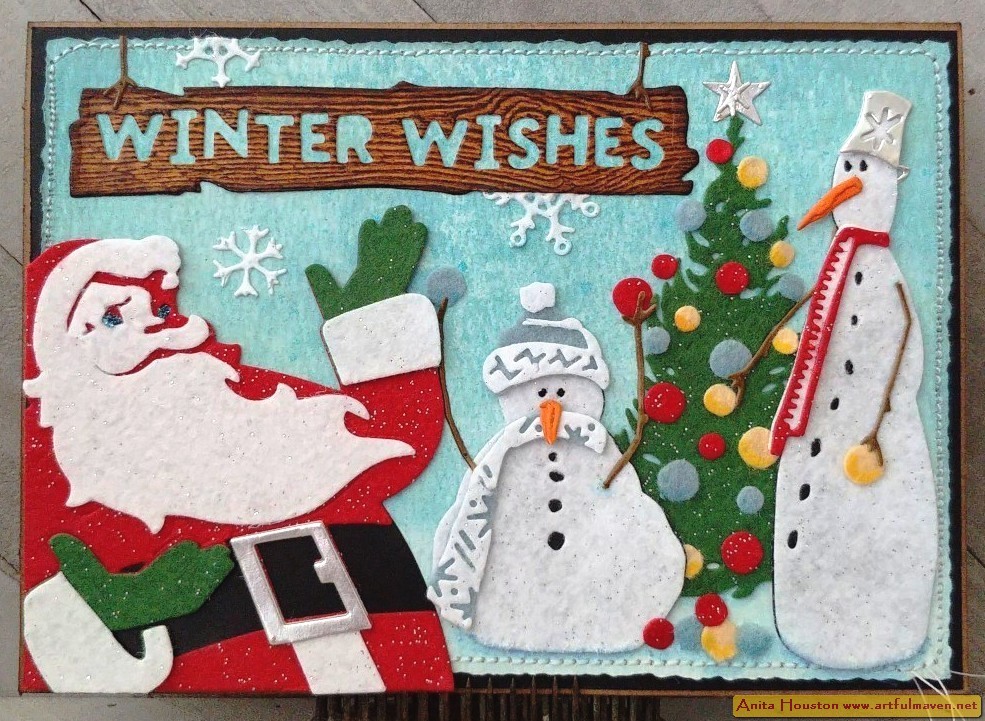
Hello again this week Everyone! Here is the first of two projects that were on the Tim Holtz Sizzix Christmas Live last week. This card, using lots of felt, is made with the new Retro Santa and Twig and Stump Thinlits, and was so SUPER FUN to make! I kept talking to little characters as they were coming together! LOL! Felt makes this card super fun to touch as well. Enjoy!


Add two sided tape to the
back of Black Cardstock, and red, green, and white glittered felt. Die cut the
base pieces of Santa from Retro Santa Thinlits and the two Snowmen from Twig
and Stump using Black Cardstock. Die cut the second Santa piece using red
glittered felt as well as the long scarf and ornaments. Die cut the tree and
Santa's glove parts with the green glittered felt. Die cut the Snowmen, their
hat parts, the shorter scarf, the belt, and the snowflakes with the white
glittered felt. Then die cut the long scarf again with the white glitter as
well as Santa's glove parts.

Add two sided tape to
the back of silver Metallic Kraftstock, and die cut Santa's belt part, the pail
hat, and the star. Adhere the red felt Santa part to the black, and then the
green glove parts whole. Cut the cuffs from the white felt and adhere those on
over the green matching part, and discard the white glove part or save for
another time. Adhere Santa's beard part on. Cut the buckle off the white felt
and discard, and then adhere the fur part on where it goes. Cut the silver
buckle part off and adhere where it goes and discard the fur part. Santa is
complete so set him aside for now.

Add two sided tape to the
back of light blue and yellow felt. Die cut ornaments from each, and the short
scarf part and beanie hat again with the blue felt. Interchange the white felt
parts of both scarves with the red and blue felts. Save the other scarves for
another time as you will have four once interchanged. Adhere the white felt
Snowmen to the black bases. Add the scarves. Assemble the hat parts as well and
add those on. The handle of the pail will need to go the opposite way to look
correct. Remove the snowflake inside the pail part on the silver Kraftstock and
add it to the star for the tree. Add two sided tape to orange Kraftstock, and
die cut the noses, and adhere those on. Add two sided tape to the back of Kraft
Cardstock and die cut both sets of arms but leave those in the die for now. Leave
the ornaments, tree, and star off to the side as well.

Mist a piece of
Woodgrain Cardstock with Brushed Corduroy Distress Spray Stain from Ranger.
Lightly mist a little water on as well, and let sit a few minutes and then blot
off with a paper towel. Dry. Add two sided tape to the back. Rub the pad of
Walnut Stain Distress Ink over the raised parts of the Woodgrain and dry. Die
cut with both parts of the sign. Ink the edges with Walnut Stain and remove the
letters and save those for another project. Set this aside for now.

Using a Deckle Trimmer
and Watercolor Cardstock, cut it to 4.75 x 6.75 inches. Ink over it with
Speckled Egg Distress Oxide with an Ink Blending Tool, but leave the bottom
inch portion (horizontal part) more or less uninked. Mist over the paper with
water lightly then mist Tumbled Glass Distress Spray Stain over lightly. Dry
and blot while drying.

Ink over that bottom inch
portion with Picket Fence Distress Ink and an Ink Blending Tool heavily.
Lightly mist water over, and dry.

Ink around the edge of
the watercolor with Speckled Egg Distress Oxide, and then lightly mist Snow
Flurries Mica Stain over. Dry, and then stitch around the border with white
thread. Fold a Kraft Cardstock base to 5 x 7 inches, and mount black cardstock
to the front of this cut slightly smaller (4 7/8 x 6 7/8 inches) with two sided
tape. Adhere the watercolor paper on top with two sided tape. Adhere sign to
the top left, and add snowman arms to look like they are mounted to the top of
the sign to hold it. Add tree and star, then the tall Snowman to the right with
his arms, and short Snowman to the left of the tree with his arms. Add Santa.
Add snowflakes, and cut a couple in half to give a behind the sign look and
around the border. Add ornaments to tree and Snowman's hands. Add Ice Blue
Stickles to Santa's eyes, and Black Diamond Stickles to the Snowmen eyes. Add
slight shadow under the Snowmen and on the bottom of the ornaments with
markers.


(Scissors, Two Sided Tape, Die Cut
Machine, Die Pick, Water Mister, Ink Blending Tools, Deckle Trimmer, Paper
Trimmer)
-Ranger Surfaces: Black Cardstock, Kraft
Cardstock
-White, Green, and Red Glittered Felt
-Sizzix
Tim Holtz Thinlits (Christmas 2022): Retro Santa, Twig and Stump
-Tim Holtz Idea-ology: Metallic Colors
Kraftstock, Classic Kraftstock
-Sizzix Felt Sheets: Bold Colors
-Ranger Tim Holtz Distress Woodgrain
Cardstock
-Ranger Tim Holtz Distress Spray Stain: Brushed
Corduroy, Tumbled Glass
-Ranger Tim Holtz Distress Ink: Walnut
Stain, Picket Fence
-Ranger Tim Holtz Distress Watercolor
Cardstock
-Ranger Tim Holtz Distress Oxide Ink: Speckled
Egg
-Ranger Tim Holtz Distress Mica Stain:
Snow Flurries
-Ranger Stickles: Ice Blue, Black
Diamond
-Blue, Red, Yellow Marker
Thank you so very much for stopping by today. I hope I've given you some inspiration for your Christmas makes. I'll be back again soon. Until then, I hope your hands get creatively dirty soon!


Twig and Stump are just the cutest Snowmen ever!!! My fav pick from the Christmas release. I have to try felt. I love that you have so many options of them facing different directions and all the accessories make this set a valuable purchase.
ReplyDelete