
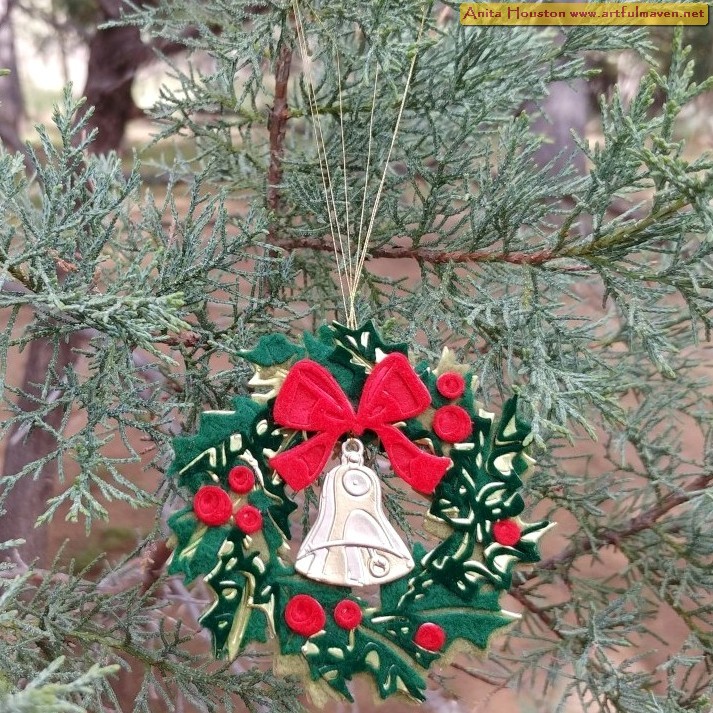
Happy October everyone! Time is flying by so fast, and now you'll start seeing Christmas projects here. Tim Holtz just launched his Christmas release from Sizzix...I hope you were able to catch the Live on Saturday. If not, check out the replay. I made two projects for the Live that I'll be showing in the next two weeks, but today I have a felt and velvet ornament made with the new Colorize Yuletide that was not on the Live. I adore this set of dies, and even though I made a few mistakes in the making and debated whether to show it, the mistakes did not take away from the beauty of the design of the dies, and this ornament really looks so regal...the pictures do not do it justice. And...you need very little supplies (felt and velvet) to make this and it comes together quickly, which makes for great assembly line making for gifts, so that is another reason I decided to show it. Hope you like it as much as I do, despite. Enjoy!

Take the lighter gold and
darker gold Metallic Classics Kraftstock, and cut about 2x2 inches pieces from
each. Add two sided tape to the back of each. Take the four bell die pieces
from the Colorize Yuletide Thinlits, and die cut the base piece 1 and piece 3
with the darker gold. Die cut the 2 and 4 pieces with the lighter gold.
Assemble the bell as shown on the picture. Take the darker gold scrap piece and flip
it over to the back so you can see the tape backing, and die cut the base piece
1 again but on the tape side. Remove the tape pieces from the bell and the
backing, and stick them together so that now the back of the bell is gold. Set
this aside.
For the three ribbon and
berry die pieces, cut a piece of red Metallic Kraftstock, red felt, and red
velvet each about 2x2 inches. Add two sided tape to the back of each. Die cut
the base ribbon and base berry with the red metallic, the ribbon 2 and berry 2
with the felt, and ribbon 3 and berry 3 with the velvet. Assemble the ribbon
and the berries, and set them aside for now. (I kept the berries inside the die
cut negative for safe keeping until I was ready to stick them on.)

(Note: My mistake was adding two sided tape to these felt pieces, as they are so detailed and delicate that when I peeled away the backing to stick them down, I kept having to peel the pieces from each other and things were sticking to everything I didn't want them to.) From the Metallic Colors
Kraftstock, take the yellow green piece and cut two pieces about 3x3 inches
each. Cut about a 4x5 inch piece from the sage green felt. Cut a 3x3 inch piece
from the dark green felt. (Note: Having the two sided tape on the back of the
detailed felt pieces was a little difficult assembling on the wreath as I kept
making it stick together, so if that might bother you, skip the two sided tape
and use Collage Medium on the felt.) Cut a 2x3 piece from the dark green
velvet. Add two sided tape to the back of each. Take the 5 wreath die cut
thinlits out. Die cut the base 1 piece from one of the metallic pieces, then
flip the other over and die cut the same piece again but on the tape side, and
set that piece aside. Die cut the 2 and 4 pieces from the sage felt. Die cut
the 3 on the dark felt. Die cut the 5 on the dark green velvet. Using the
picture on the die envelope and really just following the shape of the wreath
and going in number order, assemble the wreath.

Take gold metallic
thread and wrap it around your hand loosely three times so that when you remove
it you have three loops about five inches long. Tie a knot on the two end
pieces of thread and snip the ends. Keeping the loops together and folded in on
themselves so you have six strands, push one of the ends through the loop on
the bell about an inch. Separate the strands in half (3 and 3) and pull the
other end of the threads between the other two and pull lightly until the bell
and secure. Confusing, but just think about how you tie string onto a tag
hole...same thing here. Remove the backing tape on the assembled wreath and lay
it face down. Turn the bell to the back and then lay the bell in the middle of
the wreath with the bottom of the bell pushed through to the face of the wreath
and with the loop of the bell showing (when the wreath is face up) and push the
threads into the sticky part of the tape gathered up in a line, with the loops
of the string straight up. Remove the backing on the other base wreath and
match it up to the assembled wreath and adhere to the back of the assembled
wreath so that it has a nice finished look on the back. Remove the backing on
the bow and adhere it over the loop of the bell. Adhere the berries to the
wreath as well.


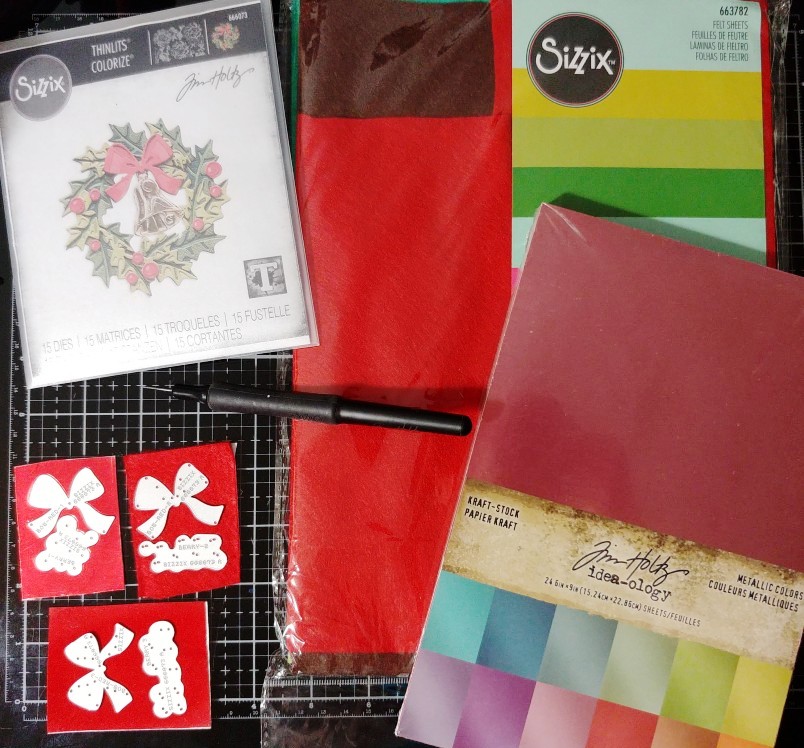
Supplies:
(Scissors, Two Sided Tape, Die Cut
Machine, Die Pick)
-Sizzix
Tim Holtz Thinlits (Christmas 2022): Colorize Yuletide
-Tim Holtz Idea-ology: Metallic Colors Kraftstock,
Metallic Classics Kraftstock
-Sizzix Felt Sheets: Festive Colors
-Red Velvet, Dark Green
Velvet, Gold Metallic Thread
Thank you for all the comments on the Live, and of course for stopping by here today! I'll be back soon. Until then, I hope your hands get creatively dirty soon!


I love this ornament and the colors you choose just made it pop. This detail is magical. I loved so many things about this release but I knew I could only buy 1 so Twig and Stump won as I am snowman crazy. I really enjoy all your postings thanks for sharing the details and amazing pics.
ReplyDelete