
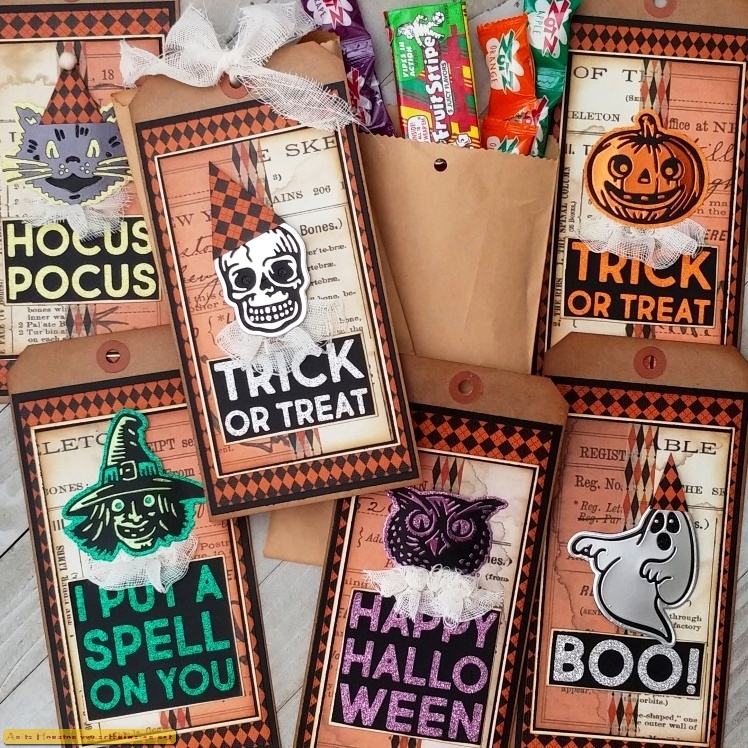
I'm back and with my last project from the Tim Holtz Sizzix Halloween Live...these fun Bold Text Halloween and Retro Halloween Treat Bag Gift Tags, for those special Trick-or-Treaters. The Retro Halloween images are so easy and fast to put together, and you can use so many substrates with them and interchange the pieces with different ones...so cool! I was lucky to find some (Although not enough so all the bags are not filled yet in the photos, but I'll be looking for more.) retro candy to fill the sacks with to match the retro feel of the tags...love that those are still being made, especially the Razzles. Enjoy!


When die cutting the Retro
Halloween and Bold Text Halloween pieces, you will need glitter paper and
Metallic Kraftstock in the same color family, as well as black cardstock, all
with two sided tape on the back and ready to go...with the exception of the
ghost and skull (they need black glitter paper as well as silver glitter paper
and silver Metallic Kraftstock) and cat (yellow glitter paper but with black
Metallic Kraftstock). All the faces will need two solid base pieces in glitter,
one face in metallic, and one face in black cardstock. You will replace the
inside pieces of black cardstock with the inside pieces of Metallic Kraftstock,
then adhere each one to a glitter base with the glitter showing through to the
eyes and anywhere else you think (See the next picture for some detail on
this.). On the text of each one, die cut the words with black cardstock, remove
the letters and save for later, and adhere the words to a glitter paper and
trim around the border (see pic 3 for better details). Then you will decide
which face to use on the tags and save the other for another project or make
more tags with them.

Here is a better look
at what I talked about above. There are two base glitter pieces for each face
(one in metallic and one in black), and you swap out the middle pieces on the
faces with the other color, leaving the eyes open to see the glitter when you
adhere the face on. You can also cut the two die pieces together to get a thin
border trim to use on one, which is a cool thing to be able to do and that
makes it like there are three dies per character instead of two. The hard part
is deciding which face to use on the tag, or you can make two tags and use
both.

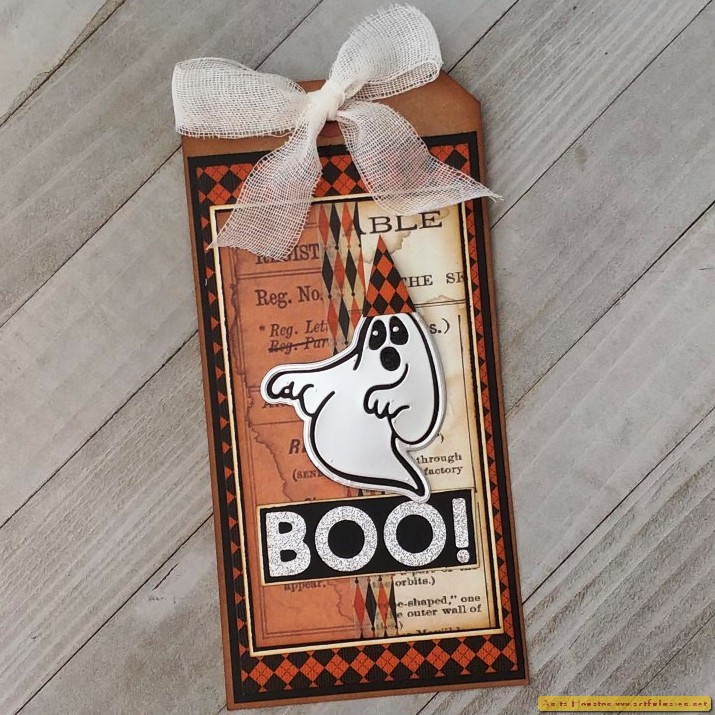
Here is a little detail
on the sentiment. Die cut using Black Cardstock with two sided tape on back,
push out the letters and use for another time, then adhere to a glitter paper
and trim around. Adhere this onto Mixed Media Cardstock or Manila and trim
around just leaving a tiny border, and ink the border with Gathered Twigs
Distress Ink.

To make the tags, pick
two Halloween Backdrops to paper piece together. Cut each into six each pieces,
and then join two together (one piece from sheet) with a piece of Halloween
Design Tape. Ink the edges with Gathered Twigs Distress Ink, and then mount
onto Black Cardstock, just leaving a very thin edge. Mount this onto Mixed
Media Cardstock or Manila, and cut and ink the edges. Mount this onto a
patterned Halloween paper (I used Halloween Kraftstock...love this stash!) and
leave a wider border, and ink. Then mount onto black and finally onto a #10
Kraft Tag, and ink the edges. Lots of layers, but it really makes the images
pop.

To dress up the
characters, add hats cut from patterned Halloween paper, and even add a pom pom
on top with Collage Medium. To make collars, cut a piece of Mummy Cloth about 5
inches long, and pull a few threads from each side opposite each other to make
it ruffle up, and gently pull and slide the cloth at the same time until you
get the ruffled look you want. Tie the threads into a knot behind the collar,
and add two sided tape behind. Remove the two sided tape backing from the
character and stick the collar in place where you want it and then adhere the
character to the tag directly or add some foam tape behind to prop up the
middle of the face and stick the sides of the face down like I did. Adhere the
sentiment below. Add whatever else you want to dress up your character.

Take large Kraft treat
sacks that are slightly larger than the #10 tag, and ink the edges in Gathered
Twigs. Fill the bags with vintage retro looking candy, and fold the top about
3/4 of an inch. Punch a hole in the middle of the fold to match up with the
hole on the tag, and secure the tag on top of the sack with a Mummy Cloth bow
to give to your special Trick-or-Treaters or as party favors. SO STINKING CUTE!


 Supplies:
 (Scissors, Two Sided Tape, Paper
Trimmer, Die Cut Machine, Die Pick, Ink Blending Tool, Foam Tape, Hole Punch)
-Sizzix
Tim Holtz Thinlits (Halloween 2022): Retro Halloween, Bold Text Halloween
-Tim Holtz Idea-ology: Metallic Colors
Kraftstock, Metallic Classics Kraftstock, Halloween Backdrops, Halloween Design
Tape, Halloween Kraftstock, Halloween Trimmings
-Ranger Surfaces: Black Cardstock, Mixed
Media Cardstock, #10 Kraft Tags
-American Crafts Glitter Paper Pad
-Ranger Tim Holtz Distress Ink: Gathered
Twigs
-Ranger Tim Holtz Distress Collage
Medium: Matte
-4.75 x 9.25 Inch Kraft
Gift Sacks, Tiny Pom Poms
More Halloween goodness is on the way, so stay tuned! Thank you so much for coming on over. Until next time, I hope your hands get creatively dirty soon!


These are sooooo Stinkin' CUTE!!!!!
ReplyDeleteLoving all these fun Halloween tags. So beautifully made. I wish I had some use for these so I could make some too. Now I only admire yours.
ReplyDeleteSo cute, I was having trouble following you on what to cut in what substrate...until, I scrolled on down and zoomed in on the pictures and THEN I could see the different pieces/colors and I am sure once you start cutting....it will be hard to stop with the combinations....just one more....LOL.
ReplyDeleteHello from Switzerland, j'adore vos créations c'est Magnifique. Amitiés Rachel (r_me@windowslive.com)
ReplyDeleteNice post thank you Brooke
ReplyDelete