
It's not quite Autumn yet, but it's coming soon and it's my favorite season and time of the year. Today, I have one of two of the makes from the Tim Holtz Sizzix Halloween Live, and I am in love with how these four cards came out as I was just experimenting really, because I had not used the Alcohol Ink surfaces like this before, and never have embossed them. Boy oh boy was the Acorns 3D Texture Fade the right one to start with! And..it pairs so wonderful with the Pumpkin Duo. The experiment yielded four great cards, so I decided to show you all of them and the differences with them. Enjoy!

I ran a piece of
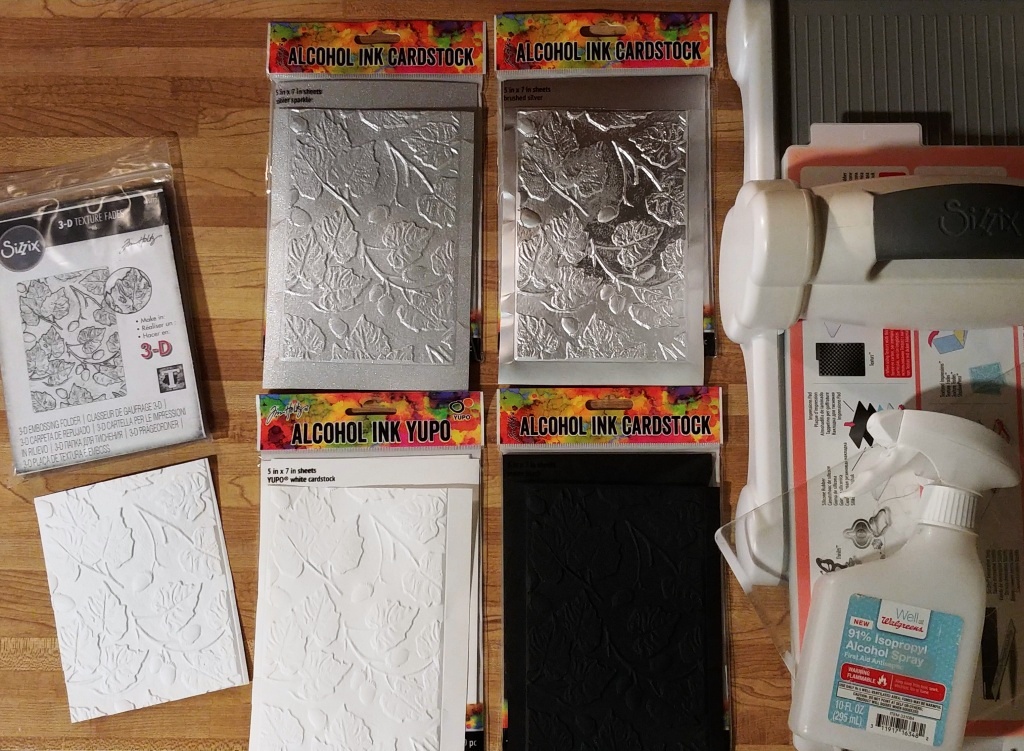
regular white cardstock (lightly misted with water) through the Acorns 3D
Texture Fade just to see all the little intricacies and details of the
Fade...so so good...to have for comparison and as a sample, plus I can use it
another time (far lower left in the photo). Because I couldn't decide which
Alcohol Ink Cardstock from Ranger to use (or if dry embossing was even going to work), I
just decided to use all four and see the differences after to decide which one
I wanted for my card. I wasn't sure what was the best way to dry emboss these
(especially the Yupo) as these paper are different from regular cardstock, but
on the Yupo (made from plastic), I lightly misted both sides with 91% Rubbing
Alcohol, placed it inside the Acorns 3D Texture Fade, and then ran it through
the machine in and out and in and out again, so a total of four times. The
image came out pretty good (lower left)...not as good as regular cardstock, but
still pretty sharp. I decided to see what it would be like to not use the
alcohol, so I did another Yupo piece (not shown) and it did not come out as
good as the alcohol misted one, plus it buckled the paper a bunch more than the
other, so I think the alcohol helped. Then I did the Silver Sparkle next (upper
left) not misting it at all, and it came out SUPER!. Then I did the Brushed
Silver next (upper right), with no misting, and it came out EXCEPTIONAL, even
better than the white sample cardstock. I guess because it's metallic foil like
so it molded so so well. Then I did the Matte Black, the one I was really
worried about because it's thicker and almost suede like. I misted it with
alcohol on both sides and ran it through same as the others, and then bam it
was FABULOUS! Not as good as the Brushed Silver but close. I decided then that
I was going to do four cards using each of these and using all the same things
and colors to see the differences later. Why not? So, you can decide which to
use or even do all four and do as I did or find an even better way to dry
emboss on these surfaces. Don't trim off the unembossed sides yet, as it's
easier to hold to add your color next, and you can trim after.

I wanted each to have a
blue sky background (they are in the same order as before), so I added
Aquamarine and Aqua Alcohol Inks to the felt on an Alcohol Ink Applicator with
a little Blending Solution, and pounced it on the Yupo and silver papers. You
can't do that on the black though as it won't show up, so I pounced on Snow Cap
Mixative first and covered all the black, let that dry, and then added the
blues. It worked great, subtle, but I liked it. So that is the only difference
of the things I did for each paper, only adding the Snow Cap to the black
first. I lightly misted a piece of paper towel with 91% rubbing alcohol, and
then rubbed over each leaf and acorn to remove some of the blue for easier
color application later. It worked good on all of the papers, especially the
Yupo and Brushed Silver. The other two worked okay to remove the blue, but some
of the blue soaked in, so these two are more absorbent than the Yupo and
Brushed Silver.

I removed the silicon mat
from the Glass Mat to use the grid as my palette for Alcohol Inks...works so
good. I started with Ember, a color I haven't used yet. I am in love with this
color, yum! I added a little Blending Solution to extend the open time, and
painted on the color here and there on the leaves of each paper. Do you see how
different the color looks on each paper...so so good.

I used Moss next,
adding it here and there on the leaves and adding it on all the stems and
branches as well. Then I added Dijon next, filling in whatever was not colored
on the leaves. I decided the leaves looked a little blotchy with the three
colors, and needed balancing, so I used Honeycomb to paint on top of each leaf.
On the Yupo and Brushed Silver the Honeycomb moved the other colors a little,
but on the other two the Honeycomb stayed on top and balanced it all out like I
wanted. Just when I pick a favorite, they change and then I have a new
favorite. Typical of me! They still look so different even though the colors
are the same, especially the black.

I painted the tops of
the acorns with Sandal and the bottoms with Caramel. Then I used Moss again to
paint over all the veins in the leaves and the stems.

I
trimmed the umembossed borders off of each one. I shook up the new Harvest Moon
Mica Stain, and going outside, I misted it in the air and ran the papers
through the mist and got the finest of dots all over each one...so good and
warm. Then I set these aside.

I added two sided tape to
the back of another sheet of each of the cardstocks. I die cut all the Pumpkin
Duo pieces on each one keeping them in a layering order and the base and stem
pieces on the right side...a perfect fit for all of them. I was surprised as
well that the Thinlits cut through the Yupo and Black, really nice, but I did
the same as before, in and out and in and out, so that is four passes. I
punched out the base and stem pieces and then left the pumpkin body pieces
inside the paper for easier coloring.

Again, I repeated what
I did before on the Pumpkin Duo pieces as I did the 3D Acorns, using the same
of everything and same process except adding the Snow Cap to the black. I
started with the base pieces and stems of the pumpkins, pouncing on Limeade to
all the pieces, and then adding Moss onto the felt and pouncing on only on the
stems that will go on the top.

For the bodies of
pumpkins (and because my pieces were in layering order) I started with the
lightest color on the felt for the smallest (also very top pieces) pieces using
Butterscotch. Then using the same felt, I added Sunset Orange and pounced it on
the next size, then added my fav, Ember, and pounced it on the next set, and
finally added Sienna (still the same felt) and pounced it on the largest
pieces. I love the color variegation on these. Then I removed the backing on
the pieces and assembled the pumpkins.

I cut and folded a Kraft
Cardstock base card to 5x7 inches for each one, and inked the edges with Walnut
Stain Distress Ink. I mounted a gorgeous blue Metallic Kraftstock to the top
cut slightly smaller using two sided tape. Back to the Acorn, I inked the edges
of paper with Walnut Stain Distress Ink, and then mounted them to Mixed Media
Heavystock cut slightly bigger. Then I mounted this on top of the blue Metallic
with two sided tape, deciding to turn two horizontal and two vertical for a
little difference. I decided the tops of the acorns needed something to help
them stand out, so I poured a tiny bit of Harvest Moon Mica Stain out and
painted the tops of each acorn with a paintbrush.

I selected sentiments
from kraft Chit Chat Stickers and mounted them
on Mixed Media Heavystock and cut a fishtail at the end of each. I cut
two strips of Mummy Cloth, both five inches long, gathered one up slightly and
adhered it to the card front below where the pumpkins would sit with two sided
tape, for each card. I added the pumpkin (the one that will be sitting furthest
behind) on the strip of Mummy Clothe, and then added the other strip on top
slightly gathered. I added the sentiment to the side of the other pumpkin and
then adhered them on with foam tape so it would be slightly forward and
overlapping.
NOTE: I
decided I love each one, and although I was not initially happy with the Yupo
one probably the most, I do love the end result. Yupo allows the Alcohol Ink to
move around, which is great, but I wanted it to stay still this time.
Ultimately though, I love the artsy look of the leaves on the Yupo. Probably my
fav though (at the moment) is a tie between the Brushed Silver and the
Black...they are most like me...dark with a little color. LOL! If you haven't
played with these substrates yet, I really suggest you do...so much fun and
exciting at the same time.
Acorns and Pumpkin Duo Autumn Alcohol Ink Card on White Yupo


Acorns and Pumpkin Duo Autumn Alcohol Ink Card on Matte Black


Acorns and Pumpkin Duo Autumn Alcohol Ink Card on Metallic Brushed Silver


Acorns and Pumpkin Duo Autumn Alcohol Ink Card on Silver Sparkle


Supplies:
(Die Cut Machine, 91% Rubbing Alcohol In
Sprayer, Scissors, Two Sided Tape, Alcohol Ink Applicator with Felt, Small
Paint Brush, Glass Mat, Paper Towel, Paper Trimmer, Ink Blending Tool, Foam
Tape)
-Ranger Tim Holtz Alcohol Ink Cardstock:
White Yupo, Brushed Silver, Silver Sparkle, Matte Black
-Sizzix
Tim Holtz 3D Texture Fade (Halloween 2022): Acorns
-Ranger Tim Holtz Alcohol Blending
Solution
-Ranger Tim Holtz Alcohol Ink:
Aquamarine, Aqua, Ember, Moss, Dijon, Honeycomb, Sandal, Caramel, Limeade,
Butterscotch, Sunset Orange, Sienna
-Ranger Tim Holtz Alcohol Ink Mixative:
Snow Cap
-Ranger Tim Holtz Distress Mica Stain:
Harvest Moon
-Sizzix
Tim Holtz Thinlits (Halloween 2022): Colorize Pumpkin Duo
-Tim Holtz Idea-ology: Metallic Classics
Kraftstock, Metallic Jewels Kraftstock, Halloween Trimmings, Seasonal Chit Chat
Stickers, Chit Chat Stickers
-Ranger Surfaces: Mixed Media Cardstock,
Kraft Cardstock
-Ranger Tim Holtz Distress
Ink: Walnut Stain
-Ranger Tim Holtz Distress
Collage Medium: Matte
Making these cards brought memories of Ranger U back to my mind...the experimenting and playing with mediums...I've missed doing that, so you will probably see more of this. Thank you so much for stopping by. I'll be back soon with my last make for the Live. I hope your hands get creatively dirty soon!


Totally aweso.e cards, with very cool backgrounds!
ReplyDeleteLove the side-by-side comparison...my favs are the Brushed Silver and Silver Sparkle....but in the end the Brushed Silver is the winner.
ReplyDelete