
Hello Everyone and welcome to the first of two Halloween makes from the Tim Holtz Stamper's Anonymous Live. My other one will be next Friday, and today I have a watercolored duo from The Scarecrow and Unraveled Stamp Sets. The images are so super fun to color in, and I took inspiration for the colors from the marbled background from the Halloween Backdrops...love those. Enjoy!!!


Cut two pieces of Watercolor
Paper to 3.75 x 5 inches for both card fronts. Gather the stamp sets and plan out your cards.
Place the paper (rougher side up) into the platform and the Scarecrow at the
bottom center, and close the lid to secure. Stamp the Scarecrow using Black
Soot Distress Archival Ink from Ranger. You will need to stamp a few times for a nice crisp
look on the Watercolor Paper. Leave the Scarecrow in place, and remove the paper, and then place a sticky note in.
Without reinking, stamp the Scarecrow onto the sticky note and cut out. Remove the Scarecrow stamp now, and place the card back in. Place
the sticky note over the Scarecrow on the card, and add the moon stamp over him, and stamp the moon around the head of the
Scarecrow using Hickory Smoke Distress Archival Ink. Remove the moon and add the
corn stalks on each side of the Scarecrow. Stamp these using Peeled Paint
Distress Archival Ink. (Note: I also stamped border webs from the Unraveled
Set, but after coloring later the images were sort of lost, so I recommend
stamping the webs after everything is colored in.) Stamp the bats in Black
Soot over the moon.

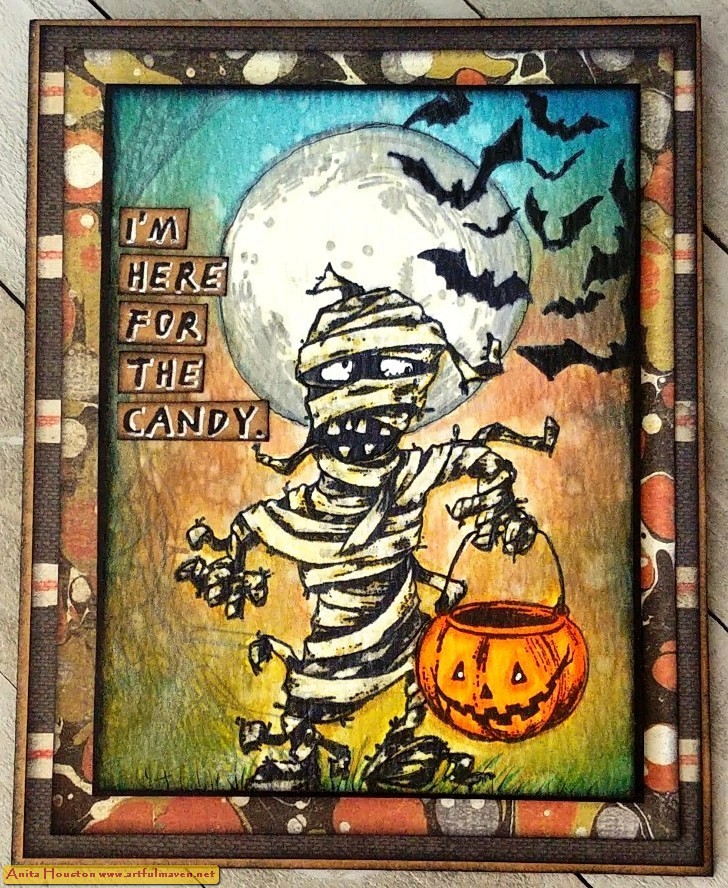
Place the other
Watercolor Paper into the platform and add the Mummy and Halloween bucket on
the card to see placement. Remove the Mummy and stamp the bucket using Black
Soot. Stamp the leftover ink onto a sticky note and cut this out. Remove the
bucket stamp and add the Mummy stamp on. Place the bucket sticky note over the bucket
and then stamp the Mummy over it using Black Soot so that it looks like the mummy
is holding the bucket. Restamp the mummy a few times to make it nice and dark. Remove the card, and then stamp him on sticky note and cut out. Remove the Mummy stamp. Put card back in, and place the Mummy sticky note over the image and stamp the moon in Hickory Smoke Archival.
Stamp the bats in Black Soot. (The same as above on the webs.)

Using the silicon mat on
the Glass Mat, push the pad of Uncharted Mariner Distress Ink on to the mat and
mist a little water in it. Pick up the ink with the Broad Water Brush and paint
over the top portion of the sky on each card, being careful not to color in any
of the images. Add Speckled Egg below blending in with the other color. Then continue
with Crackling Campfire, then Rusty Hinge, then Crushed Olive Distress Inks, and finishing
with Peeled Paint Distress Ink, blending all the way down and not getting any
color (if you can) on any of the stamped images. (Note: I was trying to mimic
the colors in the patterned paper that is in the pic.) I also switched up to a
Detail Water Brush to try to not get any color on the images. Flick water over
the cards and allow the spots to bleach up some, and then use a paper towel to
soak up any water drops left. Let dry a bit.

Apply Iron Gate
Pearlescent Distress Crayon to the mat. Pick up the crayon with the Broad or
Detail Brush and color over the sky area so it now has a slight sheen to it. Color
in all the other images with more Distress Inks and the Detail Water Brush. I
used Antique Linen for the Mummy and moon, along with Hickory Smoke for details
on each. I also used Carved Pumpkin for the bucket, Old Paper on the Mummy, Fossilized
Amber, Gathered Twigs, and Walnut Stain on the Scarecrow with Uncharted Mariner.
Go back over any part that needs darkening. Once finished dry or let dry, stamp the webs around the border on one side of the card with
Hickory Smoke Archival, and then ink the edges of the paper with Black Soot
Archival. Mount both onto Black Kraftstock cut just slightly bigger for a slim
border. Add foam tape to the backs.

Stamp
the sentiments onto Kraft Cardstock with Black Soot Archival. Cut each word
apart and ink the edges in Black Soot. Use a white pen to add drop shadows on
the letters. Use the white pen to add dots to eyes, and a black pen to fix any
black areas that need touch ups, and then trace around the moon and plants and add
blades of grass with the black pen. Cut and fold Kraft Cardstock base cards to 4 7/8 x 6 1/8
inches. Ink the edges with Black Soot. Mount the striped Backdrop paper to the kraft
after inking edges with Black Soot with two sided tape, then cut marbled
looking Backdrop paper about 1/2 smaller all around, ink edges in Black Soot,
and mount on the striped. Remove foam tape backing and mount the card fronts on
the base cards. Add sentiments to each with two sided tape.


Supplies:
(Paper Trimmer, Stamp Platform, Sticky
Note for Masking, Scissors, Glass Mat, Broad and Detail Water Brush, Water
Mister, Ink Blending Tool, Two Sided Tape, Foam Tape)
-Ranger Tim Holtz Distress Watercolor
Paper
-Stamper's
Anonymous Tim Holtz Stamp Set: The Scarecrow, Unraveled
-Ranger Tim Holtz Archival Ink: Black
Soot, Hickory Smoke, Peeled Paint
-Ranger Tim Holtz Distress Ink: Uncharted
Mariner, Speckled Egg, Crackling Campfire, Rusty Hinge, Crushed Olive, Peeled
Paint, Antique Linen, Hickory Smoke, Carved Pumpkin, Old Paper, Fossilized
Amber, Gathered Twigs, Walnut Stain
-Ranger Tim Holtz Distress Crayon:
Pearlescent Iron Gate
-Tim Holtz Idea-ology: Black Kraftstock,
Halloween Backdrops
-Ranger Surfaces: Kraft Cardstock
-Permanent Black Pen, White Pen
Thank you truly for ALL the comments over on Instagram for these cards...I was blown away, and really didn't think these cards were all that special, so WOW! You guys are the best! I'll be back again next Friday with the second make. Until then, I hope your hands get creatively dirty soon!


I love these makes! I hope I can use your inspiration and come up with something nearly as cool as these! Can’t wait for my supplies to be delivered.
ReplyDeleteI have never masked to stamp...must give it a go...these are absolutely fabulous. Who wouldn't want one of these...I would frame mine...
ReplyDeleteYour cards are just fabulous! I’m 63 and just discovered paper crafts a couple years ago after retiring from teaching Math. I have to tell you that I look forward to Tim Holtz releases on YouTube to see your fabulous creativity and talent along with the others. I just got onto Instagram (I’d even forgotten our school district had us make an account…lol) to tell you how much I appreciate your sharing everything with us. It’s very generous and I’m so inspired by you!! With since appreciation and awe, Nancy Rolfe
ReplyDeleteP.S. I’d never thought of adding a white drop lettering but it adds so much to the sentiment…just one of many things
Wow Anita, that's amazing. Try starting with your examples later in the morning.
ReplyDeleteLove your cards! The color choices are so fab!
ReplyDeleteThese are amazing, Anita! Love how you added color the backgrounds and the items in the foreground as well! Truly works of art! I wish I had a smidgeon of your creativity and talent!
ReplyDelete