
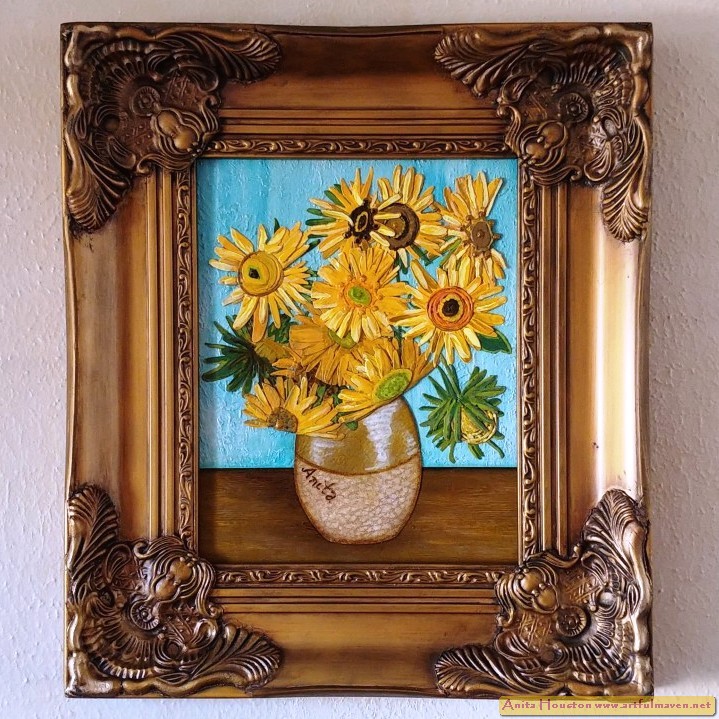
Hello everyone! I hope you had a lovely and blessed Easter. Today, I have the Vincent Van Gogh inspired (his sunflower series here) 12 Sunflowers In A Vase Mixed Media Canvas for you, made from the new Tim Holtz Sizzix Modern Floristry and Artsy Stems Thinlits as well as Cracked Leather 3D Texture Fade. Okay
you all, I'm continuing on my excitement with this Sizzix Chapter 2 release
from Tim. I cannot stop drawing out ideas using these artsy dies. When I first saw
the large flower from the Modern Floristry Thinlits I thought they looked like
the crazy sunflowers Van Gogh painted, and combined with the Artsy Stems I knew
both sets were created just so I could create flowers like him, so I decided to
use them to create my own take of the his paintings after a massive amount of
research on him and his paintings. I felt like I was back in collage in Art
Appreciation, and I can't tell you how much I enjoy the research and am
continuing to learn. It's almost a creative epiphany for me that I must study
the Greats and break out the canvas while doing so. A moment of time that I must create just for
me that I didn't know I needed, and it's all because of these two die sets. They
have allowed me a new outlet of creating, with a resurgence as well as energy
like I haven't had in a while. I think
it's so much easier to use layered collaged die cuts to create things rather
than trying to only paint those things, and I am just not that good of painter yet,
so these were perfect for canvas. Being a Mixed Media Artist gives so much more
freedom when creating and not just having to use paint, and you have so much
more at your disposal to use...in my opinion. (Day dreaming now...Imagine if
Van Gogh was alive today and was a Mixed Media Artist and all the more he could
have done...LOL!!!!) Now since Van Gogh painted seven different versions of
Sunflowers in his series, I decided to go with the two paintings that had 12
Sunflowers in them as my canvas was only 8x10 inches, and try to recreate the
look best as I could with the dies. This painting came out even better than I
imagined, and I am quite proud of the end result. In fact, I was so inspired by
the dies that I decided to do my own series of Flowers In A Vase inspired by
the Greats using them. I think you can pretty much use these two sets to create
most types of flowers. You are only limited by your imagination. I seriously
think I could use only these two sets for a whole year to create a slew of
paintings and be perfectly happy doing so. Can you tell I am in love with these
two sets of dies??? So you will be seeing one more painting for sure after this
(Poppies), and hopefully a few more in the future...I'm thinking tulips or
carnations next, got to research more. Enjoy and grab a snack...lots to see!


I took my inspiration from these two paintings from Van Gogh. The one on the left is the original and on the right the redo he did later.
(Note: It's good to
print off the two Van Gogh 12 Sunflowers In A Vase for reference while you work,
or have the pics on your phone to use for detail work. I also printed out the
Three Sunflowers In A Vase because I liked the look of the table better in that
one than the other two. I used both 12 Sunflowers as reference while painting
as I like different parts of each. Also, there are famous characteristics that
each the paintings share that I took note of and tried to mimic, like the 'V'
shaped petals on the flower in the upper left for instance, so you might want
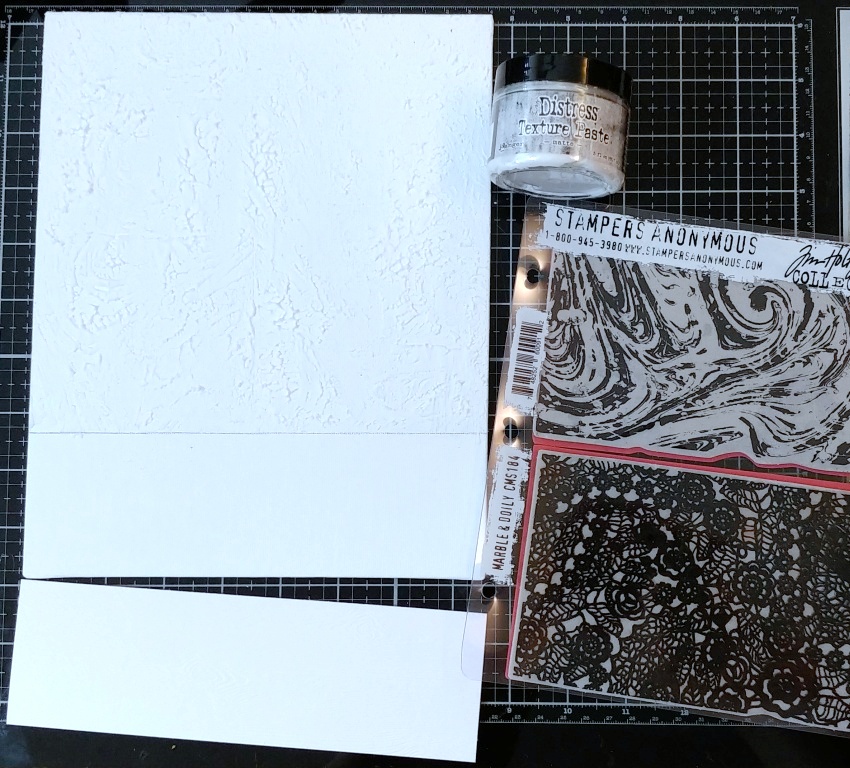
to study each and look for specifics.) Take an 8x10 inch canvas panel and using
your fingers or a palette knife, apply a thin layer of Matte or Crackle Distress
Texture Paste from Ranger to the whole canvas where the table part (about 2.5 inches wide)
will not be. While the paste is wet lay the Marble Background stamp from
Stamper's Anonymous in the paste to create a texture. My paste was not very
thick so I only saw parts of the texture from the stamp, so keep that in mind.
You don't really have to do this, but since the Marble stamp looks a little
like Starry Night I thought it would be cool, but it didn't pan out like I
wanted. Clean your stamp immediately after with soap and water. Let the canvas
dry about 30 minutes.

Paint over the
textured area with Old Paper (or Antique Linen or Picket Fence) Distress Paint
for a base layer. While the paint is still wet add a bit of Tumbled Glass and
Peacock Feathers to the silicone mat and pick up both colors with a medium flat
head paint brush (a color on each side of the brush) and paint over the Old
Paper vertically creating stripes of color while blending them for a soft
striated look. Let the canvas dry.

When the canvas is dry,
add a tiny amount of Picket Fence Distress Paint to the mat and lightly dry
brush over the blue area for a little white here and there for some highlights.
Let dry. Cut a piece of Woodgrain Cardstock to 2.5 x 8 inches. Paint over the
whole piece using Gathered Twigs Distress Paint, and while wet blend in some
Fossilized Amber here and there where you think the light will be facing it (I
think the light source is straight from the front) blending the paint in, and
then add a little Ground Espresso paint to the top line area and center of the
paper around where the sides of the vase will be for a shadow effect, blending
in the colors. Dry this, and then collage the paper on along the bottom edge
for the table with Crazing Collage Medium for a little more texture. Let dry.

Using Watercolor
Cardstock, die cut two of the largest sized Ovals from the Sized Ovals Movers
and Shapers set. Lay the ovals on top of each other and trim off the bottom
slightly curved so it looks like the bottom of a vase. Separate the pieces and
cut the top slightly curved inward of one of the pieces so it now looks like a
vase. Set that one aside. Take the other piece and cut it in half slightly
curved inward. This will be the leather wrapped bottom piece of the piece.
Lightly mist this piece only with water and place it inside of the Cracked
Leather 3D Texture Fade and run it through your machine three times. Discard
the top part you cut off from this.

Paint over the Cracked
Leather bottom part with Old Paper Distress Paint and let dry. Paint over the
vase part with Gathered Twigs Distress Paint and while wet blend over a little
bit of Tarnished Brass Distress Paint. Dry brush the same two colors over the
bottom part and then mist with water while using a paper towels to clean off
the paint from the raised cracks. Dry both. Use more Old Paper to paint in some
reflective parts on the top of the vase. Ink the edges of both pieces with
Ground Espresso Distress Archival Ink, and then add the bottom piece to the
vase using Matte Collage Medium. Let dry and then adhere the vase to the bottom
middle of the canvas about an inch up using the Matte Collage Medium.

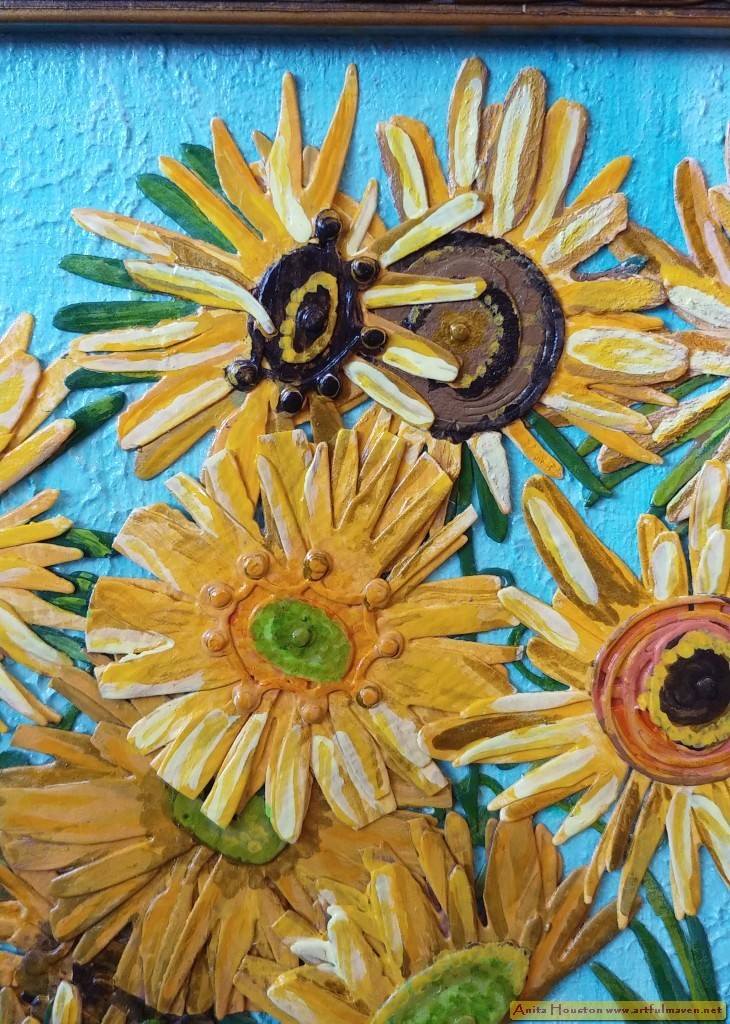
From the Modern Floristry
Thinlits, you will need the large flower, half flower, groups of dots, leaf,
and tulip looking die (used for flower centers), and from the Artsy Stems use
will need the circular and sunflowers looking ones. Using the picture of the
painting for reference and looking at each flower individually (I gave each a
number starting with the flowers in the back to the flowers in the front as
that is how I worked on them), plan out how many of the large flowers and half
flowers you will need to build each flower. I used two large flowers for each
regular looking sunflower, and three large flowers for the bushy gone to seed
looking ones in the center along with three half flowers for the half looking
bushy ones, and then two half flowers
for the one hanging off the right side. I also die cut more half flowers for
fill in and leaves hanging behind the flowers. Looking at each center of the
flowers, I decided which got circles and which got the sunflower looking
centers, and I just used those stems for anywhere else. I started with a list
of totals of each but I'm pretty sure it changed as I had a few left over half
flowers, and I forgot to do a final count, but hopefully the pics can help you.
Die cut the flowers and stems using Watercolor Cardstock and lay them out on
the canvas like in the painting. Doing this will inspire you for sure.

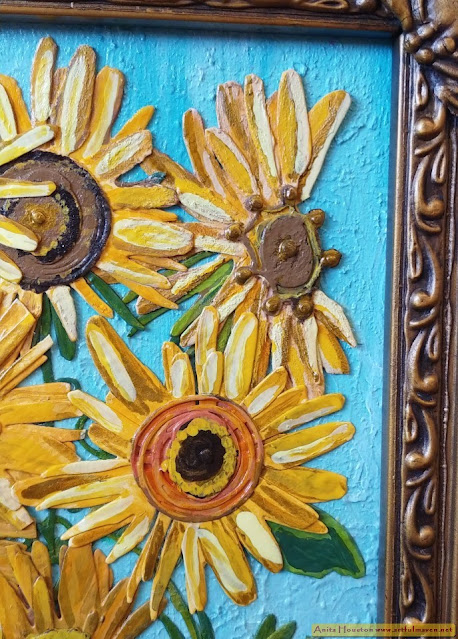
Starting with the side
view flower on the upper right side (I circled it in the pic), cut a large
flower in half. These will be layered on top of each other. You will also need
a half flower for the leaves in the back. Paint one half using Wild Honey and
one half using Scattered Straw Distress Paints, and then adhere them together
with Collage Medium, making sure the petals fan out from each other for
fullness. Paint the smaller half flower with Rustic Wilderness, and then adhere
this to the back of flower making sure the leaves fan out and show on the lower
left area as in Van Gogh's paintings. Cut the small sunflower looking center
from the stem, and paint the stem with Rustic Wilderness and adhere it to the
back of the flowers pointing out to the left and shaping the stem with a little
bend so that it goes down but to the left like in the paintings. Paint the
center part with Gathered Twigs, and then add a little Texture Paste with your
finger to the petals and center of the flower for great texture. Van Gogh's
paintings were a miraculous textured composition before impasto was really a
thing. Wow he did it is still debated today. Anyway, when the paste is dry
(Actually, I didn't wait for paste or paint to dry on anything...I like the
surprises of that.) start adding detail with the paint. Add Twisted Citron to
the stem and leaves for variegation, and Fossilized Amber stripes to the petals
while looking at his light points on his coordinating flower. On this one the
light petals are on the bottom and top petals indicating the light source is
coming from the right center, but it does change a bit for each flower. Add
dots of Ground Espresso to the center of flower and all those dots going round.
Finish off the flower with golden stripes and dots of Tarnished Brass Distress
Paint. To me, Tarnished Brass is what made my painting pop. I used it
everywhere. Set this flower aside to dry on the canvas where it goes...that
helps to see progression. One down, eleven to go!

I forgot to get pics of
all these flowers in the making, but the large sunflower is two large flowers
stacked and painted like the one above, but using a circular center and painted
in like a bullseye using the same colors as above. The weird dark green thing
(I assume the back of a flower) is two large flowers layered and painted with
Rustic Wilderness and Ground Espresso, with Twisted Citron highlights and that
weird mini sunflower painted on with Tarnished Brass. This flower has perplexed
me bunches, especially because I think they are really two flowers, but then
that would be 13 flowers. He did mess up on flower count though with a few
paintings, so it really could be a 13th. Anyway, the cute hanging flower is one
large flower base in greens, a circular middle in Fossilized Amber and
Tarnished Brass, and then a half flower turned the other way on top of the
center part painted in green. The stem is adhered up top folded to the left. All
the flowers are painted pretty much the same and using the same paints. I let
all of them dry on the canvas where they will go.

For those four bushy
gone to seed flowers, I did those all at the same time, and I trimmed around
them once glued to make them a tighter looking circle of petals. There are
really five in that group, but the one you can hardly see any off, I made just
like all others with two large flowers so you can get creative with that one,
but it has a group of leaves behind it on the lower right side that can be seen
on the front of the vase. Two of the bushy sunflowers are full and have three
large flowers stacked up, and one has a center that goes with the large flower
die and one with a circular center and a regular center on top. One is darker
in color with Fossilized Amber and Wild Honey with a Twisted Citron Center. The
other has light parts using Squeezed Lemonade and Mustard Seed with a dark
center with a green ring. The other two, I cut three large flowers in half and
adhered three of the halves together. I also cut around the petals to make them
look tighter like the others. One has a regular center from the large die, and
the other is a leaf with the end clipped off. Both are painted with Fossilized
Amber and Wild Honey, one with a dark bullseye type middle and one (the one
with the leaf) with a green center, both with dots of Tarnished Brass.

There are three left, full
one on the top left that has a stem and with the 'V' shaped petals (cut them if
you need to) at the top and has lots of bright and light petals with a circular
center and the odd diamond shaped bullseye and leaves off to the right side,
top left right facing flower that is pretty dark with a sunflower shaped center
and leaves off to the left, and then the last flower from the center right is a
full flower with a circular center and regular center on it that looks like an
eye and the large leaf off to the bottom right. Adhere all the flowers on the
canvas once they are all dry using Collage Medium and slathering it on heavily,
starting with the furthest back in the arrangement (see my photo). You will
need to press down on the flowers about 10 seconds each to make sure they are
adhered well or leave the canvas under a book a few minutes after each flower.

Take the cluster of
dots die and die cut it twice using Watercolor Cardstock. Adhere the dots to
the centers of the flowers however you want. I put one in the center on the
circular middles and dots all around on the sunflower looking centers. However,
I was told by someone that some of my centers look like nipples (LOL) so if you
see that and it bothers you, rearrange them or don't use them. Add paint to
those centers and add any details to the centers and petals to make them match
up more to their corresponding flowers from the real painting. Van Gogh's redo
painting (the second one he painted with the red centered flower and red line
tracings around the vase) has a few differences in the centers of the flowers
so if you want that red centered flower go for it. I made mine more light
orange than red. Once everything is detailed enough for you, print your first
name in the Cracked Leather area on the left side of the vase slanting towards
the bottom center as he did.

I picked up the frame
from Hobby Lobby during a 50% off week, but I didn't like the gray colored
distressing on it, so I painted over it using Black Soot Distress Paint and
wiped off what was not in the recessed areas with a damp paper towel before it
dried. Once dried, I added a bit of Gilded Foundry Wax to the scrolly parts on
the corners of the frames and heat set those. I added the canvas in and used
Glazier Points with a hammer to hold the canvas in place. I also added the wire
holder parts on the back for hanging.


(Glass Mat, Medium Paint Brush, Paper
Trimmer, Water Mister, Die Cut Machine, Paper Towel, Die Pick, Ink Blending
Tool, Small Paint Brush, Scissors)
-Ranger Tim Holtz Distress Texture
Paste: Matte
-Stamper's Anonymous Tim Holtz Stamp
Set: Marble and Doily
-Ranger Tim Holtz Distress Paint: Old
Paper, Tumbled Glass, Peacock Feathers, Picket Fence, Gathered Twigs, Ground
Espresso, Scattered Straw, Fossilized Amber, Tarnished Brass, Twisted Citron,
Rustic Wilderness , Peeled Paint, Wild Honey, Squeezed Lemonade, Rusty Hinge, Crackling
Campfire, Mustard Seed, Black Soot
-Ranger Tim Holtz Distress Woodgrain
Cardstock
-Ranger Tim Holtz Distress Archival Ink:
Ground Espresso
-Ranger Tim Holtz Distress Collage
Brush: Small
-Ranger Tim Holtz Distress Collage
Medium: Crazing, Matte
-Sizzix Tim Holtz Movers and Shapers:
Sized Ovals
-Ranger Tim Holtz Distress Watercolor
Cardstock
-Sizzix
Tim Holtz 3D Texture Fade (Chapter 2 2022): Cracked Leather
-Sizzix
Tim Holtz Thinlits (Chapter 2 2022): Modern Floristry, Artsy Stems
-Ranger Tim Holtz
Distress Foundry Wax: Gilded
-8x10 Inch Canvas Panel,
Frame, Glazier Points
Thank you thank you so very much for all the comments about these Chapter 2 makes over on Instagram! You all have shown me so much love! I'll be back again soon. Until then, I hope your hands get creatively dirty soon!


Very beautiful! The details are amazing.
ReplyDeleteWow, I would be proud of myself too! This is just downright awesome. Looks really good all framed up, too. I have read the tutorial, now I need to go back through and see if I can follow along with the pictures...may have to try my hand at this one. Oh, yes, a flower collection would look awesome all hanging together...so artistic.
ReplyDeleteGreat in-depth tutorial! Thanks for taking the time to explain your process, this is really breathtaking! p.s. I didn’t notice the “nipples” til you mentioned it. Now I can’t un-see them! ��
ReplyDeleteLooking forward to your poppies. ��
Oh, Anita, this is stop-you-in-your-tracks gorgeous. What a skillful, imaginative work of art. You knocked this project out of the ballpark and them some. Van Gogh himself would be proud!
ReplyDeleteAutumn Zenith 🧡 Witchcrafted Life