
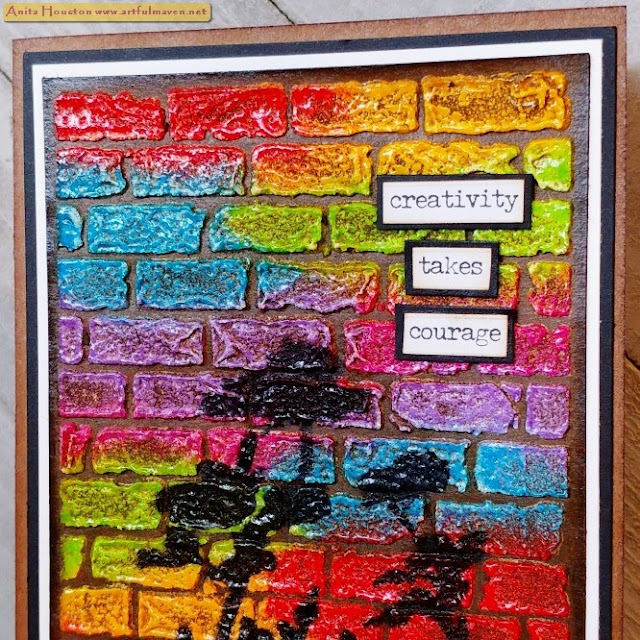
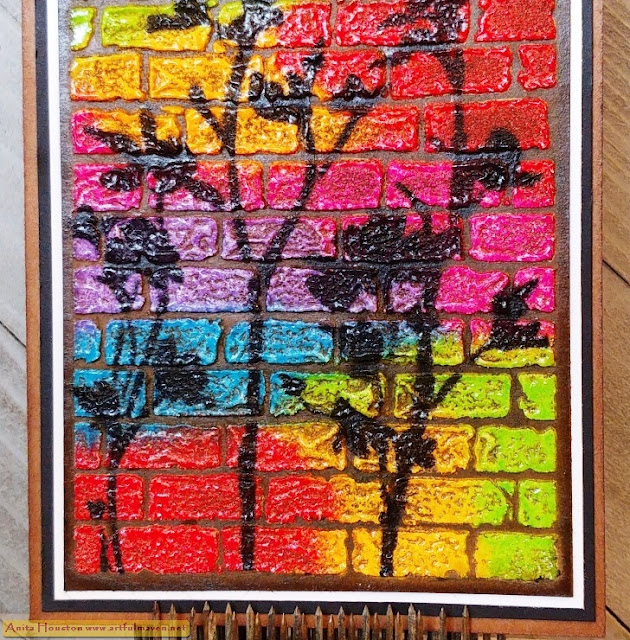
Happy Saturday everyone! How about that Tim Holtz Live showing the additional Ranger goodies?!! I am always so happy to get more colors in a line. The six new added colors of Distress Embossing Glazes are Candied Apple, Wild Honey, Twisted Citron, Salty Ocean, Wilted Violet, and Picked Raspberry, and all were good ones to add (especially Candied Apple and Twisted Citron for me). I really can't wait until all the colors are available...patience is good though. New colors of Distress Archivals were also added, but I'll have another post on that tomorrow. For this card, I used all six of the colors of Distress Embossing Glazes to make the brick wall. To say this was fun to make is not good enough...This wall was thrilling to make. I was a little nervous before getting starting as I wasn't sure if my idea would come out the way I imagined, but it totally did. And I have to add, this card was fast to make. If it wasn't for drying time, I would have been finished in 30 minutes. The cool thing about making a brick wall so colorful like this is that you can use it for so many occasions on a card, and it is easily masculine or feminine. LOVE that! Enjoy!


Have all the Embossing
Glazes ready to go, as you must work quickly for this part and the next. Lay
the Bricked Layering Stencil on same size Kraft Cardstock or a #10 Kraft Tag.
Use a palette knife to apply Opaque Grit Paste to the stencil, liberally and
evenly, so that the kraft cannot be seen underneath. Remove stencil and place
in water with the palette knife to soak while you do the next part.

Working quickly, either
lightly pour or scoop onto, Candied Apple Embossing Glaze in three spots
randomly on a group of bricks. Next use Wild Honey, pouring on next to the red
areas, then Twisted Citron, Salty Ocean, Wilted Violet, and Picked Raspberry,
making sure all bricks are covered. Lightly shimmy tag to get the powders into
the bricks and sides of the bricks. Pour the extra powder off onto a sheet of
paper, and collect the powder into an empty jar to use for another project. Set
the brick paper aside to dry naturally for about 30 minutes. Use a heat tool to
emboss the powders until shiny. Your Grit Paste might puff up a bit, but that
will just add to the texture of the bricks. If your Kraft paper buckles up a
little bit, lay it under something heavy for a little while.

Apply Vintage Photo
Distress Crayon to the silicon mat and a little mist of water next to it. Pick
up the color and water with a Blending Brush and pounce over the bricks with
the color pushing it into all the cracks and in between. Apply until all the
bricks are covered and no white can be seen. Use a damp paper towel to remove
some of the Crayon from the surface of the bricks until they shine again. Trim
around the bricks leaving about an 1/8 inch border. Ink the border edge surface
next to the bricks with Gathered Twigs Distress Ink, and then ink the edge of
the paper with Black Soot Distress Archival Ink.

Lay the Wildflower
Stencil over the bricks so that the bottom stems match up with the bottom
bricks and center it so the flowers fit perfectly on the bricked area.
Carefully hold or tape down the stencil, and ink up a Blending Tool really well
with Black Soot Archival. Pounce the ink over the stencil really pushing in the
color over the bricks, taking care to not move the stencil. Do one layer and
let it dry a bit, and repeat to really deepen the color, and trying to get it
in between the bricks. You can also use a Blending Brush to help you really get
the ink into the crevices by shortening the brush line and pouncing it over the
bricks. Let this dry well about 15 minutes. To clean the Archival from your
stencil you can use 91% rubbing alcohol. Be careful cleaning the stencil so you
don't pull up any edges of the design, better to pat it.

Fold
a Kraft Cardstock base card to 4 x 7.5 inches. Ink the edges with Gathered
Twigs. Cut black cardstock to 3.75 x 7.25 inches and mount it onto the kraft
with two sided tape. Cut White Heavystock or cardstock to 3 5/8 x 7 1/8 inches
and mount that onto the black. Chose a sentiment from Small Talk and cut the
words apart. Ink the edges in Gathered Twigs Distress Ink, and mount onto black
cardstock. Cut these out and mount onto the upper right side of the bricked
paper. Mount the bricks onto the card front with two sided tape.


Supplies:
(Palette Knife, Sheet of Paper, Extra
Jar, Heat Tool, Glass Mat, Ink Blending Brush, Water Mister, Paper Towel, Paper
Trimmer, Ink Blending Tool, Scissors, Two Sided Tape)
-Ranger Surfaces: Kraft Cardstock (#10
Tag), Black Cardstock
-Stamper's Anonymous Tim Holtz Layering
Stencil: Bricked, Wild Flower
-Ranger Tim Holtz Distress Grit Paste:
Opaque
-Ranger
Tim Holtz Distress Embossing Glaze: Candied Apple, Wild Honey, Twisted Citron,
Salty Ocean, Wilted Violet, Picked Raspberry
-Ranger Tim Holtz Distress Crayon:
Vintage Photo
-Ranger Tim Holtz Distress Ink: Gathered
Twigs
-Ranger Tim Holtz Distress Archival Ink:
Black Soot
-Ranger Tim Holtz Distress Heavystock: White
-Tim Holtz Idea-ology: Small
Talk Stickers
I'll be back tomorrow with my make using the new Distress Archivals. Thank you so much for stopping by. I hope your hands get creatively dirty soon!


love this , just watched the live and I also have this bricks stencil on order , can't wait for it to arrive now and try this!
ReplyDeleteSo beautiful, Anita!!
ReplyDeleteSpectacular! Thank you.
ReplyDeleteWonderful. I love the look. Did you melt/heat the embossing glaze right after you finished adding them? Crayon applied to melted glaze?
ReplyDeleteAfter adding Glazes on top of wet paste, set it aside for about 30 minutes then heat. Apply crayon on top and wipe off crayon from bricks only. Make sense? Sorry if I wasn't clear above.
DeleteAwesomely creative design. I am more than a little bit in love with the idea of a wall of rainbow hued bricks. This is highly inspiring, creative lady!
ReplyDeleteAutumn Zenith 🧡 Witchcrafted Life
So pretty!!
ReplyDelete