
I'm back again as promised to show you my project using the new Tim Holtz Distress Archival Inks from Ranger. You can never have enough Archival Inks in my opinion. They are my go to medium, because I like that they are permanent, water proof, and keep their color forever. I am so happy that Tim decided to bring the colors of his Distress Ink line into the Archival Ink family, and I love the 12 colors he added. There is Fired Brick, Crackling Campfire, Wild Honey, Crushed Olive, Rustic Wilderness, Evergreen Bough, Salvaged Patina, Speckled Egg, Prize Ribbon, Villainous Potion, Kitsch Flamingo, and Frayed Burlap. When I first saw the line up of colors released I instantly thought of the sunset sky in all its colorful glory, so I set out to create that sky in my head with collage. A card wasn't going to be big enough, so I grabbed a Vignette Tray instead and began my scene. Enjoy!


Using book pages, ink
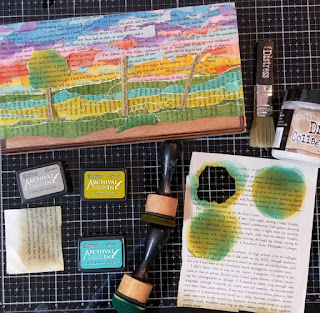
over them (a few paragraphs for each color) with Crackling Campfire, Wild
Honey, Salvaged Patina, Speckled Egg, Prize Ribbon, Villainous Potion, and
Kitsch Flamingo Distress Archival Inks using Ink Blending Tools.

Tear the colored pages
following the words on the pages, into irregular strips so there are straight
and curvy parts. Using the smaller tray from the Vignette Set, plan out the sky
area using the strips of colored pages, starting in the center and starting
with Wild Honey. Add Crackling Campfire
around the Wild Honey and fill in with Salvaged Patina and Speckled Egg. Once
you like the look, add Collage Medium under and stick the pieces down brushing
over the top of them as well, letting the edge pieces just hang off. Add Kitsch
Flamingo above while adding more strips of Salvaged Patina and Speckled Egg.
Then start adding in the darker colors above (Villainous Potion and Prize
Ribbon), still adding in the Salvaged Patina and Speckled Egg. Fill in any bare
spots with other colors for a more variegated look. Once the sky area is filled
and dried, sand off the strips that are hanging over, by lightly rubbing the
sander on the edges until the strips fall off.

Ink more book pages with
Evergreen Bough, Crushed Olive, and Rustic Wilderness, but this time ink
vertically so that the words are running up so that there will be a different
pattern of the words. Tear strips again, but make them straighter and tear
towards you so that there will be a white paper edge between the strips.

Starting with the Rustic
Wilderness strips, collage a row touching the sky area with the white torn edge
at the top. Collage a row of Evergreen Bough below that in the same way with
the white edge showing and touching the Rustic Wilderness row. Repeat with a
row of Crushed Olive. Add a row or two of Evergreen Bough and Crushed Olive,
then a row or two of Rustic Wilderness, making sure to leave about 3/4 inch of
Vignette Tray blank. Sand the edges off.
Ink a piece of book
page about 2 x 3 inches, with the words going down this time with Frayed Burlap
Distress Archival. Use scissors this time and cut five strips about 1/4 inch
wide and three inches long for tree trunks. Ink the edges of the tree trunks
with more Frayed Burlap. Choose three of the strips and place them evenly on
the tray to see where you want the trees to be making sure the bottom of the
trunk will be on the last Rustic Wilderness strip and collage those down. Take
more book paper and ink over a 2 inch or so circular area with both Crushed
Olive and Evergreen Bough. Do three of these, and then use your fingers and
tear around the circle to look like the leaf area of the tree. Ink the edges of
these with Rustic Wilderness, and collage on top of the trunks to complete the
trees. Save the other two trunks for later in the project.

You will use dictionary
paper for this part. Using the Paper Village and Paper Village 2 Thinlits Dies from Sizzix,
pick five different house shapes, and only die cut one of each shape. Use
scissors to cut off the sides that you won't need...you only need the house
front. Decide which order you want the houses to be in and ink the first house
front Kitsch Flamingo, the second Crackling Campfire, the third Wild Honey, the
fourth Salvaged Patina, and the last Villainous Potion. Ink the edges of each
in the same color. Lay each house top over a piece of black cardstock, and free
hand around the top of the house for the roof or cut 1/4 inch wide strips to
join together for a roof top. On the house front that has double roofs, you can
do one of each kind. Collage the houses and roofs on just below the trees so
that the trees look like they are behind the houses. On the house with the
double roofs, use a black pen to lightly draw the divider line between the
house parts.

Using the doors and
windows die pieces from either set, die cut five doors and several windows out
of whatever size you want using black cardstock. Arrange the doors and windows
on each house to figure out the arrangement but don't glue down yet. Ink over a
small piece of book page using the last ink you haven't used yet, Fired Brick,
just leaving the wording direction normal. Die cut this with the five smallest
hearts from the Stacked Tiles Hearts Thinlits. Ink the edges of the hearts with
the same ink. Lay a heart on each house where you like the look of it somewhere
in or close to the roof area. Collage all the windows, doors, and hearts on.
Note: Using tweezers to place the small bits helps a lot on this part.

Using more book page
facing normal, ink over a small piece (1 x 5) using Frayed Burlap. Cut five
slightly looking trapezoid shapes (door width on top and slightly longer
bottom) with scissors for the walkway of each house connecting to the doors.
Ink the edges in the same ink and collage these on underneath each door. Ink
over more book page with Crushed Olive and Evergreen Bough for the last two
trees, but this time tear the shape more like a pear than round. Ink the edges
with Rustic Wilderness. Collage the two tree trunks on so that they look like
they are in the front yard and add the tree tops to them. Punch ten holes with
a regular hole punch on any of the green areas from the tree tops book pages.
Collage a hole on each side of the door and walk way to look like bushes.

Ink over more book page
reading normal with Frayed Burlap, and tear strips toward you so you have the
white torn edges about two book lines thick, and enough to collage one row.
Collage the pieces on meeting up with the grass and walkway area so it looks
like a path along the houses. Ink over more book page with the words facing up
for one row of grass that should cover up the rest of the tray, using all three
green inks. Collage those on meeting the path with white torn border up. When
dry, sand all three edges to remove the overhang pieces.

Paint all four edges of
the Vignette Tray with Black Soot Distress Paint bringing the paint up slightly
over the border and showing a little on the tray top, and let dry. Using the
Botanical Remnant Rubs, cut off the Wonderful Life sentiment and rub on to the
top right center of the tray. Using Label Letters, collage numbers 1 - 5 onto
the door fronts, and add Collage Medium over the sentiment as well. Let all
this dry well, and then use a white pen to doodle around the doors, windows,
hearts, bushes, trees, trunks, path, grass, and outside border of the tray. Use
a black pen to hide any mistakes if any.

Paint
over three small screw hooks if they are not already black, with Black Soot
Distress Paint, and let dry. Use a ruler to help you find the middle of the
tray along the very bottom edge (4.5 inches since the tray is 9 inches
long). It has to be the very bottom on
the edge piece of the tray to make sure the hook has ample space to screw in
to, because if you do this on the back on the tray the screw will go through to
the back, and you don't want that. Mark this 4.5 with a pen first and then push
a Craft Pick in and make a small hole into the edge piece. Do the same at 1
inch and 8 inch, so you now have three tiny hole markers that go into the edge
piece. Screw in the hooks at each hole mark and add a little Collage Medium to
the hole before you screw in the hook for extra strength. Let dry.


(Ink Blending Tool, Sanding Block, Scissors,
Die Cut Machine, Die Pick, Ruler, Craft Tweezers, Hole Punch, Remnant Rub Tool,
Craft Pick)
-Book Paper, Dictionary Paper
-Tim Holtz Idea-ology: Vignette Tray Set
(small), Label Letters, Botanical Remnant Rubs
-Ranger Tim Holtz Distress Archival Ink: Fired Brick,
Crackling Campfire, Wild Honey, Crushed Olive, Rustic Wilderness, Evergreen
Bough, Salvaged Patina, Speckled Egg, Prize Ribbon, Villainous Potion, Kitsch
Flamingo, Frayed Burlap
-Ranger Tim Holtz Distress Collage Brush
(small)
-Ranger Tim Holtz Distress Collage
Medium: Matte
-Sizzix Tim Holtz Thinlits: Paper
Village, Paper Village 2, Hearts Stacked Tiles
-Ranger Surfaces: Black Cardstock
-Ranger Tim Holtz Distress Paint: Black
Soot
-Ranger Fude Ball Pen: Black
-White Gelly Roll Pen #5,
Screw Hooks

I'll be back again soon. Until then, I hope your hands get creatively dirty soon!


This is amazing! Thank you for the details! Simply stunning!
ReplyDeleteLove your creative use of Village collection and book pages. Awesome!
ReplyDeleteVery nice!
ReplyDeletePractical and beautifully done!
ReplyDelete