Hello Crafters and happy Friday! I have a Halloween project and step outs to share today...a lighted burlap panel using
Tim's new Snow Globe Thinlets from
Sizzix...and as promised, to announce the WINNERS from my 5th Blogiversary give-away! Huge thanks to all of you that commented and participated. Some of the comments even made me tear up...THANK YOU!!! I feel so loved and appreciated, and I am so very thankful for all of you...AND it's especially sweet that I didn't get to much razzing about my chart!!!
 |
| Unlit at Night |
 |
| Lit at Night |
 |
| I did lots of die cutting using oldies and newbies with either Ranger Kraft, Black, or Watercolor Cardstock. I also adhered Halloween Deco Sheets on some of the black cardstock for the children, rooftops, and windows. Then I assembled all the pieces. The Snow Globe dies can be used for tons of things and with a plethora of papers....it might be a new favorite. |
 |
| I taped off the edges of a burlap panel so it would have a framed feel, and then I slathered the middle with Gesso...for two reasons: durability and spreadability. You will see why next. |
 |
| Since I wanted to add lights to this piece, I knew I'd have to drill through it as the panel is solid, which I love. If I were to drill through with no Gesso to make the burlap rigid, it could have unraveled with the drilling. Plus...I just love to use my Dremel!!! I punched holes into my houses were I wanted the lights to go with the Crop-A-Dile. I used the ruler to make sure my houses were straight when I laid them out, then I poked a hole with the Craft Pick through the holes in the houses where I wanted the lights to go. That hole will also guide the drill so it doesn't skip around. The backing of the panel is thin enough that you can poke a hole all the way through. I also poked holes were the stars would go, then I drilled through all of them to make the holes larger. |
 |
| Another reason for the Gesso was to make a smoother surface so I could smudge in Distress Crayons, and not fray up the burlap. To cover this, I scribbled color on and smoothed it over first with a lightly moist towel to really push the color into the cracks. Then I added more color over this and blended with my finger. All the colors blended so nicely and didn't muddy up...gotta love Distress Crayons. |
 |
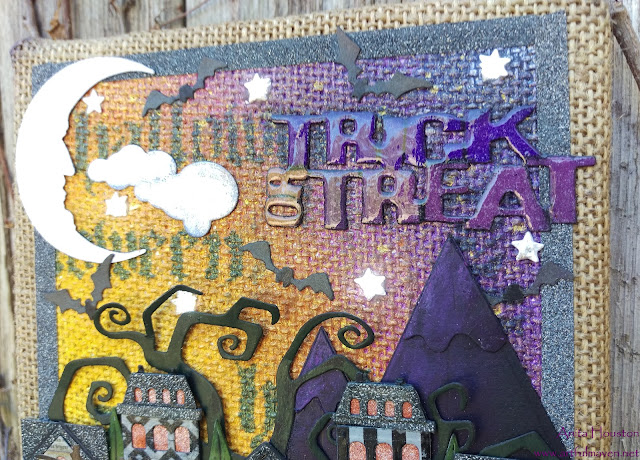
| I gave the surface a dry, and then stenciled in the Halloween word from the Mini Layering Stencil Set 23, with Wendy Vecchi's Hydrangea Archival Ink from Ranger. I chose this color because it's a purply gray and was dark enough to ink over the crayon. It's a very versatile color. |
 |
| I lightly spritzed over the the background with Wendy's Buttercup Mica Spray for some sparkly Halloween night splendor. I removed the tape, and then added the black glittery Design Tape from the new Materialize stash. |
 |
| I used more Distress Crayons to color in parts of my other dies. They even work on black cardstock...love that. I inked in the kraft bats with more Hydrangea...cool huh?!! I also inked the edges of the fence and trees with it. I painted in the moon and stars with Pearl Paint Dabber. |
 |
| I painted in my sentiment with Distress Paint so it would pop more, and covered that with Glossy Accents. Then I adhered my pieces on with either Multi Medium or Foam Adhesive. I glued on the stars and waited until they completely dried before poking a hole into them. NOTE: They are so tiny, that when I went to poke holes for the lights, some of them tore. I really wanted to use Micro Dots Lights (I suggest them over the minis.), because I thought this would happen once I saw how tiny the stars were, but my craft store didn't have them. I could have used larger stars...from Tim's Paper Punch...but I decided to just go with it to see the outcome. I am okay with them, but I want you to be advised that the Micros would be better. I pushed in the lights from behind and taped between each one, on the back of the panel for security. I used velcro to adhere the battery pack to the back as well...sorry I forgot to photograph that part...but it's ugly anyway. |
|
 |
| Lit in the Day |
 |
| Unlit at Night |
It's such fun to use dies intended for Christmas and Winter at Halloween. This one probably needs an idea chart too! :0) I think I will hang this in my wreath on the front door for Halloween night! Such fun!
And now for our winners. I had three hats...one for each monster. Those of you that wanted any, your name went into each hat. Those that wanted a particular, your name went in twice in that particular hat...just to make it a little more fair. Oh how I wish I could give each of you the dies...so hard for me, but...(drum roll sound)...
The
Monster Thinlets go to
CRAFTY HOPE! Who said,
Those tags have so much detail in them! Beautifully done. And, the thought put into to make that list is inspiring. You really get a bang for your buck with all those options! Now
that I see how versatile these are, I'd be happy to win any of the
three. Thanks so much for the opportunity and your amazing inspiration!
The
Vampire Thinlets go to
REDANNE! Who said,
Yay on the 5 years!! I love all three tags, they look amazing!! But
your charts - WOW, you have given me so many ideas now for my one and
only die in this set - the Zombie - thank you so much (sadly, ideas do
not flow for me like they do for you). Your chart is fantastic! I
agree, blogging is time consuming and often difficult, but it takes us
ages to make creations and it is always nice to give/receive some
encouragement, it makes it all worthwhile! If I am lucky enough to win,
I would love either the Monster or Dracula.... Hugs, Anne xx
The
Zombie Thinlets go to
JACKIE P. NEAL! Who said,
OMGosh Anita! I am still laughing at some of those phrases!! What a
mind you have-awesome! haahaa i still think my favorite is "zombies
don't like fast food-keep running! LOL Your tags are absolutely too
cool- not only the die parts, but your backgrounds really do speak to
me- you added so much interest to these- well done!! Geesh I don't have any of the dies and if i was the lucky one to be picked I would be happy with whatever you chose to send! ") Happy
Blog-i-versary and thank you so much for taking the time to create and
share all that you do! It means alot to so many of us!
hugs,Jackie
Congrats to all three of you, and AGAIN a huge thank you from my whole heart. Please email me your address so I can get these out as soon as possible.


Congratulations to the three winners! I love your little canvas, and it's given me a great idea. Blessings!
ReplyDeleteThis is so cute!! I love all the textures. Amazing as usual!!
ReplyDeleteOh, I'm loving this canvas panel! Very creative and love that it can be lit!! Truly Awesome!!
ReplyDeleteOh my, the canvas is stunning, I love the wonderful colours and all the detail you added with the little houses - a great mix of dies. Lighting it up was a genius idea, it looks even more amazing! Love it....
ReplyDeleteWoohoo!!! Thank you SO MUCH Anita, I am thrilled to bits that I won the Vampire, I can't believe it - wow! What a lovely way to start the weekend! Thank you again.... Hugs, Anne xx
Fabulous panel, I'm sure it will look great on your wreath. Congrats to all the winners.
ReplyDeleteYour burlap panel is exquisite Anita, love it. Congrats to the winners xxx
ReplyDeletei would love to live in your mind for a little bit just to see if your way of thinking/seeing things would rub off!! amazing piece my friend!!! huge congrats to all the winners !!
ReplyDeleteSo innovative! It is going to look amazing on your door! Love all the details. COOL idea to add the lights!
ReplyDeleteHoly moly, Anita! This is drop dead AMAZING. I'm at a loss for words, other than I LOVE it. You are so incredibly creative! Thank you for the inspiration.
ReplyDeleteHugs,
Linda
Holy Cannolis!!
ReplyDeleteLucky me and lucky Redanne&Craft Hope! actually lucky all of us, to have you,Anita,constantly inspiring us!Thank You!
and speaking of inspiring...holy cats is this canvas ever soooo cool! I just adore the lights you added, so clever, and the background colors are just delish! The children in front,just perfect! What a fab piece for your trick or treaters to be greeted with!!
huge hugs,Jackie
Congrats to the winners! This is so fabulous, I love that you made your burlap panel light up! Fantastic!
ReplyDeleteOh, what a fantastic illuminated Halloween panel! You created a lovely scene, Anita! Hugs
ReplyDeleteOMG! I'm so excited. Just sent you an e-mail.
ReplyDeleteThanks so very much for the opportunity!
That is so brilliant Anita, love the Halloween interpretation of the Snowglobe die and lighting it up was truly inspired! So sorry I missed your blogaversary, congratulations on 5 years of creative blogging and congratulations to the lucky winners! Deb xo
ReplyDeleteWow Wow Wow Anita! It's impossible to comment this project! It's too fabulous!!! Love love love your idea and your creative mind! Barbara
ReplyDeleteThis is delightful! I love those lights, who cares what the back looks like, it's amazing.
ReplyDeleteamazing project, Anita!
ReplyDeleteCongrats to the winners, now we need to see what you make from Anita's chart. I just love the chart inspiration and I'm trying to think outside the box like this for many of my stamp sets. Keep those charts coming & thanks again!
ReplyDeleteMagical Halloween make - love those sparkly colours and the lights.
ReplyDeleteAlison x