
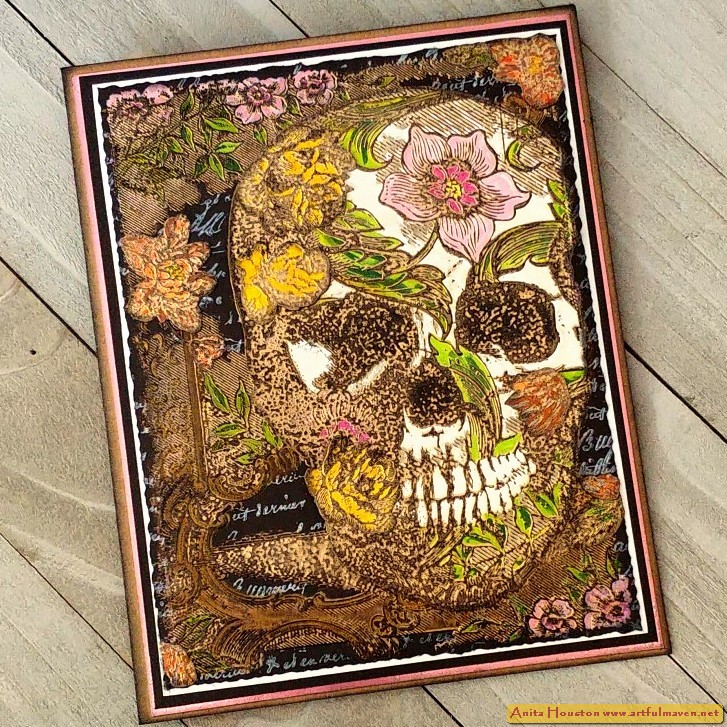
Hi Everyone! Here is my second make from the Tim Holtz Stamper's Anonymous Halloween release, that so many of you have asked about. Thank you truly for all the kind words. This card was made with the Exquisite and Gothic Tapestry Stamp Sets. I tried to give it a metal pieced look with embossing and Distress Paint, and while I wasn't sure if it was gonna turn out the way I wanted, I was pleased with the elegant look accompanied with a little macabreness (if that's a word). Enjoy!


Cut a piece of Specialty
Stamping Paper (SSP) from Ranger to more than fit the skull image from Gothic
Tapestry. Do the same with a piece of Black Kraftstock. Place the SSP inside
the larger Stamping Platform and place the skull image on it leaving a slight
border of paper around the image. Close the lid to secure the stamp. Stamp the
image using Black Soot Archival Ink. Remove the paper and dry with a heat tool
as SSP always need a little drying as the ink stays wet awhile. Leave the stamp
in place on the platform for the duration of the card making, and lay a paper
towel in the platform and close it while pressing the stamp to remove as much
of the ink as you can or blot lightly with the paper towel. It does not need to
be perfectly clean. Reink the stamp with Glacier White Pigment Ink this time,
and place the Black Kraftstock in the platform. Stamp the image, focusing more
on the border around the skull for crispness. Remove and dry. Leave the stamp
in place on the platform, and carefully pat away as much of the white ink as
you can on the stamp using a damp paper towel without moving the stamp. Leave
the stamp in place on the platform for later.

Cut a piece of SSP to
more than fit the bouquet image from Exquisite. Place the SSP inside another
Stamping Platform and place the bouquet image on it leaving a slight border of
paper around the image. Close the lid to secure the stamp. Stamp the image
using Black Soot Archival Ink. Remove the paper and dry with a heat tool. Leave the stamp in place on the platform for
the duration of the card making. (If you don't have another Stamping Platform,
then save this part for last after you've finished with the skull.)

Paint in the images on
all three paper using Distress Paint. You don't have to paint in the skull on
the black or the border areas on the SSP with the skull. I started with Twisted
Citron and Rustic Wilderness and did all the leaves. I also only selected a few of the flowers on the Exquisite that I
thought I would use.

I used Kitsch Flamingo
and Picked Raspberry for the flowers on both the skull papers, with Squeezed
Lemonade centers.
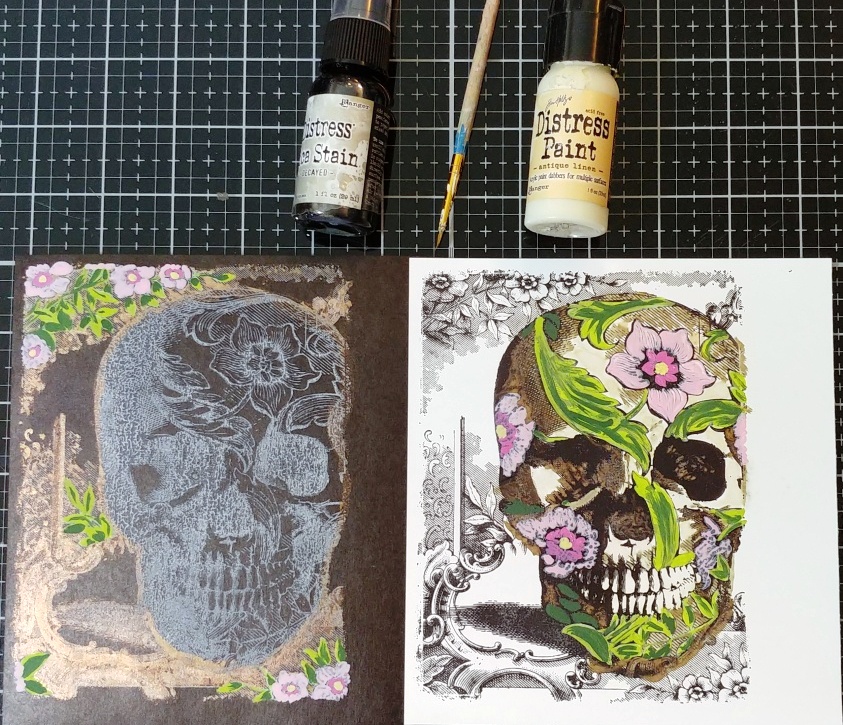
Shake up the Distress
Decayed Mica Stain, and pour a little out on the silicon mat. Pick up with a
detail paintbrush and paint in the areas of the frame on the black paper and
any shaded areas and details that you like. Paint in the shaded areas on the
skull on white paper. Paint in the rest of the skull in the white areas with
Antique Linen Distress Paint. Let everything dry.

Paint in the roses on
the Exquisite paper with Mustard Seed Distress Paint. Paint the other flowers
that you want on the Exquisite paper with Crackling Campfire, Dried Marigold,
and Saltwater Taffy Distress Paints. Let dry.

Pounce an Anti-Static
Pouch over the Exquisite paper and then place in the platform. Stamp with Black
Soot Archival and then immediately pour Gold Embossing Powder over it. Shake
off excess and flick the paper underneath a bit to get a little more off and
then heat emboss. Place the Exquisite back in the platform and this time just
rub the Black Soot Archival pad over the stamp to just barely add ink. Stamp
this over the embossed flowers. You will still see the gold embossing but now
the light ink will highlight the images even more for a cool metallic mottled
look. Dry this. Repeat the same with both skull papers (an Anti Static Pouch is
a must for both of these) heat embossing with the Gold powder, but focus on the
border with the Black Kraftstock and the skull on SSP, remembering to flick
some of the excess off. If you get powder on the areas that will not be seen
just use a brush to wipe the powder off before embossing. Like before, rub the
pad of the Black Soot Archival over the stamp and then stamp the image so that
there is just a bit of black ink on the gold embossing for a mottled metal look
on the skull papers...it brings out the image a little better over the
embossing as well. Dry both.

Cut the skull out from
the SSP. Ink the edges with Black Soot Archival and add foam tape to the back.
Take the Black Kraftstock skull and use the Deckle Trimmer to cut around it. Take
the script image from the Exquisite set or use the one from the Tapestry set
and using Glacier White Pigment Ink, randomly stamp the image in the blank
spots and borders of the Black Kraftstock skull, using some sticky note to help
you not get any where you don't want it. Dry.

Cut out the flowers from
the Exquisite and ink the edges in Black Soot Archival. Use Collage Medium to
adhere the orange flowers to the black skull paper and adhere the yellow roses
to the white skull. Ink the edges of this with Black Soot and then mount onto
white cardstock or SSP using two sided tape. Mount that onto black cardstock
with a thin border and the onto pink Metallic Kraftstock with a thin border,
and then finally onto a Kraft Cardstock base card cut and folded to 5 3/8 x 6
3/4 inches. Ink the edges of the Kraft with Black Soot Archival. Remove the
backing from the foam tape on the skull and adhere it to the front of the card
matching it to the one underneath.


(Paper Trimmer, Stamp Platform, Heat
Tool, Glass Mat, Detail Paint Brush, Water Mister, Anti-Static Pouch, Scissors,
Deckled Trimmer, Ink Blending Tool, Two Sided Tape, Foam Tape)
-Ranger Surfaces: Specialty Stamping
Paper, Kraft Cardstock
-Tim Holtz Idea-ology: Black Kraftstock,
Metallic Colors KraftStock
-Stamper's
Anonymous Tim Holtz Stamp Set: Gothic Tapestry, Exquisite
-Ranger Tim Holtz Archival Ink: Black
Soot
-Ranger Pigment Ink: Glacier White
-Ranger Tim Holtz Distress Paint: Twisted
Citron, Rustic Wilderness, Kitsch Flamingo, Picked Raspberry, Squeezed
Lemonade, Antique Linen, Mustard Seed, Crackling Campfire, Saltwater Taffy, Dried
Marigold
-Ranger Tim Holtz Distress Mica Stain:
Decayed
-Ranger Embossing Powder: Gold
-Ranger Tim Holtz Distress
Collage Medium: Matte
A huge thank you for all the kind words on the Live and on Instagram about this card. I so so so appreciate you all. Until next time, I hope your hands get creatively dirty soon!


