Hello Everyone! Did you see that Tim Holtz came out with a brand new product from Ranger called Distress Foundry Wax?!! Oh my word, it is fabulous stuff! It's yummy pearly liquid at first and then turns creamy, but then you heat it up and it turns permanent, hard, and leafy metallic. There is nothing like it. It comes in four metallic finishes, Gilded, Sterling, Statue, and Mined. I can see myself using it on everything, even furniture. I had a wonderful time making this framed panel with the swinging girl on it with the wax. I used it to stencil, paint, and recolor...it's so versatile. This would be the kind of project I'd teach in a class, but that is not happening yet, so you get the whole tutorial. It's super lengthy though, so grab a snack. Enjoy.
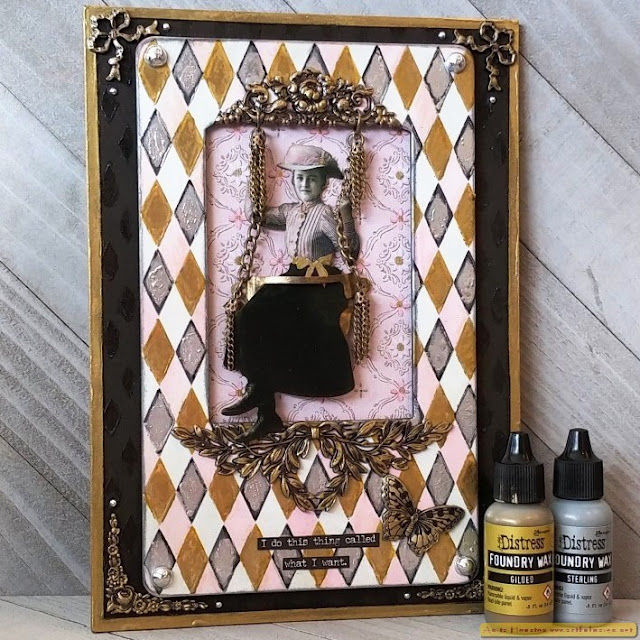

Taking one of the
Collage Frames, paint over it using Picket Fence Distress Paint, making sure to
cover up the gold border lines. I didn't like covering those up, but I didn't
think the lines would look good with my overall design. Let dry, and repaint if
need be to cover up the lines.

Lay the largest
Harlequin Shifter Stencil from Stamper's Anonymous over the frame and while holding if firmly ink over
it using Black Soot Distress Archival Ink using an Ink Blending Tool. Carefully
remove it, and dry the ink. Clean the stencil of any wet ink, and move it over
to ink in more of the matching diamonds, repeating until the whole frame is
covered. It will take about four passes to complete the pattern. Clean the
stencil with 91% rubbing alcohol to remove any black ink for the next part, and
dry the frame.

Lay the stencil back
over the black diamonds and slide it to the right covering up perfectly all the
black diamonds so that they are now covered up by the solid diamonds on the
stencil. Ink over these diamonds with Vintage Photo Distress Archival Ink. Do
the same as before, removing the stencil and drying the frame and cleaning the
wet ink off before continuing the pattern in Vintage Photo.

Lay the clean stencil
over the frame so that now the black and brown diamonds are covered up and the
open diamond is between a group of black and brown diamonds. Ink in these
diamonds with first Spun Sugar Distress Ink. Since there is no Spun Sugar
Archival Ink yet which is permanent, reink over these pink diamonds very
lightly with Kitsch Flamingo Distress Archival Ink. This ink will help hold the
regular Distress Ink in place, just don't ink in too dark as you want a light
pink to match somewhat with the Worn Wallpaper background that will come later.
I know this sounds confusing and probably unnecessary, but you want the ink to
stay permanent so none rubs off during the next parts of the project. Complete
the pattern as you did before, drying and cleaning the stencil until the frame
is complete with pink diamonds in the middle of the black and brown.

Lay the clean stencil
over the black diamonds so that the brown and pink are covered up. Rigorously
shake the Sterling Foundry Wax so you can hear the mixing ball move. Squirt out
about a dime sized amount of the Sterling onto the silicon mat, and then close
the lid on the wax so it doesn't get air in it to dry it up. Using your finger,
rub the Sterling Foundry Wax over the open diamonds on top of the black
diamonds, just in the center so that there will still be a border of black ink
around the diamond. You don't need much wax for each diamond so start light
until you get the feel for how much you need to cover the centers of each
diamond, and reshake bottle each time you want more, remembering to recap. Again,
remove the stencil, wipe it off, and then lay it back down adding more Sterling
to the black diamonds until all are covered in the center, being careful not to
smudge any of the already waxed diamonds. Heat set the Sterling Foundry Wax
with a heat tool, making sure the bottle is not close by so you won't dry it
up. The wax sets very quickly so just watch until the wax turns shiny. The
thicker you add the wax the more shiny and metallic the wax like silver
leafing, so if you want it shinier add more on top until you get the look you
want. Clean your stencil and finger when finished for the next part. The wax
comes off with soap and water or even the rubbing alcohol.

Place the stencil back on
leaving the brown diamonds open. This time add the Gilded Foundry Wax to the
centers of the brown diamonds using your finger as before, and repeating and
cleaning, and then finally heat setting the wax.

Using an Ink Blending
Tool, ink the edges of the inside and outside of the frames with Black Soot
Archival. Set aside to dry. Take the two Vignette Accents as shown or whatever
you want that is metal, shake the Gilded Foundry Wax, add a drop to the mat and
rub the wax over the raised portions of the designs in the metal, then heat set
using a tweezers to help as the metal gets real hot and you don't want to burn
yourself. When the metal pieces are cool to the touch, apply Collage Medium to
the backs of them and adhere the smallest one to the top of the open window on
the frame letting it hang down a bit (matching the leaves on the metal to the
curve on the frame window), and adhere the larger piece to the bottom edge of
the window frame. Let dry.

Taking two Swivel
Clasps in whatever finish you want (I used silver for all of mine), use pliers
to help you remove the chain from the clasp by opening up the jumprings
connecting them. You will not need the clasp so you can put those up. Get a
Label Pull, four Chain Tassels, and two large jumprings as well. I thought I
might need four jumprings, but I only ended up needing two. Attach the large
jumprings to either end of the chains. Take the Label Pull and working on a
solid surface or hammer mat, use pliers and or the hammer to slightly bend the
bottom portion of the pull to make it a little flatter. The upper thin piece
(or bar) will stay rounded and that is fine as you want it to look like one of
those swings that looks like a seat with the protective bar sliding down to
your lap to hold you in, like when you were a child...remember those?!! Just
make sure that bottom wide lip (formerly the pull) is as flat as you can get it
without messing up the shape of the top bar. Shake the Gilded Foundry Wax again
and add some to the mat, and then apply it over all the metal pieces. Don't
worry about getting into any cracks as you want the duo tone metal look. Once
all the metal pieces are covered, heat set them using tweezers to hold them as
they get hot.

Make sure the metal
pieces that are adhered on the frame are firmly adhered. Take a craft pick and
poke a hole in the center of the frame when the rolling scrolls are on the top
metal piece. Make the hole big enough for the jumprings to slide in. Open the
large jumpring that is connected to the chain using pliers and slide the
jumpring into the hole. Add the tassel to the front part of the jumpring and
then close the jumpring back with the pliers. Do the other side as well so that
you now have two chains with tassels hanging down from the top metal piece.

It's easier to do the
next part if the frame is standing up, so prop it up against something, and let
the chains hand down naturally. Open up the bottom jumpring at the end of the
chain, and place the Label Pull (now swing seat) hole in the ring and add a
tassel to the front of the pull. Close the jumpring with pliers, and then do
the other side the same. It should now look like a 'swanky' swing (basically)
hanging from the metal piece on the frame.

Get the Paper Doll from
the Solos pack that look like she is holding on to a swing, and cut down
between the sleeve between her hand and arm on the right side (her left arm)
all the way to the end of her cuff. This is so the chain can go behind it and
look more natural like she is holding the chain. Ink the edges of her with
Vintage Photo Archival and an Ink Blending Tool, and rubbing off any ink that
is a little thick on the top of her...you only want the white edge covered up.
Take a Spun Sugar Distress Crayon and apply some to the silicon mat, and pick
it up with a detail water brush. Color in the girls shirt and the ribbon on the
hat. You can also add some color to her cheeks. Dry with a heat tool slightly.
Shake the Gilded Foundry Wax and apply to the mat. This time pick up a tiny bit
of wax with a small paintbrush and add a little to the girl's necklace, add
dots to the ears for earrings, and add dots to the ribbon on the right side of
the hat like a metal embellishment is on there. Paint in the bow on her waist
as well. Heat set the wax. Clean the brush with alcohol or warm water and soap.

Lay the frame down
flat and fix the swing so that it is laying flat with all the tassels out of
the way. Add a small strip of two sided tape to the seat of the swing. Take the
Paper Doll and slide her hat first between the bar and seat, turning her so her
arm right arm goes in next and then her left, up to her waist. Remove the tape
backing and secure her down on the seat so it looks like she is sitting in it
naturally.

Lay the left chain over
her arm (her right arm) and add Collage Medium under the chain to secure her
arm. Take the right chain and slide it between that cut that you made so that
it looks like her left hand is holding onto the chain. Add Collage Medium to
her hand and secure it to the chain. I place a few slightly heavy objects on
her arms to make sure I got good adhesion for a few minutes. While she is
drying, paint the edges and sides of a panel from the Framed Panel set (you
won't use the frame part) using Black Soot Distress Paint. You don't need to do
the middle as it will be covered up. When her arm and hand are dry and secured,
you can add Collage Medium to her boot and secure to the bottom metal piece or
you can leave her alone to swing freely. I went ahead and adhered mine just to
be safe.

Take the light pink
flowery wallpaper piece from the Worn Wallpaper set, corner round all four
corners. Adhere it on to the center of the panel with two sided tape. I show
foam tape in the picture, but it's not time for that yet...I jumped ahead so
pretend that is not there. Add more Spun Sugar Distress Crayon to the mat and
pick up with the waterbrush. Paint in the little four petal flowers between the
circle scrolls to bring in some cohesion of pink colors from the harlequin
frame. You don't have to do them all as the borders will be covered up. Shake
the Gilded Foundry Wax, and use the paintbrush to paint in the centers of those
four petal flowers and the centers of the large white flowers in the middle of
the circle scrolls. Heat set the Gilded. This wallpaper now really pops!

Using Washi Tape for
masking really helps on this next part or you can free hand it. Shake the
Gilded and add to the mat. Use your finger or a brush and apply it to the sides
of the panel and about 1/4 inch in on the borders. If you use the washi, you
can peel it off and heat set the wax. The more you apply the more brilliant the
gold. I did a side at a time instead of doing all four and heat setting as that
was easier for me. NOTE: In the picture you see that I added the foam tape to
the borders of wall paper, as I thought I was ready to add the frame to the
panel and finish up. BUT...I went to sleep not liking the starkness of that
black border, so the next day I added stuff to it as you will see in the next
photo. BUT...it would have been MUCH EASIER to do that step before the foam
tape and frame addition as I had to cut my stencil to achieve what I wanted. So
IF YOU want to add the small harlequin pattern to the black part, do step 16
now instead of after you add the frame to the panel. If you don't want the
harlequin pattern, then add foam tape to the border and add the frame on top.
ALSO...Select a quote from the Snarky Small Talk Stickers and trim it down and
ink the edges in Black Soot Archival after you cut it apart.

This
should have been done before the foam tape and frame addition, but I needed a
sleep to dream about I guess. Take the smallest pattern of Harlequin Shifters,
and lay it over the black area of the panel. Use washi tape again to mask over
the gold border and pink wallpaper to help you not make a mess if needed. Use
your finger to apply Collage Medium over two rows of the diamonds along the
sides of the panel and a half a diamond border on the top and bottom. I just
felt like the black area needed a little something so the hint of tiny
harlequin diamonds was perfect for a little something. The Collage Medium dries
super quick too. Remove the washi. NOW add the foam tape to the borders of the
wallpaper and add the frame with the swinger on top. Add the quote to the
bottom middle of the frame. Add a large silver Metallic Droplet to each corner
of the frame. And because I still
thought the panel needed something, I added more Gilded to two bows from
the Ribbons Bows Adornments, and a small butterfly, and two corners from the
Vignette Accents. Feel free to be finished if you don't want more metal added,
but I like lots. The two metal bows go on the top corners with tiny silver
droplets on each end of the bows, and the two corner pieces on the bottom corners
with droplets on each side. The butterfly goes on the bottom right next to the
quote. Finally finished and I finally liked it!!!


Supplies:
(Ink Blending Tool, Glass Mat, 91%
Rubbing Alcohol, Heat Tool, Small Paint Brush, Craft Tweezers, Craft Hammer,
Pliers, Craft Pick, Scissors, Two Sided Tape, Corner Rounder, Detail Water
Brush, Washi Tape for Masking, Foam Tape)
-Tim Holtz Idea-ology: Collage Frames, Vignette
Accents, Label Pull, Swivel Clasps, Jumprings, Chain Tassels, Solos Paper
Dolls, Worn Wallpaper, Framed Panel, Small Talk Snarky, Ribbons and Bows
Adornments, Butterfly Adornments, Metallic Droplets
-Ranger Tim Holtz Distress Paint: Picket
Fence, Black Soot
-Stamper's Anonymous Tim Holtz Layering
Stencil: Large and Small Multi Harlequin Shifter
-Ranger Tim Holtz Distress Archival Ink:
Black Soot, Vintage Photo, Kitsch Flamingo
-Ranger Tim Holtz Distress Ink: Spun
Sugar
-Ranger
Tim Holtz Distress Foundry Wax: Gilded, Sterling
-Ranger Tim Holtz Distress Collage
Medium: Matte
-Ranger Tim Holtz Distress Crayon: Spun
Sugar
Isn't the Foundry Wax just wonderful?!! I will be using it A LOT. Hope you enjoyed this project as much as I did making it. Thank you truly for stopping by. Until next time, I hope your hands get creatively dirty soon!