Friday, April 07, 2023

Numbered and Tailored Celebrate Birthday Card with Emporium and Bulletin Letters

Hello All and Happy Good Friday! My youngest Sonshine turned 20 today, and this is the birthday card I made for him, using the new Tailored, Colorize Celebrate, and Emporium and Bulletin Alphanumeric Dies from Tim Holtz and Sizzix. I also used the Numbered 3D Texture Fade for the background, which I can't get enough of for birthday cards....just love how it comes out every time. He will love this card I am sure, and it was so fast to make. Enjoy!

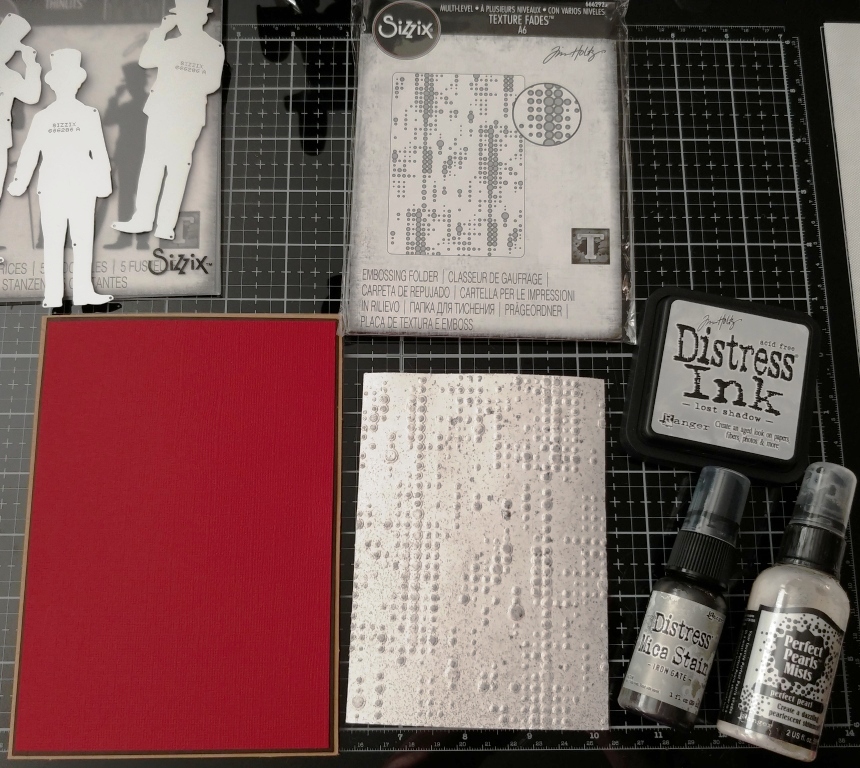
For the background I used the blue marbled Backdrops Sheet from Idea-ology, cut it to size, misted it with water, and ran it through the machine using the Numbered 3D Texture Fade. I ran the pad of Picket Fence Distress Ink over it to bring out the numbers more. I inked the edges in Black Soot Archival and then mounted it to Silver Metallic Kraftstock, then Black Kraftstock, and finally onto a card base folded and cut to 5x6.5 inches, and all those edges were inked in Gathered Twigs Distress Ink.
 I die cut the balloons from Colorize Celebrate using Silver Metallic Kraftstock, and the Tailored hat and suit using Kraft Cardstock and all three of the Textile Surfaces. The Textile Surfaces are perfect for this die set if you are looking for a real textural look. I inked everything with Gathered Twigs and assembled all the pieces together. 

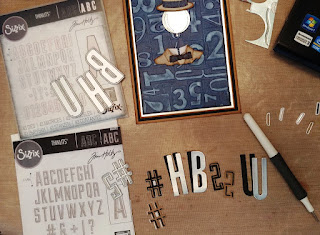
I used Silver and Black Kraftstock as well as Kraft Cardstock for the mix matching of the letters and set aside the others that I didn't use for another project as it makes double when you switch out the negatives for another color of paper. Then I adhered everything on the card front. So simple and fast.


Supplies: 
(Paper Trimmer, Two Sided Tape, Die Cut Machine, Water Mister, Ink Blending Tool, Scissors, Water Mister, Stamp Platform, Small Paint Brush, Foam Tape)
 -Tim Holtz Idea-ology: Backdrops Volume #5, Metallic Classics Kraftstock, Black Kraftstock, Textile Surfaces
 -Sizzix Tim Holtz 3D Texture Fade: Numbered
 -Ranger Tim Holtz Distress Ink:  Picket Fence, Gathered Twigs
 -Ranger Tim Holtz Distress Archival Ink: Black Soot
 -Ranger Surfaces: Kraft Cardstock
 -Sizzix Tim Holtz Thinlits (Everyday 2023): Colorize Celebrate, Tailored, Emporium Alphanumeric, Bulletin Alphanumberic
-Sizzix Tim Holtz Thinlits: Collector 
 
Thanks for stopping by today, and especially for the comments. I'll be back again next week. Until then, I hope your hands get creatively dirty soon!

Monday, April 03, 2023

Mini Brushstroke Flowers in Papercut Cafe Cups with Bunny Stitch Easter Rabbits Entangled Cards

Hello All, and Happy April! Easter is this week, and so I have a pair of cards made with the new Everyday Dies and Texture Fades from Tim Holtz and Sizzix, that I think turned out just adorable. The new Bunny Stitch Thinlits pair perfectly with the new Papercut Cafe and Mini Brushstroke Flowers, and these were so super fun to make. Enjoy, and Happy Easter to those who celebrate!

I used felt from Sizzix to die cut all the main pieces from the Bunny Stitch Thinlits and mounted it on to the base pieces of each item cutting them from Kraft Cardstock from Ranger. I used regular pink thread to sew into the hollow parts of the ears and nose of each bunny. Then I used a thicker white thread to create the bunny's whiskers, just going in and out around the nose, and securing the back with scotch tape. For the eyes I used Tim's Brown Craft Thread, tying a knot and leaving the threads for the eyelashes. They are not perfect looking, but I like the little slant the knots give to the eyes. I also free hand cut the fluffy tails using the felt. I inked the edges of everything with Gathered Twigs Distress Ink.

 I die cut all the pieces from the two cups from Papercut Cafe using Ivory Heavystock, and the main saucer and cup piece using parts of the new Collage Strips from Idea-ology. I love the those strips and love that you can cut apart the pieces that you need and all the patterns work so well together. So I made one blue flower cup and one pink. I inked the edges of everything with Gathered Twigs Distress Ink.
For the Mini Brushstroke Flowers, I die cut the ones I wanted (and there are so many to choose from) using Watercolor Cardstock with two sided tape on the back. I colored them in with Distress Watercolor Pencils and a Detail Waterbrush leaving them in the negatives. Then I adhered them together, and into the cups. 
 
 For the background of the card front, I cut a piece of Watercolor Cardstock to size, times two, and misted it with Twisted Citron Oxide Spray and a little water. While it was damp I ran it through the machine in the Entangled 3D Texture Fade. Talk about LOVE!!!! This fade is gorgeous! I rubbed the pad of Peeled Paint Distress Archival Ink over the raised areas, and then trimmed around the top raised images to look like blades of grass and foliage. 

 
For the sky, I cut more Watercolor Cardstock and misted it with Tumbled Glass Oxide Spray and water, and then into the Dotted 3D Texture Fade. I rubbed the pad of Picket Fence Distress Ink over the dots, and inked the edges with the same color. I mounted these onto White Heavystock and then onto a Kraft base card cut and folded to 5x7 inches. 

 I stamped the sentiment onto more White Heavystock, from the Spring Shadows stamp set from Stamper's Anonymous, and mounted it onto Kraft with a fish tail cut. I cut Crinkle Ribbon enough to go around each card front and back a bow, and misted it with water and Mustard See Distress Oxide Spray and wadded it up to dry. Then I tied it around the front. Then I added on all the die cut pieces with Collage Medium and foam tape. 

 
Supplies: 
(Paper Trimmer, Two Sided Tape, Scissors, Die Cut Machine, Die Pick, Sewing Needles, Scotch Tape, Ink Blending Tool, Waterbrush, Water Mister, Small Stamping Block, Hole Punch, Foam Tape)
 -Ranger Surfaces: Kraft Cardstock
 -Sizzix Felt Sheets: Neutral, Bold, Pastel
 -Sizzix Tim Holtz Thinlits (Everyday 2023): Bunny Stitch, Papercut Cafe, Mini Brushstroke Flowers 
-Tim Holtz Coats and Clark Craft Thread: Dark Brown
 -Ranger Tim Holtz Distress Collage Medium: Matte
 -Ranger Tim Holtz Distress Heavystock: Ivory, White
 -Tim Holtz Idea-ology: Collage Strips, Crinkle Ribbon
 -Ranger Tim Holtz Distress Ink: Gathered Twigs, Picket Fence, Tumbled Glass,
 -Ranger Tim Holtz Distress Watercolor Cardstock
 -Ranger Tim Holtz Distress Watercolor Pencil: Mustard Seed, Kitsch Flamingo, Tumbled Glass, Twisted Citron, Rustic Wilderness
 -Ranger Tim Holtz Distress Oxide Spray: Twisted Citron, Tumbled Glass, Mustard Seed
 -Sizzix Tim Holtz 3D Texture Fade (Everyday 2023): Entangled, Dotted 
-Ranger Tim Holtz Distress Archival Ink: Peeled Paint, Ground Espresso
 -Stamper's Anonymous Tim Holtz Stamp Set: Spring Shadows
 -Pink Thread, Heavyduty White Thread
 
Thank you so very much for stopping by today! I'll be back real soon. I wish you all a happy and blessed Easter full of LOVE! Until next time, I hope your hands get creatively dirty soon!

Thursday, March 02, 2023

The Singing Gentlemen Happy Birthday Card

Hi Everyone and happy March! Spring is coming soon and time is flying by fast. Today, I have a birthday card that I made for my Father In Law, who has a band and loves all things live music, so I tried to make the new Gentlemen Thinlits from Tim Holtz and Sizzix look like they are on a lighted stage singing Happy Birthday with a gorgeous curtain made with the Dotted 3D Texture Fade behind them. Does it look like it...maybe. I might have to explain it to him, but I do think he will like it. Enjoy this short tutorial for making this super fast and fun card. 
For a 5x7 inch card, cut and fold Kraft Cardstock for the base. Cut a Black Kraftstock mat to 4 7/8 x 6 7/8 and adhere onto the Kraft with two sided tape. Cut red cardstock to 4 3/4 x 6 3/4 and adhere to the black. Set this aside. For the curtains cut White Heavystock to 4 x 6 inches. Lightly mist with water and place into the Dotted 3D Fade and run through the machine. Remove and rub the pad of Lost Shadow Distress Ink from Ranger over the raised areas. Shake up Iron Gate Distress Mica Stain and lightly mist over the paper. Then shake up Perfect Pearls Mist and spray heavier over the paper. Let dry. Ink the edges with Lost Shadow, and adhere to the top center of the card front.

For the stage, take Woodgrain Cardstock and cut 1.5 x 4 5/8 inches. Angle cut both sides from the top edge 1/4 inch in to the bottom corner, so that the top lines up perfectly with the curtains and the bottom angles out. Mist the paper with Lost Shadow Spray Stain, and let dry. Rub the pad of Gathered Twigs over the raised woodgrain until you like the color. Ink the edges as well. Adhere the stage to the bottom portion of the card front on top of the curtains and leaving just a slight piece of red cardstock showing around the edge. 
 
Computer generate the singing words using Playbill Font, 20 point for the bottom words, and 16 point for the three happys. Add two sided tape to the back of these, and cut apart. Ink the edges with Gathered Twigs, and set the three happys aside. Take the long sentiment and mount onto Kraft Cardstock, ink those edges, and mount again onto red cardstock. Set aside. Add two sided tape to the back of Black Metallic Kraftstock, and die cut the three Gentlemen from this. Lightly mist them with Iron Gate Mica Stain. Let dry. Adhere the gents to the card front, and then add the sentiments. Ink the edges of the card with Gathered Twigs. 
 
Supplies:  
(Paper Trimmer, Two Sided Tape, Die Cut Machine, Water Mister, Ink Blending Tool, Scissors) 
-Ranger Surfaces: Kraft Cardstock 
-Tim Holtz Idea-ology: Black Kraftstock, Metallic Classics 
-Bazzill Cardstock: Dark Red 
-Ranger Tim Holtz Distress Heavystock: White 
-Sizzix Tim Holtz 3D Texture Fade: Dotted 
-Ranger Tim Holtz Distress Ink:  Lost Shadow, Gathered Twigs 
-Ranger Tim Holtz Distress Mica Stain: Iron Gate 
-Ranger Perfect Pearls Mist: Perfect Pearl 
-Ranger Tim Holtz Distress Woodgrain Cardstock 
-Ranger Tim Holtz Distress Spray Stain: Lost Shadow 
-Sizzix Tim Holtz Thinlits (Everyday 2023): The Gentlemen 
-Computer Generated Sentiments with Playbill Font 
 
Thank you so much for stopping by today. I will be back soonish, I hope. Until then, I hope your hands get creatively dirty soon!