Hi Everyone! The
Tim Holtz Stamper's Anonymous Halloween Live is just about to finish up, and of course my mind is up in the clouds in awe of all the makes, as I'm sure yours is as well! It's so crazy to see so many different kinds of makes from five stamp sets! If you missed the original Live the replay will be up soon. Here is one of my makes from the show featuring the new
Sketchy Leaves Stamp Set along with help from
The Obscure and
Foreboding Sets using Alcohol Inks from
Ranger. These were a cinch to make and just enjoyable to do. Oh how I LOVE Autumn, and cannot wait for it to arrive. Enjoy!

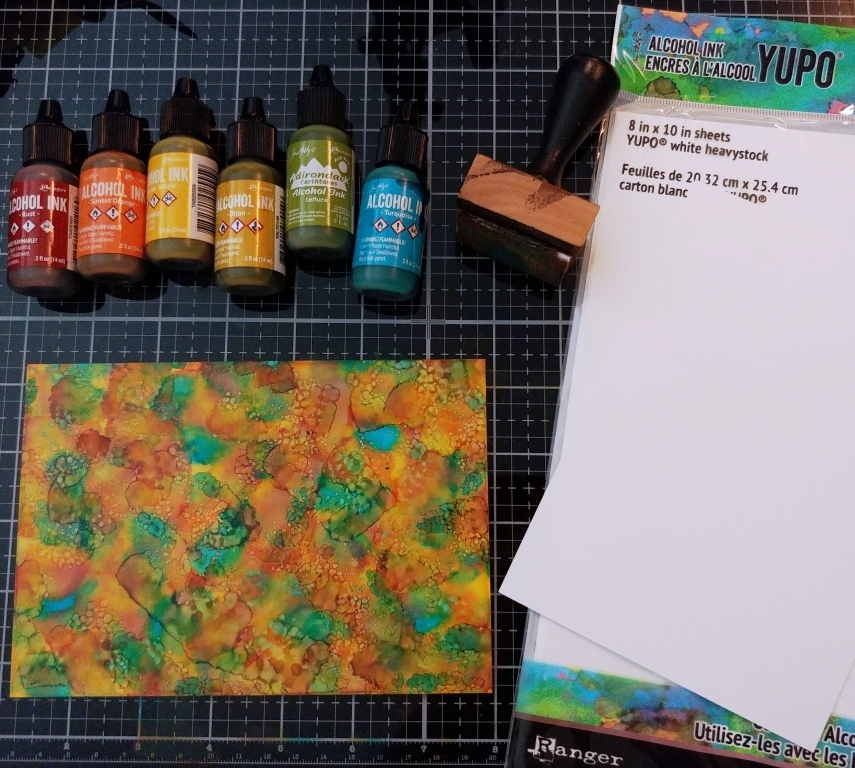
Cut a piece of Yupo White
Heavystock to 4.5 x 6.5", and another piece that is about 4 x 4".
Gather Rust, Sunset Orange, Sunshine Yellow, Dijon, Lettuce, and Turquoise
Alcohol Ink from Ranger, and apply a small dot of each onto the felt on an
Alcohol Ink Applicator, then pounce the ink onto the paper until covered. You
can blow on a few spots to create tiny circles, fyi. Do the smaller paper the
same and then set that one aside for now.

Place the larger paper
into the large stamp platform, and arrange one of the scrolls and the flowers
from the Foreboding and The Obscure Stamp Sets onto the bottom of the paper so
they will be framing the bottom. Close the lid to secure the stamps. Gather
Alcohol Lift Ink, a paper towel, and cut
a piece of Ivory Heavystock to the same size 4.5 x 6.5 inches and have it
ready. You need to work fairly quickly to do the lifting. Apply the Lift Ink to
the two stamps generously. Close the platform and stamp the images onto the AI
paper, and press firmly and for a few seconds. Open the platform and carefully
remove the paper and place the Ivory Heavystock in exactly where the other
paper was, and then close the platform and stamp to transfer the ink, pressing
firmly and for a few seconds. Open platform and remove the paper. You can stamp
another paper if you wish to get whatever is left over on the stamps. Place the
paper towel in the platform and stamp a few times until all the ink is
transferred to the paper towel, then
lightly clean the stamps with the paper towel, but leave the stamps in place on
the platform. Take the paper towel and place it over the Alcohol Ink paper and
lightly wipe away the ink on the stamped images, revealing the lifted images.
Clean all the ink off. Place the AI paper back in the platform but TURN IT so
that the lifted images will be at the top, and a clean bottom is ready for
more. Repeat all the above steps to lift the ink and transferring it the Ivory.
Finally clean and remove the stamps as you are finished with those.

Use sticky notes or
scrap paper to cover all the lifted images as best you can on the AI paper.
Place the Fractured Layering Stencil over the center and position it so that
you can see as much of the stencil parts on the open areas of the paper. Take a
clean Ink Blending Foam and add it the tool, dab it onto the Alcohol Lift Ink
pad to pick up the ink, and then start dabbing it over the open stencil areas.
You will see the ink lifting away. Once all areas are lifted, remove the
stencil and sticky notes and use a paper towel to remove any ink. You should
have a lifted fractured area in the center. Wash the stencil and the foam with
warm water to remove all the ink and let dry for use another day, and have the
stencil ready to use on the next part.
Take the Ivory paper now,
and cover the images with the sticky note like before, add the stencil on. Use
Gathered Twigs or another brown ink and stencil in the Fractured image over the
center of the paper. Clean the stencil and now you are finished with it.
Take the 4 x 4"
piece with the Alcohol Ink on it and place it into the platform. Select a leaf
from the Sketchy Leaves set, and place it on the paper and close the platform
to secure it. Cut a piece of Ivory Heavystock the same size about 4 x 4"
and have it ready, as well as the Lift Ink again, and a paper towel. Stamp the
leave with the Ink, then transfer to the other paper, and repeat the clean up
like before. Add two sided to the back of both, and then use scissors to cut
the leaves out leaving a small border around. Mount both of these to turquoise
color Metallic Kraftstock, and then cut those out again leaving a border.
Cut and fold two Kraft
card bases to 5 x 7". Ink the edges of the cards with the Gathered Twigs.
Cut two turquoise Metallic pieces to 4.75 x 6.75" and mount to the cards.
Stamp the sentiment from the Tiny Frights Stamp Set on the lower right corner
of both papers using a dark brown Archival like Ground Espresso. Mount these
the cards. Apply foam tape to the back of the leaves and then mount the
corresponding one to the card fronts. Shake the Unraveled Distress Mica Stain,
and then pour a tiny bit out onto the
white mat. Pick up with the Water Brush and color in some of the images
on both cards, like on the scrolls and flowers, and even on the leaves.
(Paper Trimmer, Alcohol Ink Applicator, Large
Stamp Platform, Paper Towel, Ink Blending Tool w/Clean Foam, Sticky Note, Two
Sided Tape, Scissors, Foam Tape, Detail Water Brush)
-Ranger Tim Holtz Alcohol Ink Yupo White
Heavystock
-Ranger Tim Holtz Alcohol Ink: Rust, Sunset
Orange, Sunshine Yellow, Dijon, Lettuce, Turquoise
-Ranger Tim Holtz Alcohol Lift Ink
-Stamper's
Anonymous Tim Holtz Stamp Set: Foreboding, The Obscure, Sketchy Leaves, Tiny
Frights
-Ranger Tim Holtz Distress Heavystock:
Ivory
-Stamper's Anonymous Tim Holtz Layering Stencil: Fractured
-Ranger Tim Holtz Distress Ink: Gathered Twigs
-Ranger Tim Holtz Distress Archival Ink:
Ground Espresso
-Tim Holtz Idea-ology: Metallic Colors Kraftstock
-Ranger Surfaces: Kraft Cardstock
-Ranger Tim Holtz Distress Mica Stain:
Unraveled
Thank you so much for stopping by, and of course for the comments. I truly appreciate all of you who do. I'll be back again on Friday with my other Halloween make that was in the show. Until then, I hope your hands get creatively dirty soon!


No comments:
Post a Comment
Thank you so much for viewing my blog and commenting on it! It truly means so much to me.