Friday, March 04, 2022

Tim Holtz Sizzix Chapter 1 - Happy Easter Colorize Papercut Chicks and Bunny Games with 3D Doily Cards

Hello All! Here are my last cards from the Tim Holtz Sizzix Chapter 1 Live, and these cute cute Easter cards are made with the Colorize Papercut Chicks and Bunny Games Thinlits, along with the 3D Doily Texture Fade. Oh my goodness, have you ever seen a more CUTE bunny and chick?!! I want to adopt these guys and let them run around my house with the dog! So so precious! BUT, these cards have to be the most cute project I've ever done...there was no way I could grunge these guys up. They needed to stay clean and cute! ;0)  That Texture Fade is amazing too. I thought it made the best lettuce looking hills, perfect for the bunnies. Enjoy!
 
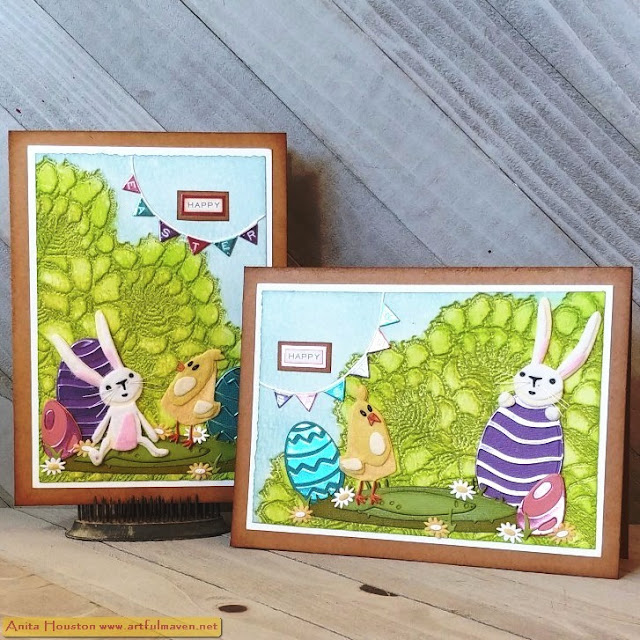
Die cut pieces for the chicks using two yellows of felt, an ivory felt, orange, and black cardstock, after adding two sided tape to the back of each paper or felt.  Die cut two grasses (if making two cards) with three colors of green cardstock and ink the edges of each with Peeled Paint Archival Ink before assembling. Use Metallic Confections pink and Classic Pink for the eggs. 
 
 
Die cut the rabbits with ivory, white, and pink felt and black cardstock. On the flowers, die cut three of each die piece in white and yellow felt and then mix them to get 12 flowers in all. Die cut six grass blades in green. On the eggs, die cut two base eggs for each size in a matte cardstock, and one each of the pattern egg in a matching Metallic Kraft Stock. When you remove the solid piece from the pattern egg, use the loose pieces for the other egg base...no waste. Die cut the banner in white Heavystock and all the banner pieces in three colors of Metallic Kraft Stock. You can save the extras for another project.
 
 
Cut two 'happy' words from the Quotations Metallic Stickers, and ink the edges in Gathered Twigs. Mount these onto a Metallic Kraft Stock (I used pink.) and then onto Kraft Cardstock, inking those edges in Gathered Twigs. Adhere the Metallic banner pieces onto the banner, alternating colors. Cut words from the Tiny Remnant Rubs that have the letters to spell 'Easter' (I used 'observations' and 'adventure'), cut the letters off that you need, and use tweezers to apply them to the banner pieces and rub on. Save the extra letters for another project. 
 
 
Cut Watercolor Cardstock to fit into the 3D Doily Texture Fade. (Note: I used the debossed side.) Ink over the raised parts of the fade with Peeled Paint Distress Archival Ink. Lightly mist the Watercolor Cardstock with water, and then close the fade and run through the die cut machine three times for good embossing. Do two of these for two cards. Clean the fade with 91% rubbing alcohol to remove all the ink. Let paper dry. The green ink is in the debossed areas, so you will use the back of the Doily design rather than the raised design the way the Texture Fade is intended.
 
 
Use the Deckle Trimmer to cut the one blank side on the watercolor down to where the doily pattern starts, so the paper will now be 4 1/8 x 5 7/8 inches. Ink the open un-patterned area with Speckled Egg Distress Ink and an Ink Blending Tool, taking care to not get into the green area. Ink the open parts of the patterned green area with both Twisted Citron and Shabby Shutters Distress Inks for a more lettuce look. Lightly mist the paper with water to create water droplets and use a paper towel to remove the wet, and let dry. Ink the edges of the watercolor paper with Speckled Egg on the sky area and either one of the greens in the lettuce hill area. One will be vertical and one horizontal for the card fronts. Mount both onto White Heavystock with two sided tape, cut to 4 3/8 x 6 1/8 inches. Then mount this onto a kraft card base folded to 5 x 6 3/4 inches, remembering one is vertical and one horizontal. Ink the edges of the kraft base card with Gathered Twigs Distress Ink. 
 
 
To add whiskers to the bunny's heads, first use a Craft Pick and poke a tiny hole through the bunny's face under his nose, on each side of his nose, so you know where the needle will go and you have less of a chance of messing up the face. Use a wide hole needle and add three pieces of white thread to each (about 8 in. each so you have plenty to work with). Place the needle into one of the tiny holes you just made on the front of the head and pull the three threads through (say that fast three times) leaving about an inch of each thread, and then push the needle into the tiny hole on the back of the bunny's head and push the needle through taking care to pulling the threads out on the front. Cut the three threads off the needle leaving about an inch of threads on that side of the nose. You should have long whiskers on both sides of the nose. Add a piece of two sided tape (do not remove the backing yet) over the threads on the back of the bunny's head to hold them in place. Cut the whiskers to the length you want. If the whiskers won't behave and go all over the place add a tiny bit of the Collage Medium to the whiskers and smooth them out and lay them where you want and hold them down a few seconds until they obey. Do the same for the other bunny head. Adhere all the die cuts to the front of the card, starting with the grass, then eggs, then flowers and grass, then chicks and bunnies, and finally the banner and 'happy', and use a bit of Collage Medium to help secure the tiny pieces if there wasn't much two sided tape on the back.
 
Supplies: 
(Scissors, Two Sided Tape, Die Cut Machine, Die Pick, Ink Blending Tool, Craft Tweezers, Paper Trimmer, Water Mister, 91% Rubbing Alcohol, Deckle Trimmer, Craft Pick, White Thread with Wide Hole Needle)
-Sizzix Tim Holtz Thinlits (Chapter 1 2022): Colorize Papercut Chicks, Bunny Games 
-Tim Holtz Idea-ology: Classic Kraft Stock, Metallic Confections Kraft Stock, Tiny Text Remnant Rubs, Quotations Metallic Stickers 
-Sizzix Felt Sheets: Pastel, Neutral, Bold 
-Tim Holtz Core-dinations Kraft Core: Nostalgic, Classic 
-Ranger Tim Holtz Distess Archival Ink: Peeled Paint 
-Ranger Tim Holtz Distress Watercolor Cardstock
-Sizzix Tim Holtz 3D Texture Fade (Chapter 1 2022): Doily 
-Ranger Tim Holtz Distress Ink:  Speckled Egg, Twisted Citron, Shabby Shutters, Gathered Twigs 
-Ranger Surfaces: Kraft Cardstock 
-Ranger Tim Holtz Distress Heavystock: White 
-Ranger Tim Holtz Distress Collage Medium: Matte 
-Gelly Roll Pen: White

I am totally going to use this rabbit on a new baby card. So darn cute! I'll be back soon. Thank you truly for stopping by. I hope your hands get creatively dirty soon!

Tuesday, March 01, 2022

Tim Holtz Saltwater Taffy Distress Miss You Card

Hello everyone and Happy March! This year is flying by already! Today I wanted to show you a simple card made with the new Tim Holtz Saltwater Taffy Distress goodies from Ranger.  What a super soft and versatile color to go with pretty much any other color in the Distress line. When I first saw the new color, I thought it was perfect for flowers that bloom on cactus. I'm not a big cactus person (fell into so many as a child), but my Mother loves them, and since she has been on the East Coast with my Sister for several months I thought I'd send her a little card with a cactus to remind her of home and me. Enjoy!
 
Ink over a #8 Distress Heavystock tag with Peacock Feathers and Salty Ocean Distress Ink using Ink Blending Tools. Flick larger droplets of water over the tag once you like the amount of ink on it. Blot away the water with a paper towel and let dry or use a heat tool. Ink over the whole tag using Saltwater Taffy Distress Ink, especially added lots of ink to the whitish water droplet areas. My tag here shows the bottom portion of the tag inked with Saltwater Taffy so you can see the difference when the ink is added over. Set tag aside for now. 
 
 
Die cut the new Simple Plaid Thinlit from Sizzix using Woodgrain Cardstock. Poke out all the inside rectangles and save those for another project like a for use in a shaker, or just toss them. Trim off the bottom edge of the Plaid so that it is about the same length as the tag and save this piece. Trim off any side portion that is wider than the tag as well, and toss this. You will use the bottom portion only so trim off any lines that are hanging off of a nice border piece. Add Collage Medium to the back of both the longer Plaid and thinner bottom piece and adhere these to a piece of white or cream vellum about the same size as both pieces. Ink over the vellum and woodgrain heavily with Saltwater Taffy Distress Ink, getting into all the areas of woodgrain and into the rectangles of vellum showing. 
 
 
Cut off the smaller piece of plaid and trim around it. This will be the top of the curtain, the valence. Take the larger piece of plaid and cut it in the shape of a tied back curtain panel best as you can, and toss or save the side you are not using. Ink the edges of both curtain pieces with Saltwater Taffy. Cut off the bottom potion of the tag right next to the hole. Turn this part over and ink over the hole with Saltwater Taffy as dark as you can. Cut around the hole and ink the edges. This will be a decorative thing of some sorts that looks like it ties back the curtain. Ink the edges of the remainder of the tag using one of the blue inks.
 
 
Add a strip of Merchant Design Tape to the bottom of the blue portion. I used the scroll design that matches the Saltwater Taffy. Adhere the curtain panel on the left side with Collage Medium or two sided tape. Adhere the valence above the curtain on top of it, and adhere the tag hole to the part of the curtain where it looks like it is tied back. 
 
 
Cut and fold a Kraft card base to 4 x 5.5 inches. Ink the edges with Gathered Twigs Distress Ink. Cut an Ivory Heavystock piece to 3.75 x 5.5 inches and add another strip of Design Tape to the right side (length wise) leaving a tiny border of Ivory showing. Mount this onto the front of the card base. Mount the curtain piece onto the Ivory between the tape and left Ivory edge making sure to leave a bit of Ivory showing on each side, using two sided tape. Set aside for now. 
 
  
Using the Funky Cactus Thinlits, die cut the prickly pear cactus pieces, large flower pieces, and tiny flowers using Watercolor Cardstock. Die cut the large pot pieces with Kraft Cardstock. Ink over the tiny flowers with Mustard Seed Distress Ink. You will only need three of these. Ink over the flowers with Saltwater Taffy Distress Ink, and then color in the small of the two with Saltwater Taffy Distress Spray Stain using a small paintbrush so you can achieve the darkest of the color. Ink over the kraft pot pieces with Saltwater Taffy Distress Ink, adhere them, and then paint over the top and right side areas of the pot with more Spray Stain to deepen the color for shadow. Ink over the smaller cactus piece with Crushed Olive Distress Ink and larger with a blend of the Crushed Olive with Rustic Wilderness. Ink the edges of both with Rustic Wilderness and adhere these together. Adhere a tiny flower to the center of the large flower, and then adhere the smaller flower on top of these for a layered look. Adhere the cactus to the lower right side of the card front with room for the pot underneath. Adhere the pot on the bottom so it is sitting on the Design Tape. Adhere the flowers onto the cactus randomly, all using Collage Medium.
 
 
Spray a small piece of Ivory Heavystock (about 3 x 3 inches) with Saltwater Taffy Distress Spray Stain and Oxide Spray, melding them. Use a heat tool to dry. Cut this into three strips, and die cut the 'birthday', and 'so much' portions only from the Bold Text #1 Thinlits. Remove leaving the letters inside the Heavystock if you can. Die cut the 'so' portion again. You only need the letters to spell 'miss you' so you can poke out the others and save them for another project. Leaving the others in place, ink over them with Saltwater Taffy Distress Ink and pour Saltwater Taffy Distress Embossing Glaze powder over. Heat to emboss these, holding them with craft tweezers to help not burn you. They will emboss super fast. Poke the letters out and arrange them on the valence how you want. Add Collage Medium to the back and adhere them down. 
 
Supplies: 
(Ink Blending Tool, Water Mister, Paper Towel, Die Cut Machine, Die Pick, Paper Trimmer, Two Sided Tape, Small Paint Brush, Heat Tool, Craft Tweezers) 
-Ranger Tim Holtz Distress Heavystock Tags: #8
-Ranger Tim Holtz Distress Ink: Peacock Feathers, Salty Ocean, Saltwater Taffy, Crushed Olive, Rustic Wilderness, Mustard Seed, Gathered Twigs 
-Ranger Tim Holtz Distress Woodgrain Cardstock 
-Sizzix Tim Holtz Thinlits:  Simple Plaid, Funky Cactus, Bold Text #1 
-Ranger Tim Holtz Distress Collage Medium: Matte 
-Tim Holtz Idea-ology: Merchant Design Tape 
-Ranger Tim Holtz Distress Heavystock: Ivory 
-Ranger Surfaces: Kraft Cardstock 
-Ranger Tim Holtz Distress Watercolor Cardstock
-Ranger Tim Holtz Distress Spray Stain: Saltwater Taffy 
-Ranger Tim Holtz Distress Oxide Spray: Saltwater Taffy 
-Ranger Tim Holtz Distress Embossing Glaze: Saltwater Taffy 
-Vellum
 
I will be back again this week. Thank you truly for stopping by and leaving a comment. Until next time, I hope your hands get creatively dirty soon!