Thursday, March 02, 2023

The Singing Gentlemen Happy Birthday Card

Hi Everyone and happy March! Spring is coming soon and time is flying by fast. Today, I have a birthday card that I made for my Father In Law, who has a band and loves all things live music, so I tried to make the new Gentlemen Thinlits from Tim Holtz and Sizzix look like they are on a lighted stage singing Happy Birthday with a gorgeous curtain made with the Dotted 3D Texture Fade behind them. Does it look like it...maybe. I might have to explain it to him, but I do think he will like it. Enjoy this short tutorial for making this super fast and fun card. 
For a 5x7 inch card, cut and fold Kraft Cardstock for the base. Cut a Black Kraftstock mat to 4 7/8 x 6 7/8 and adhere onto the Kraft with two sided tape. Cut red cardstock to 4 3/4 x 6 3/4 and adhere to the black. Set this aside. For 
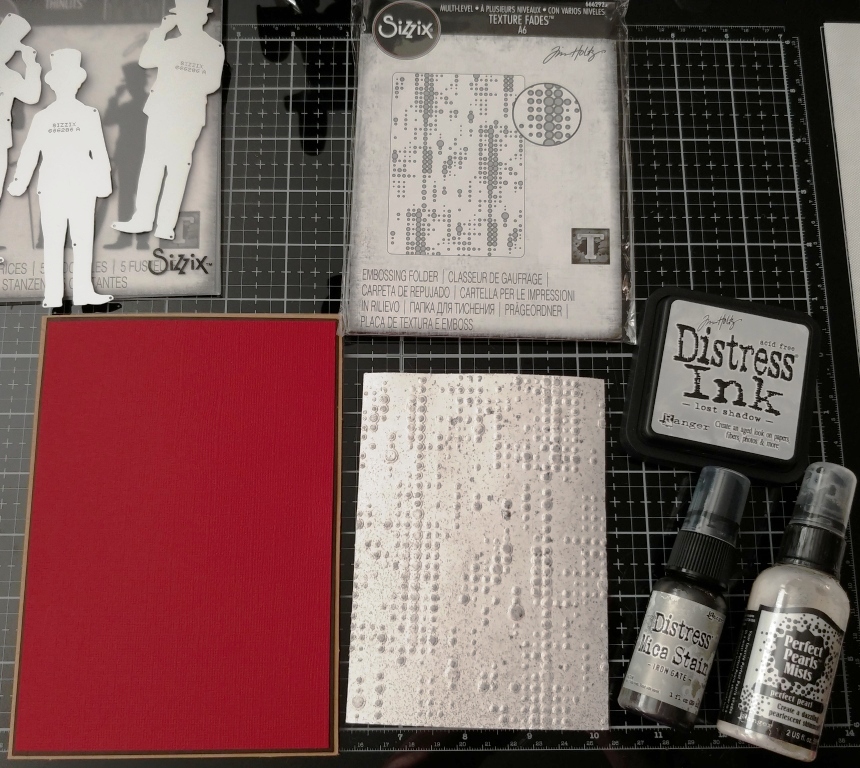
the curtains cut White Heavystock to 4 x 6 inches. Lightly mist with water and place into the Dotted 3D Fade and run through the machine. Remove and rub the 
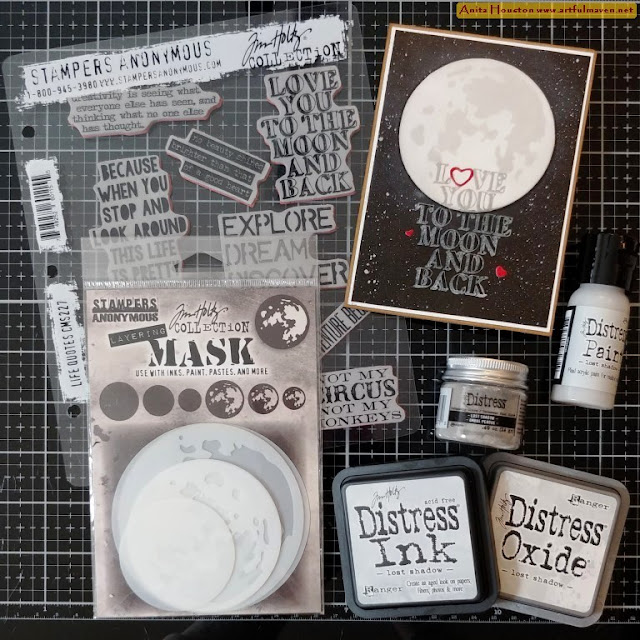
pad of Lost Shadow Distress Ink from Ranger over the raised areas. Shake up Iron Gate Distress Mica Stain and lightly mist over the paper. Then shake up Perfect Pearls Mist and spray heavier over the paper. Let dry. Ink the edges with Lost Shadow, and adhere to the top center of the card front.

For the stage, take Woodgrain Cardstock and cut 1.5 x 4 5/8 inches. Angle cut both sides from the top edge 1/4 inch in to the bottom corner, so that the top lines up perfectly with the curtains and the bottom angles out. Mist the paper with Lost Shadow Spray Stain, and let dry. Rub the pad of Gathered Twigs over the raised woodgrain until you like the color. Ink the edges as well. Adhere the stage to the bottom portion of the card front on top of the curtains and leaving just a slight piece of red cardstock showing around the edge. 
 
Computer generate the singing words using Playbill Font, 20 point for the bottom words, and 16 point for the three happys. Add two sided tape to the back of these, and cut apart. Ink the edges with Gathered Twigs, and set the three happys aside. Take the long sentiment and mount onto Kraft Cardstock, ink those edges, and mount again onto red cardstock. Set aside. Add two sided tape to the back of Black Metallic Kraftstock, and die cut the three Gentlemen from this. Lightly mist them with Iron Gate Mica Stain. Let dry. Adhere the gents to the card front, and then add the sentiments. Ink the edges of the card with Gathered Twigs. 
 
Supplies:  
(Paper Trimmer, Two Sided Tape, Die Cut Machine, Water Mister, Ink Blending Tool, Scissors) 
-Ranger Surfaces: Kraft Cardstock 
-Tim Holtz Idea-ology: Black Kraftstock, Metallic Classics 
-Bazzill Cardstock: Dark Red 
-Ranger Tim Holtz Distress Heavystock: White 
-Sizzix Tim Holtz 3D Texture Fade: Dotted 
-Ranger Tim Holtz Distress Ink:  Lost Shadow, Gathered Twigs 
-Ranger Tim Holtz Distress Mica Stain: Iron Gate 
-Ranger Perfect Pearls Mist: Perfect Pearl 
-Ranger Tim Holtz Distress Woodgrain Cardstock 
-Ranger Tim Holtz Distress Spray Stain: Lost Shadow 
-Sizzix Tim Holtz Thinlits (Everyday 2023): The Gentlemen 
-Computer Generated Sentiments with Playbill Font 
 
Thank you so much for stopping by today. I will be back soonish, I hope. Until then, I hope your hands get creatively dirty soon!

Friday, February 03, 2023

Lost Shadow Distress To The Moon Valentine Card

How about that new Distress color?!! Talk about the most versatile neutral ever! Lost Shadow from Tim Holtz and Ranger is really unique as it's not too dark, not too light, goes with every single color in the line, AND can hold it's own all by itself. I never thought I could love a gray shade so much, but I do. Here on this very simple Valentine, which took me about 20 minutes to make from start to finish, I used Lost Shadow not only as a gray (for the moon) but also in place of my usual white that I would normally do on a night sky card. There is no other color I could do that with. Typically when I create a moon, I use a combination of Pumice Stone, Hickory Smoke, and Antique Linen to achieve the look I like, but with Lost Shadow it was all I needed. Just perfect! And then it's light enough to create stars with. Seriously, just perfect. Enjoy this simple simple tut and card...that can really be an all occasion card and not just a Valentine.
  
For this 4x5.5 inch card, I cut and folded a Kraft Cardstock base, inked the edges in Gathered Twigs Distress Ink, and then added a White Heavystock mat. I used the medium Sized Circles Movers and Shapers from Sizzix, to cut a White Heavystock piece for the moon. The medium Moon Mask from Stamper's Anonymous is a great match for this size of circle. I also cut the Black Kraftstock as a front for the card just slightly smaller than the white mat.

First, I inked over the whole circle with Lost Shadow Distress Ink and an Ink Blending Tool. Then I laid the open mask over the circle and inked in the parts with Lost Shadow Distress Oxide. Taking the Black Kraftstock, I placed the solid mask in the center upper portion of the black, and inked around it with the Oxide. Yes, it shows up wonderfully. Then I lightly misted both pieces with water to get some mottling going.

I adhered the moon in place, and then added the sentiment to the platform, covering the 'o' from the 'love' with a sticky note so it wouldn't get stamped. I inked it up and removed the sticky note, and stamped the sentiment from the Life Quotes Stamp Set over it and the bottom of the card front with the Lost Shadow Oxide and immediately poured the matching Embossing Glaze over. I heat set the glaze. Look how wonderfully it shows up on the black. No need for white. 

 I placed the solid moon mask over the moon to cover it up and added sticky note over the sentiment to cover it up, and mixed a tiny bit of water with a tiny bit of Lost Shadow Distress Paint, and then used the Splatter Brush to add drops of paint over the rest of the black card for a starry look. Again, no need for white. 

I die cut a piece of White Heavystock using one of the icing die pieces from the Colorize True Love Thinlits and die cut the part I wanted. I inked over the hearts I needed with Lumberjack Plaid Distress Ink and a Detail Blending Tool, and added the open heart to the place where the 'o' would go, and added a few more tiny hearts to the card. Then I added the card front onto the base card. This card was so super simple and so so fast to put together, and has a big impact I think.

Supplies:  
(Paper Trimmer, Two Sided Tape, Scissors, Die Cut Machine, Die Pick, Ink Blending Tool, Water Mister, Sticky Note, Anti-Static Pouch, Heat Tool, Detail Ink Tool, Spatter Brush) 
-Ranger Surfaces: Kraft Cardstock 
-Ranger Tim Holtz Distress Heavystock: White 
-Tim Holtz Idea-ology: Black Kraftstock 
-Sizzix Tim Holtz Movers and Shapers Die: Sized Circles (Medium) 
-Stamper's Anonymous Tim Holtz Layering Mask: Moon Mask 
-Ranger Tim Holtz Distress Ink:  Lost Shadow, Gathered Twigs, Lumberjack Plaid 
-Ranger Tim Holtz Distress Oxide Ink: Lost Shadow 
-Stamper's Anonymous Tim Holtz Stamp Set: Life Quotes 
-Ranger Tim Holtz Distress Embossing Glaze: Lost Shadow 
-Ranger Tim Holtz Distress Paint: Lost Shadow 
-Sizzix Tim Holtz Thinlits (Everyday 2023): Colorize True Love
 
Thank you so much for stopping by today! The new color rocks, and I can't wait for the last one...I hope soon. See you next time, and until then, I hope your hands get creatively dirty soon!