Monday, August 08, 2022

Tim Holtz Sizzix Halloween 2022 - Colorize Trick or Treat Candy Apple Trio Tags

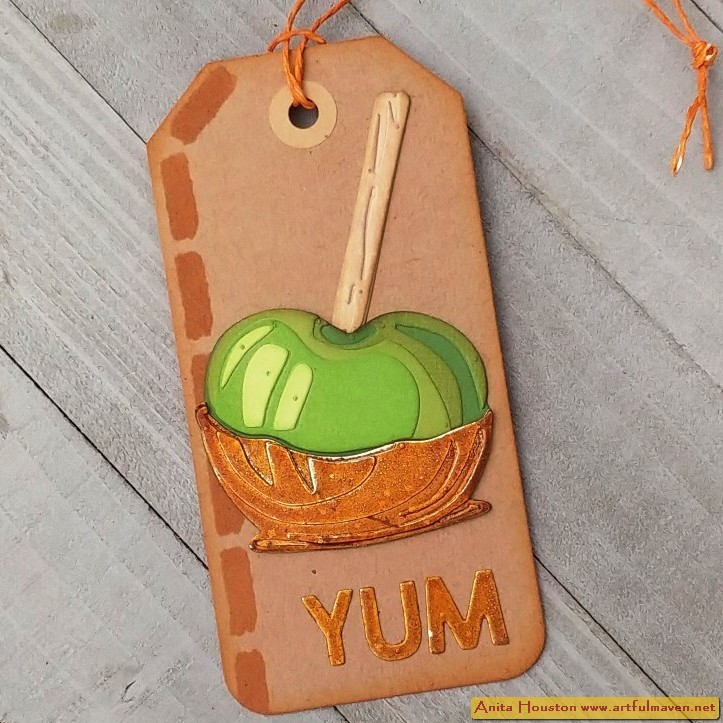
Wasn't that Tim Holtz Live showing all the new Halloween Sizzix Dies and projects made with them wonderful?!! My head is still swimming with inspiration from all the makes! I'll be posting the two projects I made for the Live in the next two weeks, but I also made two projects (one little and one big) for the after Live that I'll be showing you this week. This first project is the little one that packs a big sweet punch, and were super simple, fast, and fun to make. Aren't these little Distress Embossing Glazed chocolate, caramel, and red Candy Apple #5 tags the cutest?!! They were made with the new Colorize Trick or Treat and Halloween Bold Text Thinlits. You can add so much more and really make them special, but I wanted to keep them super simple, as I made them specifically for tying to Candy Apples for a Fall Fun Festival, and I have several more to make. They would be so great at an Autumn or Halloween themed party too. The tut is short and sweet, just like the project...enjoy!
Mist a small piece of Distress Woodgrain Cardstock with Antique Linen Distress Spray Stain from Ranger. Dry. Add two sided tape to the back. Die cut the two popsicle stick dies from the Colorize Trick or Treat Thinlits (since I made three, I die cut 3 of each). Ink the edges of the sticks with Antique Linen Distress Ink and adhere together. Set aside. Select four different shades of green matte cardstock, and add two sided tape to the back. Ink the edges of all the pieces with Twisted Citron Distress Ink, and adhere all the pieces. Die cut the three highlight pieces with white cardstock (I used Specialty Stamping Paper) and adhere those. Ink over the highlight pieces with Twisted Citron. Set all these aside. 

For the apple bottoms, you need a dark, light and medium of light brown honey colors for the caramel, reds for the candy apple, and brown for the chocolate. I used metallics for the caramel and red. You will cut the bottom piece with the lightest color, the second and third layers with the darkest color, and the top piece with the medium tone. Put two sided tape on the back of each. Also, die cut the letters 'y', 'u', and 'm' with the medium tone colors. Once die cut, adhere all the pieces together. Using an Embossing Dabber or Ink, apply liberally to the pieces and pour Vintage Photo Embossing Glaze on the caramel and chocolate pieces and heat emboss. Apply Candied Apply Embossing Glaze to the red and heat emboss. You can use Walnut Stain on the chocolate pieces, but I seem to have lost my jar. Do the same to the letters with the glaze and heat emboss using tweezers to help. 

 Take a #5 Kraft Tag and round the bottom corners. Doodle, stamp, stencil or whatever you want in the background. Adhere the word at the bottom, then the apples and sticks. Ink the edges of the tags in the same color inks as the candy part...I used Fired Brick, Wild Honey, and Vintage Photo Distress Archival. Using white or cream Paper String, cut each about 12 inches, and use the same inks and an Ink Blending Tool to color the string. Tie the string on the tag holes. 

Supplies: 
(Scissors, Two Sided Tape, Die Cut Machine, Die Pick, Ink Blending Tools, Craft Tweezers) 
-Ranger Tim Holtz Distress Woodgrain Cardstock 
-Tim Holtz Idea-ology: Metallic Colors Kraftstock, Metallic Classics Kraftstock, Metallic Confections Kraftstock, Classic Kraftstock, Solid Paper String 
-Sizzix Tim Holtz Thinlits (Halloween 2022): Colorize Trick or Treat, Bold Text Halloween 
-Ranger Tim Holtz Distress Spray Stain: Antique Linen 
-Ranger Tim Holtz Distress Ink: Antique Linen, Twisted Citron 
-Ranger Tim Holtz Distress Embossing Dabber 
-Ranger Tim Holtz Distress Embossing Glaze: Vintage Photo, Candied Apple 
-Ranger Surfaces: #5 Kraft Tags 
-Ranger Tim Holtz Distress Archival Ink: Vintage Photo, Fired Brick, Wild Honey
 
Thank you so much for stopping by today. I'll be back again this week with a big project with a long tutorial. Until then, I hope your hands get creatively dirty soon!

Wednesday, June 29, 2022

Stamper's Anonymous Summer 2022 - Noteworthy Waterfall with Bubbles Mixed Media Small Canvas Pouch

Hello again this week, and welcome to the last project tutorial from the Tim Holtz Stamper's Anonymous Summer release...yes, the one most of you have been waiting for. LOL!!! I have had so many messages and emails on this project. I never would have dreamed it, because when I designed and made this, I saw a waterfall of Noteworthy words into a rainbow of Bubbles, but half my family and several of you, saw flowers and there are no flowers on this. So to me, I just didn't do a good enough job of conveying that on this pouch. Or maybe it was just that you all liked the stamping on canvas idea. Who knows, but I can assure you that stamping on canvas is easy peasy...ONLY IF you use a stamp platform or a clear stamping block to repeat the stamping, as material soaks up the ink or paint fast, and to get the best image you need to repeat...and even heat emboss like I did. Enjoy the tut! And truly thank you so much for all the kind words!!!

 
(Note: Since you are working on a canvas bag with a zipper, it's best to turn the bag upside down with the zipper at the bottom of the platform so it closes a little better than the zipper at the top.) Place all the sentiments you want to use from the Noteworthy Stamp Set, on the large stamp platform going vertically (remember zipper at bottom so the words reading top to bottom) with a clear placement where they will start, and then staggering the words. Stamp the sentiments on a blank sheet of paper using any dark ink (I used Black Soot Archival.), and then cut around them where the bottom of the bag will be so you get a clear outline of the bottom of the waterfall, as this will be used as a guide and as a mask for later. Leave the words in the platform for later.
 
   
Using the stamped paper as your stencil, lay the paper on top of the canvas bag, with the top lining up with the zipper, and trace around the bottom with a pencil so you know where the water will stop.
 
 
(Note: Because of the color of the zipper being canvas colored, I wanted it to be blue, but I didn't want to paint it and risk coloring the zipper pull, so I thought Spray Stain would be best as it won't stick to the zipper, but will color the canvas.) Lightly mist the top of the canvas bag (the zipper area part) with water on both sides so that the stain will color evenly and be more absorbent. Spray the top of the bag with Prize Ribbon Distress Spray Stain from Ranger on both sides, and let dry. 
 
 
Cut a piece of cardboard to fit inside the bag (6 x 8.5 inches) to give it nice rigidity while painting, and to protect the paint from bleeding through to the opposite side. Paint the open top area of the bag with Prize Ribbon Distress Paint and medium paint brush, going down to the drawn line. You can use a bit of water from a mister to add to the paint to extend it, but make sure there is no canvas color showing under the paint. Let dry, and then do the other side. 
 
 
Using Peacock Feathers Distress Paint that has been watered down a tiny bit, add vertical lines of paint randomly from the top of the bag by the zipper to the drawn line, creating striations of color like in a waterfall. Let dry, and then do the same on the back of the bag. 
 
   
Pounce over the bag with the Anti-Static Pouch to prevent the powder from sticking, and then place the bag (zipper side down and zipped up) into the large stamp platform, and stamp the words on the blue area of the bag using Glacier White Pigment Ink. (Note: Make sure your Pigment Ink pad is nice and wet with the white ink...if not reink before stamping the words.). It may take a few stampings before your words are nice and crisp and white. Once nice and crisp, immediately pour Clear Embossing Powder over the words (over a blank sheet of paper for easier clean up) and then pour off, unzip the zipper,  and heat emboss the words using a heat tool while sticking your hand inside the bag to open it up to allow the air to flow through. The heat tool might make the canvas bag smoke in the corner areas, but it won't last long or catch on fire (unless you are not moving the heat tool), as the powder heats and sets quickly...just look for it to get shiny and then move the tool to a new area. Let cool. 
 
 
Gather up colorful Distress Paints. I used Prize Ribbon, Peacock Feathers, Villainous Potion, Picked Raspberry, Kitsch Flamingo, Crackling Campfire, Saltwater Taffy, Fossilized Amber, Cracked Pistachio, and Salvaged Patina. Once color at a time, paint in various sizes of circles randomly over the bottom area (below the water) of the bag, covering the side and bottom seams as well, until you've done all the colors about five or more times, using a small detail paint brush. (Note: Make sure to shake the paints before each use.)
 
 
After using all the paints and having some more open areas, I decided to add in Salty Ocean and Dusty Concord since they seemed like good bubble colors, to fill in the rest of the spaces. Let this side dry well, and then do the same to the other side of the bag. 
 
 
Place the stamped paper (the mask) over the top area of the bag and secure down with tape on the glass mat. Take the Bubbles large background stamp on the stamping block it came with, and BEFORE inking it, play with it to figure out the best way and image placement to stamp as much of the bottom area as you can. Once you figure that out, make sure your ink pad is nice and juicy as you only get to stamp once (since you are not using a platform, unless you are good enough to realign and stamp again) and ink over it with Glacier White Pigment Ink. Stamp the Bubbles along the bottom of the bag, remove the mask, and then immediately pour the Clear Powder over. Remove the excess and heat emboss. Place the mask back on and restamp the area that needs the image, pour powder and heat set. Use a White Gelly Roll Pen to add dots above the Bubbles to look like splashes of water. You can also use the pen to fix any areas that did not emboss well if you are steady handed enough. 
 
 
Using Picket Fence Distress Paint and a medium brush, add faint lines of white paint to the top waterfall area for a little more variegation between the wording. Let dry. Cut Velvet Trim ribbon to about 10 inches, and fold in half. Thread through hole in zipper pull and secure with a knot to aid in opening the zipper or to wrap around the wrist.

Supplies: 
(Sheet of Paper, Stamp Platform, Scissors, Pencil, Glass Mat, Water Mister, 5.5 x 8.5 Inch Cardboard, Medium and Small Paint Brush, Water Mister, Anti-Static Pouch, Heat Tool) 
-5.5 x 8.5 Inch Canvas Pouch
-Stamper's Anonymous Tim Holtz Stamp Set: Noteworthy, Bubbles 
-Ranger Tim Holtz Distress Archival Ink: Black Soot 
-Ranger Tim Holtz Distress Spray Stain: Prize Ribbon 
-Ranger Tim Holtz Distress Paint: Prize Ribbon, Peacock Feathers, Villainous Potion, Picked Raspberry, Kitsch Flamingo, Crackling Campfire, Saltwater Taffy, Fossilized Amber, Cracked Pistachio, Salvaged Patina, Salty Ocean, Dusty Concord, Picket Fence 
-Ranger Pigment Ink: Glacier White 
-Ranger Embossing Powder: Clear 
-Tim Holtz Idea-ology: Velvet Trims Warm 
-Sakura Gelly Roll Pen: White
 
Thank you so very much for stopping by and for all the comments here and on Instagram on this project. I sooooo appreciate it, and just know that stamping on fabric is much easier than you might think using a stamping platform. Until next time...I hope your hands get creatively dirty soon!