Thursday, October 21, 2021

Tim Holtz Sizzix Christmas 2021 - Plated Christmas Cookies Ornament Trio

Hi everyone! I've got another set of Christmas ornaments today, made with the new Tim Holtz Sizzix Christmas Cookies Thinlits. These were super duper fun to make, and the bright colors make me so happy. Enjoy!
 
Die cut one medium Sized Oval to use as a stencil, and 3 large Sized Ovals for each plate (I made three ornaments so I die cut nine large Ovals.), from Ivory Heavystock. Using the Upper and Lower Tiny Tiny Alphanumeric Thinlits, add 'Christmas' to the top of one of the large Ovals and '2021' to the bottom, keeping the dies close to the edge and curved following the plate shape, and run through the die cut machine. Pick out the letters and numbers and save them for another project. Use the medium Oval as a stencil to ink around in Barn Door Archival (see the pic in the next step for more details) with an Ink Blending Tool. Adhere the inked and die cut Oval to a blank Oval with Collage Medium. Ink the center of the 'a' and '0' and then adhere those in place on the plate. Apply Embossing Dabber over the whole plate, and pour on Antique Linen Distress Embossing Glaze over this and heat emboss. On the third large Oval, attach a picture hanger with a brad to the middle top, and then adhere this Oval to the back of the plate. Use your finger and Tarnished Brass Distress Paint to apply paint to the rim of the plate. Let dry and set these aside.

 
Just for a little more clarification on using the medium Oval as a stencil, lay the oval just below the 'Christmas' centered with the plate, and ink around the top half, and then move the Oval just above the '2021' and ink around the lower. Since the Oval wasn't the exact size needed just moving it up and down made the perfect shape so that the words and numbers were inked in to match the shape of the plate. 
 
 
Using about a half sheet of Cracked Leather Cardstock (if making all three), ink over it in Antique Linen Distress Ink, and then die cut the base pieces of each cookie from the Christmas Cookies Thinlits. Ink the edges of each base cookies with Antique Linen as well. Note: I used a Candy Cane Cookie for each plate, so that is three in total for those, and then one of each of the other cookies. Set these aside for a bit.  
 
 
Die cut all insides of each cookies (three for the Candy Cane) using White Heavystock. Separate all the pieces, and discard to tiny pieces in the very inside (like the windows, star, dots, and squiggles, as you won't need the tiny pieces). Working one at a time and one color at a time, apply the dabber to each piece and add Embossing Powder over and then heat emboss. I used White, Lime Green, Forget-Me-Not and Red Geranium powders. This is tedious with all the thin and small pieces so using tweezers really helps especially during the heat embossing so you won't burn your fingers. Once all the pieces are heat embossed, pop the pieces back together, and add Collage Medium to the backs and adhere to the base cookie pieces.
 
 
Fill in the inside tiny spaces with Glacier White Enamel Accents and let dry about an hour. Then add Sprinkled Sugar Stickles on the top of the Enamel Accents and on any white embossed pieces for a sprinkled sugar look. Let dry. 
 
 
Add white Velvet Trim to the picture hangers and tie in a knot to hang the ornaments. Use foam tape and Collage Medium to adhere the cookies to the plates. 
 
 Supplies: 
(Paper Trimmer, Die Cut Machine, Die Pick, Ink Blending Tool, Heat Tool, Water Mister, Tweezers, Foam Tape, Scissors) 
-Ranger Tim Holtz Heavystock: Ivory, White 
-Sizzix Tim Holtz Movers and Shapers: Sized Ovals (large and medium) 
-Sizzix Tim Holtz Thinlits: Tiny Type Alphanumeric Upper and Lower 
-Ranger Tim Holtz Archival Ink: Barn Door 
-Ranger Tim Holtz Distress Collage Medium: Matte 
-Ranger Tim Holtz Distress Embossing Dabber 
-Ranger Tim Holtz Distress Embossing Glaze: Antique Linen 
-Ranger Tim Holtz Distress Paint: Tarnished Brass 
-Ranger Tim Holtz Distress Crackled Leather Cardstock 
-Ranger Tim Holtz Distress Ink: Antique Linen
-Sizzix Tim Holtz Thinlits (Christmas 2021): Christmas Cookies 
-Ranger Embossing Powder: White, Lime Green 
-Ranger Wendy Vecchi Embossing Powder: Red Geranium, Forget-Me-Not 
-Ranger Enamel Accents: Glacier White 
-Ranger Stickles: Sprinkled Sugar 
-Tim Holtz Idea-ology: Neutral Velvet Trims 
-Picture Hangers with Brads
 
Thank you so much for stopping by here. I'll be back again soon with another Christmas make. I hope your hands get creatively dirty soon!

Sunday, October 17, 2021

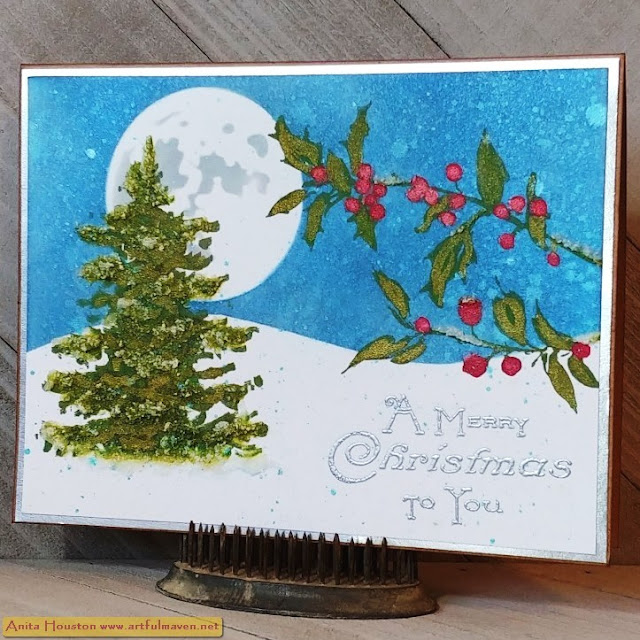
Stamper's Anonymous Christmas 2021 - Winter Watercolor 2 Night Christmas Card

Hello All! Today, I have another Christmas Card made with the new stamps from Tim Holtz and Stamper's Anonymous...this from the Winter Watercolor 2 Set and the sentiment from Jolly Santa. This card is simple yet full of texture and color, and I love how it turned out. Enjoy!

 
Cut White Heavystock to 4.75 x 6.25 inches for card front. Gather Moon Mask and a sheet of paper to cut a hill from for masking. Place solid Moon Mask in upper left corner and stick down with tape or Sticky Grid. Lay the hill in place at the bottom and tape down over the card where you want it. Ink over the moon and hill with Prize Ribbon Distress Ink with an Ink Blending Tool, until nice deep sky is created.
 
 
Keep Moon Mask and hill in place and lightly ink a circular motion of Picket Fence Distress Ink with an Ink Blending Tool, around the moon area creating a glow. 
 
 
Keeping Moon Mask and hill in place, lightly mist Snow Flurries Distress Mica Stain over sky area, after shaking it well. Clean off Moon Mask and let this dry a few minutes, and clean nozzle of Mica Stain. Place open coordinating Moon Mask over the solid Moon area, and lightly ink in with Hickory Smoke Distress Ink. Remove mask and clean. Lightly dry the card front with a heat tool.
 
 
Place the card front into the stamp platform and secure. Add the tree image from the Winter Watercolor 2 Stamp Set to the left side of the card so that the tip is in the moon area, and figure out how much of the bottom part of the tree to mask as it is larger than you need. Close the lid to secure the stamp. Place the sticky note over the area of the bottom of the tree you don't want stamped, and ink the stamp first in Forest Moss Distress Oxide. Remove the sticky note and stamp the tree. Place the sticky note back on and ink the stamp in Pine Needles. Remove the note and stamp. Repeat if necessary alternating the greens. On the last stamping, pour Frosted Crystal over the tree and heat emboss until the powder just barely turns frosty. Remove the tree and add the two holly twigs with berries to the right side of the card front so that part is on the moon and part off and the smaller one is below. Close the lid to secure and stamp first in Forest Moss and then in Pine Needles and repeat to darker the images, and on last stamping pour Frosted Crystal Embossing Powder over and heat emboss.   

 
Pounce an anti static pouch over the bottom right of the card to make this part cleaner and easier. Using the sentiment from the Jolly Santa Stamp Set, stamp it at the bottom right corner of the card front using Prize Ribbon Distress Ink (or whatever you have on the table as the powder is opaque and it really doesn't matter too much) and pour Silver Embossing Powder over and heat emboss. You are finished stamping.
 
 
Paint in the berries with a little bit of Festive Berries Distress Paint and using a detail paint brush. Let dry a few minutes, and then shake up the Peppermint Stick Distress Mica Stain. Pour out a tiny bit onto the silicon mat and pick up with the paintbrush and paint over the red berries to deepen the color and add beautiful sparkle. Clean the brush and shake up Tree Lot Distress Stain and pick up and paint in some of the pine tree area making diagonal type marks for branches and getting rid of any masking lines that might be showing through. Clean the brush and shake up Holly Branch Distress Mica Stain and paint over parts of the holly leaves and make wavy lines on the pine tree to look like the edge of branches. Dry this all slightly with a heat tool. 
 
 
You can seal the card front before doing this next part to make sure ink doesn't bleed by spraying it with Spray Fixative, or just go for it. Using a small flathead paint brush scoop out some Snowfall Grit Paste, and apply a light layer of the paste over the tree and holly branches. Once the layer has dried a bit you can add more on top. Let this dry, and then mist the whole card lightly with Snow Flurries Mica Stain. Cut and fold a kraft card base to 5 x 6.5 inches. Cut silver Metallic Kraftstock to 4 7/8 x 6 3/8 inches and mount onto the kraft with two sided tape. Mount the card front to this with the tape. 
 

Supplies: 
(Paper Trimmer, Paper for Hill Mask, Scissors, Tape or Sticky Grid, Ink Blending Tool, Heat Tool, Glass Mat, Stamp Platform, Sticky Note for Masking, Anti Static Pouch, Small Detail Paint Brush, Small Flathead Paint Brush, Two Sided Tape) 
-Ranger Tim Holtz Distress Heavystock: White
-Stamper's Anonymous Tim Holtz Collection Layering Mask: Moon (Smallest Size) 
-Ranger Tim Holtz Distress Ink: Prize Ribbon, Picket Fence, Hickory Smoke, Gathered Twigs
-Ranger Tim Holtz Distress Mica Stain: Snow Flurries, Peppermint Stick, Tree Lot, Holly Branch
-Stamper's Anonymous Tim Holtz Stamp Set: Winter Watercolor 2, Jolly Santa  
-Ranger Tim Holtz Distress Oxide: Forest Moss, Pine Needles 
-Ranger Embossing Powder: Frosted Crystal., Silver 
-Ranger Tim Holtz Distress Paint: Festive Berries
-Ranger Tim Holtz Distress Grit Paste: Snowfall 
-Ranger Surfaces: Kraft Cardstock 
-Tim Holtz Idea-ology:  Metallic Kraftstock  
 
Thanks so much for stopping by here. I'll be back again this week. I hope your hands get creatively dirty soon!