Sunday, June 27, 2021

Stamper's Anonymous Summer 2021 - Bold Sayings and Floral Outlines Cards

Hello everyone!!! I hope all of you are doing well. I'm sorry it's been a bit since I've been here, but there has been lots of creating going on. It's finally time for some stamping goods. Tim Holtz and Stamper's Anonymous have just released five new sets and stencils as well. Did you catch the LIVE yesterday?!! Talk about some beautiful makes. Today, I have the first of five posts using the new stamps...these made with the Bold Sayings and Floral Outlines sets. Enjoy and happy Summer!!! 

Using a paper trimmer, trim Ivory Heavystock from Ranger to 4 5/8 x 6 1/8 inches. Go ahead a cut a black cardstock mat to 4 7/8 x 6 3/8 inches, and fold a kraft card base to  5 x 6.5 inches, and mount the black on the kraft with two sided tape and set that aside. Note: I made two cards, so double up if making two.  Pick out the sentiments from the Bold Saying set and place on the right side of the Heavystock for each card. Add the Floral Outline Stamps around the sentiment and figure out the layout. Remove the Bold Saying for now, and add the Floral stamps to the large platform and secure the stamps. Stamp them over the heavystock using Black Soot Archival. Do the same for the other panel if you are making two cards. Do not remove the floral stamps sets as you will stamp this again later.
 
 Using the silicon mat as a palette, add a tiny bit of Black Soot Distress Spray Stain straight from the bottle to the mat. Pick the ink up with a Broad Water Brush and paint in a stripe between the flowers up at the top of the panel, freehand for an organic feel. Leave about 3/4 inch space and paint another line, and repeat this until you've covered the paper. Dry with a heat tool. Clean you brush well, and add a tiny bit of Picket Fence Distress Spray Stain (remember to shake this color as it has pigment in it and a mixing ball) straight from the bottle to the mat. Pick the ink up with the Broad Water Brush and paint in a stripe below the black one leaving a tiny little ivory border between the stripes. Continue this pattern until the paper is filled up between the black stripes and the floral parts. Do the same for the other card. Let the panels dry or use a heat tool. 
 
 
Using  more Distress Spray Stain and the silicon mat as your palette, pour a tiny bit of the stain out and color in the parts of the flowers and leaves with a Detail Water Brush on both of the cards. I used Twisted Citron and Rustic Wilderness on the leaves, Salvaged Patina and Peacock Feathers on the flower petals, and Mustard Seed for the centers of the flowers.

 Place the Heavystock panel back into the large platform with the flowers and stamp them again over the existing images using Black Soot. This is in case you got some striped Picket Fence Spray Stain over the floral parts, and it deepens the depth of the flowers. Remove the Floral Stamps and dry the pieces or let dry.
 
 Place a panel in the platform and place a Bold Saying on it and secure it by closing the lid. Stamp it several times using Black Soot Archival until it is nice and bold, and then after the last stamping add Gold Embossing Powder over it and heat emboss. Do the same for the other panel using another saying.
 
 Using a fine gold paint pen, draw lines freehand again, parallel to the black lines in the ivory area between the white and black lines. Use the pen to draw dots in the middle of the flowers around the stamen. Using a bold gold paint pen, draw a gold border around the edges of the panel. Let dry. Ink the edges of the kraft card with Gathered Twigs and adhere the panels to the front of the cards with two sided tape.
 

Supplies: 
(Paper Trimmer, Large Stamp Platform, Glass Mat, Broad Water Brush, Heat Tool, Detail Water Brush, Ink Blending Tool, Two Sided Tape, Scissors) 
-Ranger Tim Holtz Distress Heavystock: Ivory 
-Ranger Surfaces: Black Cardstock, Kraft Cardstock
-Stamper's Anonymous Tim Holtz Stamp Set: Floral Outlines, Bold Sayings 
-Ranger Tim Holtz Archival Ink: Black Soot 
-Ranger Tim Holtz Distress Spray Stain: Black Soot, Picket Fence, Twisted Citron, Rustic Wilderness, Salvaged Patina, Peacock Feathers, Mustard Seed 
-Ranger Embossing Powder: Gold 
-Ranger Tim Holtz Distress Ink: Gathered Twigs 
-Marvy Uchida Premium Deco Color Pen: Gold Fine, Gold Bold
 
Thank you so much for stopping by today and looking! I'll be back again with another stamping make. Until then, I hope your hands get creatively dirty soon!

Sunday, May 02, 2021

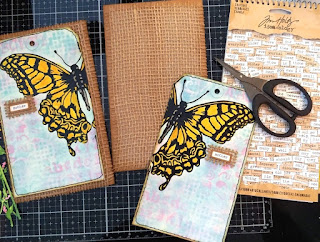
Perspective Butterfly and Wildflowers Mother's Day Cards

Happy May everyone! Mother's Day is next Sunday here in the U.S. so don't let it creep up on you like it normally does me. I managed to make these a few weeks ago for my Mom and Mother in Law using the Perspective Butterfly and Wildflower Stems 3 Thinlits from Sizzix and Tim Holtz.  They were probably the easiest and fastest cards I've ever made either one of the Moms as well, but no less wonderful as all the others. ;0) I know they will like them...they love every card I make and ALWAYS EXPECT handmade...lol! Gotta love our Mommies! Enjoy, and as always feel free to scrap lift away anything I ever share. 
 
Have a kraft cardstock card base ready at 4.5 x 7.5 inches. Die cut one Perspective Butterfly using black cardstock for each card you are making, and use the die brush to remove all the little pieces.  Trim a #10 Mixed Media Tag from Dina Wakley and Ranger down to 7 inches long. Adhere a portion of the butterfly (more than half) to the upper portion of the tag at an angle using Collage Medium or a spray adhesive. Trim off the other portion and save it for another project.

 
For the background, use a Blending Brush for blues to lightly ink in around the butterfly and the rest of the tag using Tumbled Glass Distress Ink. If you get ink inside the butterfly it is fine.
 
 
Using a Blending Brush for pinks, lightly ink around the butterfly and the rest of the tag with Kitsch Flamingo Distress Ink to create a nice blended look with the blue. 
 
 
Lay the Ironwork Layering Stencil from Tim and Stamper's Anonymous randomly over the tag and around the butterfly and using the Blending Brush, ink in portions of the design with Tumbled Glass.

 
Lay the Typo Layering Stencil randomly over the tag and around the butterfly and using the Blending Brush, ink in portions of the design with Kitsch Flamingo.

 
Lay the Halftone Layering Stencil randomly over the tag and around the butterfly and using the Blending Brush, ink in portions of the design with Tumbled Glass.
 
   
For the butterfly, apply Hickory Smoke Distress Ink directly from the pad to the silicon mat and pick up with the Detail Waterbrush. Color in the body of the butterfly. Color in the wings with Squeezed Lemonade Distress Ink first, and then add darker shades to portions using Mustard Seed and then Fossilized Amber Distress Ink. Let dry.
 
 
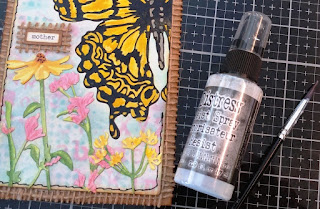
Using a regular paintbrush and Distress Resist Spray, open the top and dip the brush in and brush over the whole butterfly to add a nice sheen and protection layer. Wash the Resist out of the paintbrush immediately using warm water and soap. Ink the edges of the tag with Gathered Twigs Distress Ink, and stitch around the portion of the tag around the butterfly with black thread. Set aside.
 
 
For the flowers, use Distress Watercolor Cardstock and die cut at least six of the Wildflower 3 Stems (I used three stems per card and even added the cut off stems for extra fill in.). Add Distress Inks directly to the silicon mat and pick up with the waterbrush to color in the flowers and stems. I used Squeezed Lemonade, Mustard Seed, Fossilized Amber, and Kitsch Flamingo Distress Inks for the flowers, and Twisted Citron and Rustic Wilderness for the stems. 
 
 
Use the darker of the inks to add in detail lines on the petals and leaves. Color in the centers of the few flowers that have them with Gathered Twigs Distress Ink. Add a few dots of Tumbled Glass on top of the pink flowers for depth. When dry, add dots of a brown marker to the centers of the yellow flowers. 
 
 
For the sentiment and card base, cut burlap to fit over the front of the card base, and remove some of the strings off each side for a tattered look and adhere with two sided tape. Ink the edges in Gathered Twigs. Add a sentiment from the Chit Chat Stickers to kraft cardstock, and ink the edges in Gathered Twigs. Adhere this to a piece of burlap, remove a string from each edge and cut around the sentiment leaving 1/4 inch border. Ink the string edges with Gathered Twigs. Adhere the sentiment to the card below the top wing with two sided tape. Do not adhere the tag on yet though.
 
 
Now it's assembly time. Arrange the flowers to the bottom of the tag the way you want them and then adhere with Collage Medium. Trim off the stems that are hanging off the tag, and even add those on to fill in gaps. Ink the edges of the tag with Gathered Twigs. Use two sided tape to adhere the tag onto the card base.

 
Using a paintbrush and more Distress Resist Spray and brush over the flower heads of each flower as well as the sentiment. Let dry. 
 

Supplies: 
(Die Cut Machine, Die Brush, Die Pick, Scissors, Paper Trimmer, Blending Brushes, Distress Sprayer with Water, Detail Waterbrush, Paintbrush, Ink Blending Tool, Sewing Machine with Black Thread, Two Sided Tape) 
-Sizzix Tim Holtz Thinlits: Perspective Butterfly, Wildflower Stems 3 
-Ranger Surfaces: Black Cardstock, Kraft Cardstock 
-Ranger Dina Wakley Media: #10 Journaling Mixed Media Tags 
-Ranger Tim Holtz Collage Medium: Matte 
-Ranger Tim Holtz Distress Ink: Tumbled Glass, Kitsch Flamingo, Squeezed Lemonade, Mustard Seed, Fossilized Amber, Hickory Smoke, Gathered Twigs, Twisted Citron, Rustic Wilderness 
-Stamper's Anonymous Tim Holtz Layering Stencils: Ironwork, Typo, Halftone 
-Ranger Tim Holtz Distress Resist Spray 
-Ranger Tim Holtz Distress Watercolor Cardstock 
-Tim Holtz Idea-ology: Chit Chat 
-Brown Marker, Burlap

Thanks so much for stopping by and commenting. If you are a Mommy, I hope you are pampered and loved dearly on Sunday...well everyday really. I hope your hands get creatively dirty soon!