Thursday, May 09, 2019

Glorious Garden Cutout Mother's Day Cards

Hey there everyone! I finally made some time...very short time to boot...to make my Mother's Day cards for my Mom (red) and my Mother In Law (yellow). I've been creative but haven't touched inks, stamps, or card making goods for awhile, so it was nice to have some Paper Crafting time. These were super simple and so fast to make...about an hour and a half to make both. Hope you like.
I wanted to make sure my image came out perfect so I used the Stamp Platform to stamp the Glorious Garden stamp from Tim Holtz and Stamper's Anonymous, using Jet Black Archival from Ranger, and onto Tim's Heavystock.
I used the 'mom' from my May Set of stamps from WeCraft for the sentiment, stamping with Jet Black and embossing with Clear powder.
I used Tim's new Cutout Blossoms Thinlits from Sizzix to die cut over the large flower in the top left corner. These dies are too too cool!
Tim has a few borderless floral background dies now, but I don't have the new one that I wanted to use on this, so I dug through my stash. I found the packaging from my favorite Hand Creme...Margot Elena's Lollia At Last. Not only does it smell divine but the packaging is fabulous with the lacy cutout. I adhered it to colored cardstock from Tim, trimmed around it to the size of my card. I also adhered the floral card to the same colored cardstock, and then added a Kraft matting as well. I stitched around the floral card and the background base.
I inked the edges of everything, and used a Distress Tool to tatter up some of the edges of the card. Then I used Distress Inks and a Detail Water Brush to color in some parts of the floral card using yellows or reds. I love the way the cards came out, and I'm sure my special Mothers will too!


Supplies:
(Stamp Platform, Paper Trimmer, Craft Pick, Paper Distressor, Scissors, Ink Blending Tool, Detail Waterbrush)
-Ranger Tim Holtz Distress Mixed Media Heavystock
-Ranger Archival Ink: Jet Black
-Stamper's Anonymous Tim Holtz Stamp Set: Glorious Garden
-The Artful Maven Holiday Collection Stamp Set: May
-Ranger Embossing Powder: Clear
-Sizzix Tim Holtz Thinlits: Cutout Blossoms
-Coordinations Tim Holtz Cardstock: Kraft Core Nostalgic, Distress Collection
-Ranger Adhesive Strips, Sheets
-Ranger Surfaces: Kraft Cardstock
-Ranger Tim Holtz Distress Ink: Brushed Corduroy, Squeezed Lemonade, Mustard Seed, Aged Mahogany, Festive Berries, Antique Linen
-Lacey Cutout from Lollia At Last Handcreme Packaging

Happy Mother's Day to all you lovely crafting Mother's!!! I hope you have a super special weekend filled with love!
I hope your hands get creatively dirty soon!

Friday, May 03, 2019

Ranger Glacier White Pigment Ink Steampunk 'Proud' Card

Hello All! Today, I have my last Ranger sample card from Creativation this year, this time using Glacier White Pigment Ink in many ways, along with lots of Tim Holtz goodness. This one was probably my fav...I think...from the six that I made, mostly because of the Industrial Steampunk type feel that I LOVE to get messy in. And...the sentiment is a fav (from Wendy Vecchi), as I try to live by that especially while creating. Hope you enjoy.
I cut a piece of black cardstock to just under A2 card size, and die cut the brick thinlit from Tim's Mixed Media 3 from Sizzix. I used a bunch of post it notes to cover up the area without the die cutting, and I inked over the bricks with the Glacier White Pigment Ink and an Ink Tool, so that it looks like a gray mortar.
I rearranged the post it notes to cover up the bricks this time, leaving the rest of the cardstock for stamping. I stamped Tim's images from Inventor 1 and Inventor 2 from Stamper's Anonymous using the Glacier White. I love the crisp white against the black.
I trimmed a piece of Kraft Cardstock the same size as the black, and stamped the alphabets from Tim's Newsprint and Type...a fav set...in the corners so they will show through under the bricks, using the Glacier White.
I adhered the two pieces together using Tim's Crazing Collage Medium, and applying extra inside the bricks...love the look when dried.
Using a #5 Kraft Tag, I embossed the Mechanics 3D Texture Fade. I rubbed the Glacier White Pad over the raised images and then added Clear Embossing Powder over and heat set it. I inked in all the unembossed areas with Pumice Stone Distress Ink. I mounted the card onto a piece of Heavystock, and added the tag to the card.  I left a wider border on the left side so I could sew a thick zig-zag stitch.
I mounted the card onto Kraft and finally onto a black cardstock base. I adhered a Mini Gear to the tag hole. Using a Paper Doll, I stamped Wendy's sentiment with Glacier White and heat embossed it with Clear Powder. I inked the edges in Pumice and added him on with foam tape so it looks like he is resting on the gear.
  
Supplies: 
(Adhesive Strips and Sheets, White Foam Tape, Mini Ink Blending Tool, Multi Matte)
-Ranger Surfaces: Black Cardstock, Kraft Cardstock
-Tim Holtz Sizzix Alterations Thinlits: Mixed Media #3
-Ranger Pigment Ink Pad: Glacier White with ReInker
-Stamper's Anonymous Tim Holtz Stamp Set: Inventor 1, Inventor 2, Newsprint and Type
-Ranger Tim Holtz Distress Collage Medium: Crazing
-Ranger Paintbrush
-Tonic Tim Holtz Paper Distressor
-Ranger Tim Holtz Distress Tags: #5 Kraft
-Sizzix Tim Holtz Alterations 3D Texture Fade: Mechanics
-Ranger Embossing Powder: Clear
-Ranger Tim Holtz Distress Ink: Pumice Stone
-Stamper's Anonymous Wendy Vecchi Stamp Set: Party Art
-Tim Holtz Idea-ology: Paper Doll, Mini Gears, Tiny Fasteners

Thanks for stopping by today and for all the love and support. Don't stop until you're proud, and as always...I hope your hands get creatively dirty soon!

Friday, April 26, 2019

Ranger Archival Ink and Texture Pastes 'Cheers' Card

Hello everyone! Here is the fifth card (for a birthday I think) I made for the Ranger booth for Creativation this year, using Archival Inks, Texture Pastes, and lots of Wendy Vecchi goodies! There are several steps to this, but it really comes together fast...just look at the vivid and fun colors and so much texture! Enjoy!
I stamped Wendy's Paper Doll stamp from the Stamp It Stencil It set from Stamper's Anonymous, onto Tim's Heavystock with Jet Black Archival, and again on post it note to use as a mask.
I masked the Paper Doll and then spread a thin layer of Opaque Crackle Paste onto the tag and also on another card for the base.
Once dry, I added Transparent Gloss Paste through Wendy's Lots of Dots Stencil onto both the tag and card. You can never have too much texture.
While still keeping the mask on, I inked over the tag and card base using lots of Archival Inks, blending them into each other, and pushing the ink into the cracks.
Using Paradise Teal Archival and Wendy's Alphabets Stencil, I randomly inked in the smaller alphabet over portions of the tag and card.
Using Vibrant Fuchsia Archival, I stamped the Script Background Stamp over the tag and card.
I added Opaque Matte Paste through Tim's Mini Falling Stars Layering Stencil onto the tag and card, and then sprinkled Gold Embossing Powder onto the stars, and then heat embossed for even more texture.
I removed the mask, and wow it did such a good job, and then I laid the coordinating stencil on top of the doll and inked in the hat with Coffee Archival. I left the stencil on and stamped on top of it with Coffee using the Ticking Background Stamp for a texture look on the hat.
I positioned the stencil on again this time for the ribbon on the hat, and inked in with Paradise Teal. Then I inked in her face with Pale Ochre, her lips with Vibrant Fuschia, and her hair with Saffron all using the Detail Ink Blending Tool.
I laid the stencil on again for the ribbon on her hat (as well as her lips) and added Transparent Matte Paste for a little depth.
I stitched around the card and tag with white thread, and matted each onto more Heavystock, and a card base. Then I stenciled in the Cheers with Jet Black using Wendy's Occasion Sentiments, added the Crinkle Ribbon and Heirloom Rose, and then mounted the tag onto the card. Oh and I added dots of Glossy Accents onto her eyes.
Supplies:
(Adhesive Strips, Mini Ink Blending Tool, Craft Squegee, Palette Knife, Detail Blending Tool,
Multi Matte, Glossy Accents )
-Ranger Tim Holtz Distress Mixed Media Heavystock #8 Tag
-Ranger Archival Ink: Jet Black, Vibrant Fuchsia, Majestic Violet, Paradise Teal, Vivid Chartreuse, Saffron,
 Pale Ochre, Coffee
-Stamper's Anonymous Wendy Vecchi Stamp It Stencil It: Paper Doll
-Ranger Surfaces: Mixed Media Cardstock
-Ranger Texture Paste: Opaque Crackle, Transparent Gloss, Opaque Matte, Transparent Matte
-Stamper's Anonymous Wendy Vecchi Stencils for Art: Lots of Dots, Alphabets, Occasion Sentiments
-Stamper's Anonymous Tim Holtz Layering Stencil: Mini Falling Stars
-Ranger Embossing Powder: Gold
-Stamper's Anonymous Wendy Vecchi Background Stamps: Ticking, Script
-Tim Holtz Idea-ology: Heirloom Roses, Crinkle Ribbon

Thanks for stopping by everyone. I hope your hands get creatively dirty soon!

Friday, April 19, 2019

Alcohol Pearls Easter Egg Placecard Holders

Happy Good Friday everyone! I'm running behind lately due to a car wreck and all that that involved...I'm thankfully okay...but had one last Easter project to show you before the weekend that I finally finished last minute, using some new Tim Holtz goodies. I showed a sneak peek on Instragram a few weeks ago, but then life happened, so I didn't get back to it until this week, and then the kids came home early for Easter...a happy surprise.  I apologize for the less than stellar photos. I wish each and every one of you a blessed Easter!
I painted the eggs and the wooden bases with Tim's Antique Linen Distress Paint from Ranger, so the Alcohol Pearls and Ink would flow better and not soak up so quick.
I pounced on Smolder and Gold Mixative over them, and then added touches of Bundled Sage and Tumbled Glass  here and there for more of a vintage look.
I pounced on Lake Mist Alcohol Ink with the Pearls, and then flicked on Smolder (MY NEW FAV!) and Gold Mixative for a mottled look. Then I adhered the shredded book and eggs on the bases with Multi Matte Medium.
I have a LOVE of all things tableware, and the older the better. The dish above is from a set from the hub's Grandmother. I have never used them for Easter, so they were the inspiration behind this project. I purposely chose colors to keep in line with them. Tumbled Glass was the perfect blue. I trimmed Distress Heavystock to 2.5x3 inches, and used the Distress Spray Stain from the bottle and watercolored it on Distress Heavystock. I went around the edges of the cards with Gold Paint Dabber.
I used the cute cute Funny Farm images from Tim and Stamper's Anonymous, and stamped with Distress Embossing Ink and embossed with Gold Powder. I did cut the sentiments from the stamps, and a few eggs from the chicken one...I don't have a problem doing that. I place them all back on the stamp sheet the way they originally came so I don't lose the pieces. No fear!!!
I used four of Tim's new Archival Inks to stamp the Happy Easter sentiment from the Crazy Talk set, alternating the colors on the stamp. I did it upside down on the platform to make the stamp placement higher which is easier for me to get right. I know I'm strange!
I used Distress Paint and a waterbrush to color in parts of the embossed images.
I added the cards on the Memo Pins, and then poked holes in the tops of the eggs and pushed them in with a little Multi Matte Medium.
I love to do the table up for holidays and make them just a bit more special. Oops! Just noticed I forgot to add the silverware! I'm off to finish the table!
 
 Supplies: 
(Craft Sheet, Medium Paint Brush, Detail Paint Brush, Scissors, Craft Pick, Stamp Platform, Embossing Heat Tool)
-Craft Eggs, Wooden Candlestick Bases, Shredded Book Pages
-Ranger Tim Holtz Distress Paint: Antique Linen, Tumbled Glass, Bundled Sage, Mustard Seed, Broken China, Picked Raspberry, Victorian Velvet, Picket Fence
-Ranger Tim Holtz Alcohol Pearls: Smolder, Alchemy, Sublime, Tranquil, Enchanted
-Ranger Tim Holtz Alcohol Ink: Lake Mist
-Ranger Alcohol Ink Blending Tool
-Ranger Tim Holtz Alcohol Ink Blending Solution
-Ranger Tim Holtz Alcohol Ink Mixative: Gold
-Tim Holtz Idea-ology: Memo Pins
-Ranger Multi Matte Medium
-Ranger Tim Holtz Distress Mixed Media Heavy Stock
-Ranger Tim Holtz Distress Spray Stain: Tumbled Glass
-Stamper's Anonymous Tim Holtz Stamp Set: Funny Farm, Crazy Talk
-Ranger Tim Holtz Distress Ink: Embossing
-Ranger Embossing Powder: Gold
-Ranger Tim Holtz Archival Ink: Fossilized Amber, Peeled Paint, Mermaid Lagoon, Picked Raspberry
-Ranger Paint Dabber: Gold
-Ranger Detail Waterbrush
Thanks so much for hopping by! I hope your hands get creatively dirty soon...after Easter!!!

Sunday, April 07, 2019

Tim Holtz Assemblage Clock Challenge - The Easter Bunny Family Chocolate Box

Hi there! Today, I have an Easter project to show you, and this one was another challenge from The Crafty Scrapper. Those of us participating were asked to use a Tim Holtz Idea-ology Assemblage Clock for Spring or Easter, so here is mine, along with Vignette pieces to make another chocolate box...you can never have too much chocolate! Thank you Carolyn for asking me to participate, as I had a ball making this. Extra long post, so grab some chocolate... nom nom nom...enjoy!
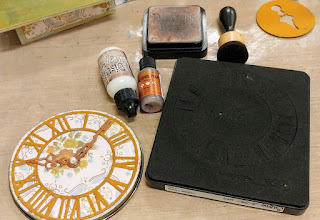
Using the new Alcohol Pearls from Tim and Ranger...LOVE THEM!...I pounced on Tranquil and Celestial with an Alcohol Ink Blending Tool. Oh the sparkle! I did not use the glass from the clock so I will save that for another project.
Using Tim's Botanical Tissue Paper, Collage Matte Medium, and Collage Brush, I added the paper over the clock base and two bells. The Alcohol Pearls shown through wonderfully.
Using more of the Pearls, Smolder, Alchemy, Splendor, Sublime, Envy, and Mineral, I painted in the flowers and leaves with a paintbrush and Blending Solution. I also pounced on some Mushroom Alcohol Ink to the edges of the clock for a little more vintage feel.
I put the clock back together, and then covered the inside walls of the clock and the back piece with Tim's Wallpaper with a blue and orange flower motif. I painted some foam craft eggs with Alcohol Pearls as well, and layered those in a tiny basket with shredded book pages. 
Using a medium Vignette Box, I painted it will Glacier Ice Fresco Finish Chalk Acrylic Paint, and then dry brushed some Terracotta on. I added more Wallpaper to the sides of the box. I used the largest Vignette Panel instead of a medium because I needed a larger base for the clock and I wanted the overhang. I painted it with Magic Moss and then dry brushed Terracotta over it.
I die cut the Sizzix Timekeeper clock from Tim out of chipboard and painted it with Terracotta Fresco Finish, and the added Mineral Pearl over the hands. I attached it to the backing of the clock with Collage Medium after I inked the edges with Brushed Corduroy Distress Ink.
I painted more eggs with Celestial Pearl and then Glacier Ice Fresco Finish, and attached those to the bottom of the box for feet using Multi Matte. I had some mini metal bunnies in my stash that were yellow, and I painted those with Antique Linen Distress Paint followed by Smolder (I LOVE Smolder!). The rabbits were attached to the front right and right corner of the box.
I had brad latches in my stash from way back when, and I colored them with Mineral Pearl. I poked holes in the panel where the latches would go and pushed in the brads as far as I could, and then used pliers to further push them in and make them flush. I attached the the box to the lid with the latches.
I die cut all the Sizzix bunnies Tim has...the new Cottontail is the daddy, the mama from Easter Elements, and the baby from Bunny and Bow Movers and Shapers. I die cut two for the baby, three for the mama, and five for the daddy, and layered them up for extra thickness with Collage Medium. I painted them with Antique Linen.
The mama was a little too big for the inside of the clock where I wanted her so I had to trim her down some. I pounced over all three rabbits with Smolder Pearl for some shimmer. Then I added some detail painting to the trio with Distress Paint. I also added felt to the inside of the box. Not seen is a felt carrot that I stamped Happy Easter on with Tim's Crazy Talk. I attached the carrot to a cut popsicle stick for a sign. I adhered the clock to the panel with lots of Multi Matte Medium, and added on more shredded book pages and the eggs and sign.
I colored the bows for the rabbits with more Pearls and adhered them on with Collage Medium. I wanted them to have whiskers so I poked holes around their noses and threaded Tim's Craft Thread through and tied it in knots before trimming off, so they wouldn't come out. I love their whiskers and love Craft Thread!!! Then I added on the rabbits to the panel and in the clock. I colored the Crinkle Ribbon bow with Faded Jeans Distress Spray Stain and tied it on. I colored a mini butterfly from the Tiny Shapes Movers and Shapers with Terracotta and then Mineral and adhered it on. I added a few more eggs and then added the chocolate!


Supplies:
(Craft Sheet, Detail Paint Brush, Chipboard, Paper Trimmer, Scissors, Craft Pick, Pliers, Mini Screw Driver, Gray Detail Pen, Stamping Block) 
-Tim Holtz Idea-ology: Assemblage Clock, Botanical Collage Tissue Paper, Worn Wallpaper, Vignette Box, Vignette Panel, Crinkle Ribbon 
-Ranger Alcohol Ink Applicator with Felt 
-Ranger Tim Holtz Alcohol Pearls: Tranquil, Celestial, Smolder, Alchemy, Splendor, Sublime, Envy, Mineral 
-Ranger Tim Holtz Alcohol Ink: Mushroom 
-Ranger Tim Holtz Alcohol Ink Blending Solution 
-Ranger Tim Holtz Distress Collage Medium: Matte 
-Ranger Tim Holtz Distress Collage Brush 
-Sizzix Tim Holtz Alterations Bigz Die: Timekeeper, Easter Elements, Cottontail 
-Paper Artsy Fresco Finish Chalk Acrylics: Translucent Terracotta, Opaque Glacier Ice, Opaque Magic Moss 
-Ranger Tim Holtz Distress Ink: Brushed Corduroy 
-Ranger Mini Ink Blending Tool 
-Sizzix Tim Holtz Alterations Movers and Shapers: Mini Bunny and Bow Set, Tiny Shapes 
-Ranger Tim Holtz Distress Ink: Antique Linen, Hickory Smoke, Victorian Velvet 
-Coats Tim Holtz Eclectic Elements Craft Thread: Antique Linen 
-Stamper's Anonymous Tim Holtz Stamp Set: Crazy Talk 
-Ranger Archival Ink: Jet Black 
-Ranger Wendy Vecchi Mica Spray: Pearl 
-Ranger Tim Holtz Distress Spray Stain: Faded Jeans
-Mini Craft Foam Easter Eggs, Mini Metal Bunnies, Mini Latch Brads, Mini Screws, Book Paper Shreds, Mini Woven Basket, Felt Carrot, Popsicle Stick, Round Metal Brad

Thanks for stopping by today everyone. Hopefully I'll be back soon with another Easter make.
I hope your hands get creatively dirty soon!