Thursday, December 13, 2012

Happy Birthday Wendy Vecchi!!!

As many of you regulars know, I love me some Wendy Vecchi goods, but I also think the lady herself is wonderful! She is kind, generous, gracious, knowledgeable, creative, inventive, and  wonderful to talk to! Today is her birthday, and this is the card I made for her, which is also what the #55 Making Art Challenge is all about at the Everything Wendy Vecchi Yahoo Group. I hope she likes it! It's a little daunting making something for a Master!
 
 
Supplies:
From My Stash- Thickers Alpha Letters, Metal Polka Dot Tab, Best Wishes Stamp


I hope your hands get creatively dirty soon!


Tuesday, December 11, 2012

A White Christmas ATC

First things first. The biggest THANK YOU ever to Tim for shouting out my Christmas In The Hood! WOW...what an honor and a thrill, and one I never expected! He is so busy trying to please us all, yet he takes the time to read so many of our blogs...what a testament to his love for crafting. He knows when you are blogging. He knows when you're at the make. He knows when you've been bad or good, so be good for crafting's sake! Sorry...I couldn't help it! And, THANK YOU people...every single one of you inky fingered people!!! The comments, the texts, the calls, the emails, the hits, the new followers, the old followers, and the passers by have made my cup truly runneth over! I've tried to reply to every single one who has left a link, an email, a number, etc. to send love back. Hugs to all of you!

Since I received my November ATC's from the All Things Tim Yahoo Group the other day, I figured it was time to get cracking on the December ones. This month's theme is Anything Christmas or Winter, so I decided to incorporate both, plus design these around ALL (Honest!) the challenges listed below, which are many, so this really was a challenge for me. I think I got it all in.
I cannot wait to see what I get back in return! It really is just like receiving a present, and a Christmasy theme will make them extra special! Thank you to those that participate.
 
Using left over scraps of white cardstock, I cut 2 1/2 x 10 1/2 inch strips. I scored and folded the strips at 3 1/2 and 7 inch intervals to make three equal sections to create an easel type stand.
Using Tim's Snow Flurry and Christmas Snow Flurry Border Texture Fades, I embossed the image on the whole first section and on the bottom portion of the last section. Seen below as well.
These were misted with Ranger's Perfect Pearls Mist in Perfect Pearl to add that blinding snowy glimmer. I inked the edges with Pumice Stone Distress Ink.
Using more scraps of white I die cut Tim's Sizzix Tree Line On The Edge Die. After misting with the Perfect Pearls, I cut these in half, inked the edges with Pumice Stone, and adhered them to the bottom portion of the front of the ATC. I also added Dresden Foil Lace to the bottom of this.
More die cutting of white scrap using The Festive Greenery branch portion. I inked the branch stems only with the Pumice Stone, and foam taped this onto the ATC. Icicle Stickles made for some snow covered needles.
I decided to try something new to me using Idea-ology Glassine to see if something would work, as my white cardstock scrap stash was now reduced to the tiniest of scrap. I covered both sides of the sheet with Claudine's Gesso, drying between coating each side. I cut the sheet into inch long strips.
I die cut the strips using the miniest of the Mini Snowflake Rosettes. The strip wasn't quite long enough, but that was good as I needed my rosette smaller. The Gesso made the Glassine so durable that no reinforcing tape was needed, and the accordion  folding was easy.  The plan worked!!!! I joined the end parts together.
Glassine adheres quickly with Glossy Accents, so rather than use my hot glue gun, I just applied a glob of GA onto my craft sheet and formed my strip into the rosette and pushed it into the glob. I glued the smallest snowflake into the center to hold in place. Here is the coolest part. The edges of the Glassine remained their original brownish color, so the snowflake rosette already looked distressed. No extra inking here, but Icicle and Silver Stickles were needed to bling it up, as well as a tiny metal star.
I used Grunge Board to die cut the Mini Cardinal. I colored him in with Distress Markers, and then gave him a coating of UTEE. I always manage to make bubbly  bits in the UTEE. I think I am getting too close with the heat tool. I adhered him to the branch. I painted some Lil Davis alpha letters (Remember that company?) with Adirondack Acrylic Dabber in Silver, and distressed them up a bit.  I stuck them on to the card base for my sentiment. Last, I added a little more Silver Stickles to the lace.


I am also submitting these to the Sunday Stamper challenge of "Noel", Unruly Paper Arts Reader Art Quest 2 for "An Easel Card", The Stamp Man Challenge for "In The Bleak Mid Winter-Use White", The Blogger's Challenge for "Create A Scene", and finally the Compendium of Curiosities II Challenge for "Paper Rosette" from Tim's Book by the same name on page 63.
Supplies:
From My Stash- various white cardstock scraps, mini metal star stickers, Little David Vinyl Letters


I hope your hands get creatively dirty soon!


Sunday, December 09, 2012

November ATC's Received

Happy mail has arrived from the All Things Tim Yahoo Group...my November ATC trades!
Sandy Nolan (Awesome! How clever is Umbrella Man inset like that? Love it!)
Donna Jean Eno (Gorgeous! Love the embossing and those Shrink Wrap leaves are so cool!)
Julie Case (This is beyond gorgeous! All of nature detail is amazing!)
Claudine Criner (You would promise that these are metal. Awesome! So unique and beautiful!)
And, here is mine again.
I hope your hands get creatively dirty soon!


Thursday, December 06, 2012

The Deer From Snowy Mountain

It's my turn to host the Friday Focus at Frilly & Funkie this week, and I wanted to give you a quick tutorial showing you my very favorite technique using Distress Markers, which happens to be stamping with them onto Specialty Stamping Paper...a match made for the creative good I tell ya!
Have pieces of Ranger's Specialty Stamping Paper cut and ready, as well as stamps ready to go. I'm using images from Tim's Mini Holiday series. Using Distress Markers, color directly onto the leaping deer rubber stamp.
After brushing your teeth (hehehe)...Give your colored in stamp a good huff of breath.
Here comes the cool part. Stamp your image onto the Specialty Stamping Paper. Give your stamp another huff of breath, and stamp the image again onto another piece of the paper. You can even repeat again...that is how color rich these markers are. Even a light mist of water will make even the faintest hint of color on the stamp come alive and make for a wonderful watercolor effect. Cool huh?
Always use a light blast from a heat tool after stamping onto Specialty Stamping Paper to set the color.
Repeat the coloring, huffing, and stamping again using the sprig and acorn image. Keep stamping it around the main sprig until all color is gone.
Repeat again using the mini tree image.
More coloring, huffing, and stamping using the large tree image.
Using Jet Black Archival, stamp the leaping deer onto a piece of Idea-ology Masking Sheet. Dry and cut it out.
Using a scrap sheet of paper, freehand cut a wave pattern to mimic a hill.
Apply the mask onto the stamped leaping deer and then apply the hilly scrap paper on top of the deer.
Color in the mini tree cluster image using the Distress Markers, huff on it, and stamp it onto the scene right where the scrap paper meets the Specialty Stamping Paper. Stamp it several times after huffing along the scene. Remove the paper and mask and dry.
Here is the coolest part. Apply the scrap back onto the scene where it matches up, and begin coloring in the sky portion with Distress Ink right over the Distress Marker images. The Distress Markers resist the Distress Ink. I used Salty Ocean and Tumbled Glass for a graduated look to the sky.
Using the Black Soot Marker, trace around the leaping deer image to make it really pop. Stamp a sentiment onto the top portion of the scene using Jet Black Archival. Ink the edges of the paper using Vintage Photo Distress Ink except the edge with the white portion.
Adhere the paper scene onto a Kraft card. Ink the edges of the card as well with the vintage photo.
Use Stickles to highlight parts of the scene for that special Christmas sparkle.
Supplies:


I hope your hands get creatively dirty soon!


Wednesday, December 05, 2012

The Hood At Christmastime!

It's that Funkie part of the fortnight! The challenge at Frilly & Funkie is being hosted by Rebecca Deeprose of Paper Primrose , and she wants to see "A Light in the Darkness".  Create with 'light' in mind.  Think candles, bulbs, lanterns, menorahs, stars, and all things that brighten this time of year, using whatever type of project you'd like. We can't wait to see what you 'enlighten' us with! And, if you need a little bright inspiration, please visit the other Design Team's blogs.
Linda Coughlin - The Funkie Junkie
Marjie Kemper - She Who Stamps and Scraps 
Teresa Kline - Paperie Blooms
Terry Horrall -  Terry's Work In Progress 
Sue Carrington - Stamping Sue Style 
Rebecca Deeprose - Paper Primrose
Lit Up At Night
1 - 6 (I apologize for the blurry photos. It was too long to photograph with the camera I have.)
7 - 12
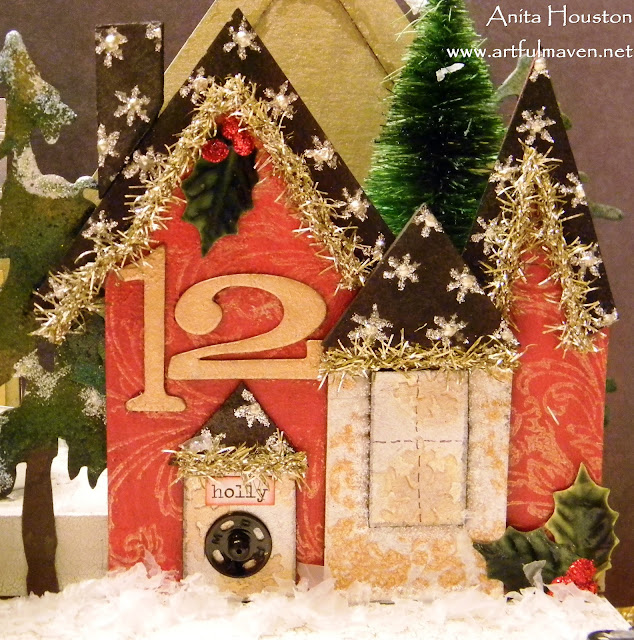
For my "Lighted Christmas Village Table Centerpiece" I decided to combine this Light challenge with all of Linda's Funkie Junkie 12 Days of Christmas Tag Challenges, sponsored by the Funkie Junkie Boutique, and this is a very heavy photo laden post, so you might want to grab a beverage and snack to sustain your energy! I used as much as her color scheme and products as possible for each house and building for my inspiration, and the numbers correlate to each of her tags.
As is usually the case the pictures do not due this justice. I am beyond thrilled with how this came out, and I will continue adding to it...like cars, foliage, and a few more details.
***EDIT***  There have been a bunch of questions on this, so to answer a few...
The houses and buildings are each made from at least 2 pieces of Wendy's Residence Art Parts, and Tim's Artful Dwellings Sizzix Bigz Die using Grunge Board and Grunge Paper. They are mounted on two 1 inch thick wood pieces measuring 30 inches long, and the widest one at 6 inches wide, with the thinnest at 3 inches. I painted the wood gold first, then gave it a white crackle finish, followed by crystal knob feet at 5 different points, and Idea-ology corners finished it off. The candles are just tea lights hidden between the largest Idea-ology Woodland Bottlebrush trees.
#1 The Church Based On Tag 1
#2 The House Of Jolly Based On Tag 2
#3 The House Of Merry Based On Tag 3
#4 The House Of Believe Based On Tag 4
#5 The House of Noel Based On Tag 5
#6 The House of Holiday Based On Tag 7...I mixed 6 and 7 up accidentally.
#7 Public School 7 Based On Tag 6...This was the other mix up.
#8 The House Of Greetings Based On Tag 8
#9 The House Of Hope Based On Tag 9
#10 The House Of Merriment Based On Tag 10
#11 The House of Joy Based On Tag 11
#12 The House Of Holly Based On Tag 12
I am also submitting this piece to Simon Says Stamp & Show for "House Rules", Inspiration Journal for "JOYful Creations", The Artistic Stamper Creative Team Blog for "Home For Christmas", and the Everything Wendy Vecchi Yahoo Group Making Art Challenge #56 for "Holiday".

Supplies: (So much was used, and these are not even close to being in order.)


I hope your hands get creatively dirty soon!