Friday, August 18, 2023

Tim Holtz Sizzix Halloween 2023 - Cracked Sign and Artsy Leaves and Layered Dots Trees in the Colorize Graveyard Pop Up Halloween Card

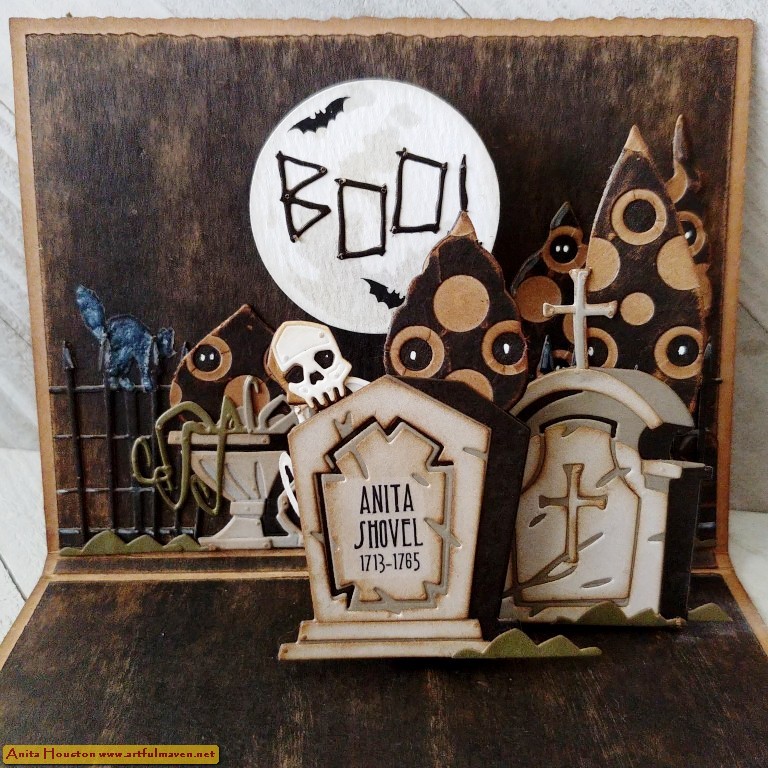
Hi Everyone! I have a Halloween make that was on the Tim Holtz Sizzix Halloween Live last week for you today. This one was super fun to make, and was made with the Colorize Graveyard, Artsy Leaves, and Layered Dots Thinlits, plus the Cracked 3D Texture Fade. I haven't made a pop up card in a while, so I thought it was time to do something different and try this again. Hope you enjoy!


Cut and fold Kraft Cardstock base card to 5 x 6.25 inches with a horizontal fold so the card will open outwards, with a 1/4 inch center so there is plenty of room for all the inside parts, and also with a Deckle Cut edge at the front bottom. A lot I 
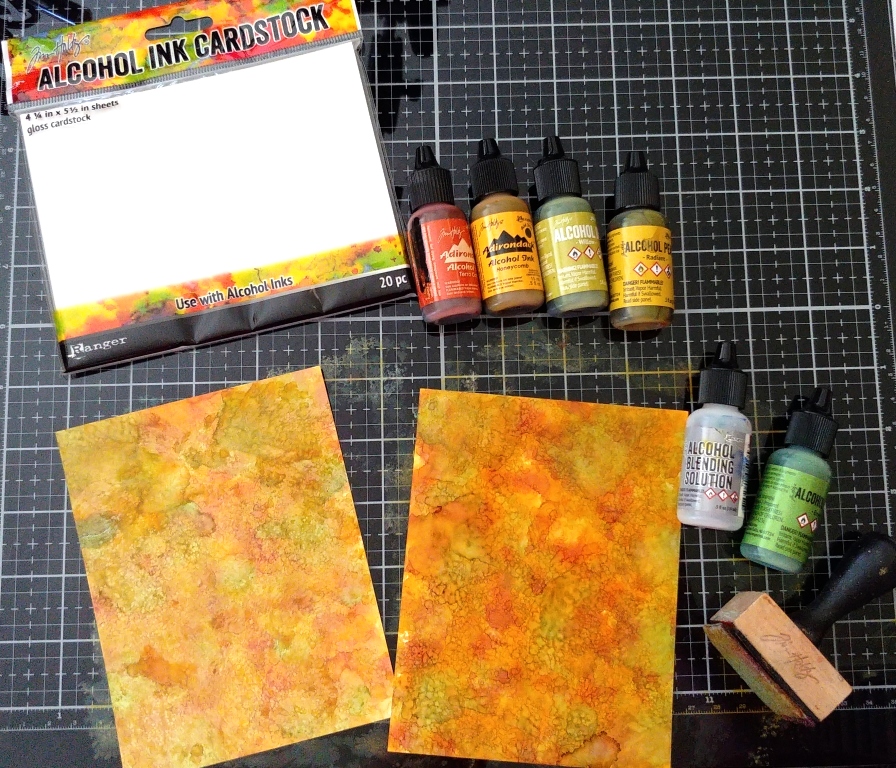
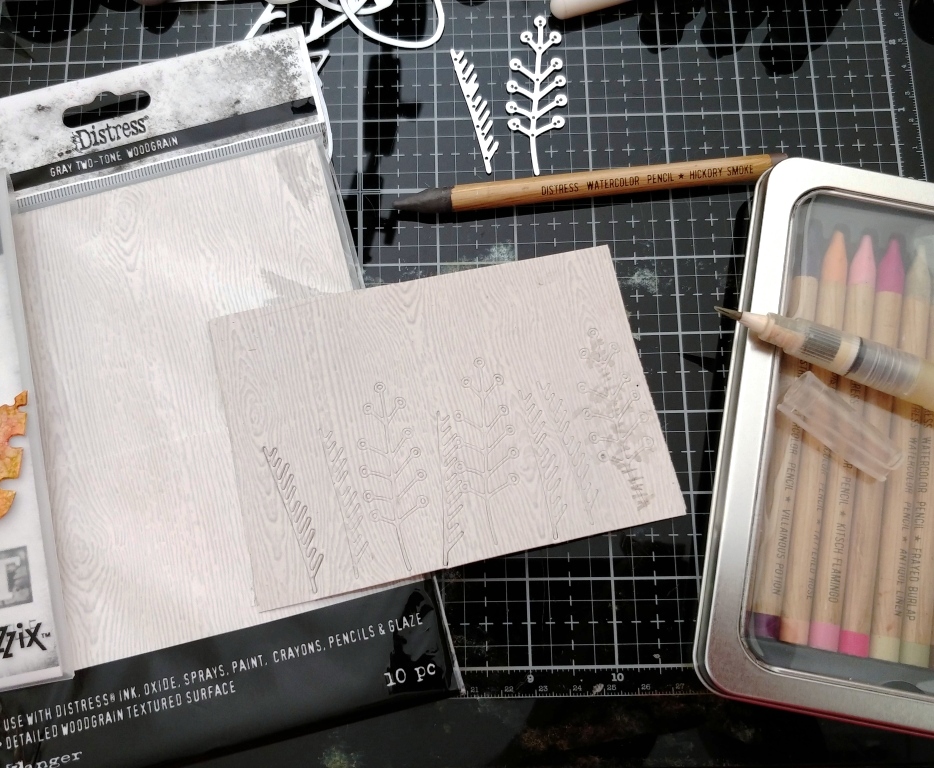
know, but starting here making the planning a lot easier. Take a piece of Gray Two Tone Woodgrain Cardstock from Ranger, and the Alpha set from the Wood Slice Thinlits and arrange the sentiment...Enter if you dare, would be great too. Die cut until you've finished the sentiment. Save the positive letters for another project. 
 
 
On the sides of the woodgrain, use a Deckle Trimmer to cut the sides at an angle, pointing inward. Use scissors or a regular trimmer to trim the top and bottom. Use a Distress Tool to distress the top and bottom. Use an Ink Blending Tool and Gathered Twigs or another brown ink and ink the edges well, and then rub the pad directly over the top lightly to bring out some more woodgrain. Mount this onto Kraft Cardstock with Collage Medium, and cut around the Kraft the same as you did the sign, deckle the sides and straight on top and bottom. 
 
 
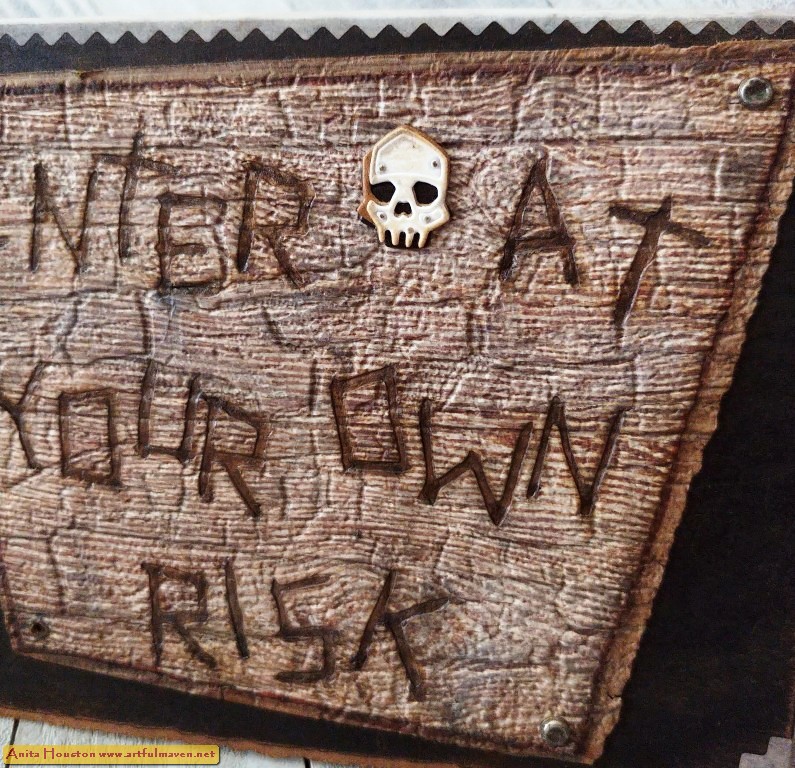
Take the new Cracked 3D Texture Fade, and working quickly, rub the pad of Hickory Smoke Archival over the inside raised areas on the Fade. Lightly mist the sign with water, and place into the Fade and run through the machine. Remove the sign from the Fade, and use a Detail Waterbrush and Gathered Twigs Distress Ink to watercolor in the letters and around the inside edge of the sign to give it more depth.

 
Cut Black Kraftstock to mount on front of card, with that bottom Deckle edge. Sand over the whole surface some to reveal the Kraft underneath the black, and ink over all the sanded areas and the sides with Gathered Twigs. Put together the little skull from the Colorize Graveyard Thinlits with black first, then kraft, then Watercolor Cardstock. Ink around him and on the raised parts with Antique Linen Distress Ink. Adhere him in place on the sign. Add Long Fasteners to the corners of the inner sign (I only did three to make it look like one is missing) and use the Craft Hammer to give the brads distressing. Rub Hickory Smoke Archival over the heads of the brads to further distress them. IF leaving one corner without a brad, use a craft pick to make a hole and distress it up. Adhere the sign to the Black Kraftstock and then onto the card front. 
 
 
Cut more Black Kraftstock to fit inside the card...top (4.5 x 6 inches with Deckle edge on top), center 1/4 x 6, and bottom 4.5 x 6 inches. Distress all the surfaces with the sanding disks, and ink over them with Gathered Twigs. Ink the right and left edges with Black Soot Archival. Adhere all three inside the card with two sided tape. Take the white pinked edge Halloween Trim Tape and apply a strip of it along the bottom edge and trim off the excess. Close the card and use the tape again on both bottom corners at a diagonal, trimming off excess, and across the top wrapping around to the back. Using a little Collage Medium is good so none of the edges come up since there is so much ink on it. 
 
 
Die cut the Layered Dots Thinlits, Black for solid, Kraft for small dots, and Black again for larger dots. Save all the dot pieces for another project like a shaker card. Also save the the side pieces with the half circle cuts from the Black Kraftstock, as these will be more headstones. Adhere only the dotted pieces together and save the black for die cutting in a minute. Select some Artsy Leaves (five of them) and die cut them using the dotted piece, making sure there are open dots on all to add some eyeball highlights later. These are the trees. Die cut two of the stem pieces for trunks using black. Sand the trees a tiny bit and ink over that with Gathered Twigs. Die cut the same trees using the Black Kraftstock from before, and then adhere the trees on the coordinating black pieces. This was just to make the dotted piece less thick for easier die cutting and less stress on the die pieces.
 
 Cut off some of the bottom edge on one of the half circle pieces and adhere it to the other half circle piece so it looks like two rows of headstones like in a cemetery. Cut the left side at an angle. Sand over it a bit to bring out the headstone shapes, and ink over the sanding with the Gathered Twigs. Select two of the trees and the trunks and adhere them to the right side of the top piece so they will be tall trees in the distance. Adhere the rows of headstones below these covering up some of the trunk parts. Die cut three gates using Black Kraftstock and three single gate parts as well. Adhere one gate part to the left side and two on the right side keeping them in line with the sides and bottom of the background piece. Die cut the medium circle from the Sized Circles Movers and Shapers or use another circle. Ink in the moon parts using the smallest Moon Mask and Lost Shadow Distress Ink. Ink the edges as well. Die cut the 'BOO!' using the Wood Slice alpha pieces and Black Kraftstock and adhere those on the moon. Add an Adhesive Spring to the back of the moon and adhere the moon to the middle top of the top piece. Die cut the urn and both headstones using Black and two shades of gray Kraftstock, the plant with two shades of green, and seven dirt/grass pieces using more green. 
 
 
Adhere the urn and one of the shortest trees to the left side. Add a grass piece to top of urn and then the plant pieces on. Adhere more grass pieces along the bottom of the gate and below the row of headstones. Take the two sets of Remnant Rubs, and cut out a cat, the large sentiment, some bats, and a headstone title. Rub on the cat on the gate top on the left side, the bats on the moon, and the sentiment to the center bottom of the bottom piece. Rub on the headstone sentiment to one of the headstones. Die cut another skull the same as before, along with one of the plant pieces using Watercolor Cardstock,  and some cross pieces using gray.  Add cross to top of the other headstone along with a tree behind that. Add grass pieces in front and behind headstone. Add a part of the white plant piece behind the headstone to look like arm bones or fingers or whatever and then the skull to that, so that it looks like the skeleton is peeping behind the headstone. Add a tree behind that, and grass along the bottom. Use a white pen to add in eyeball highlights to some of the holes in the trees and on the cat and skull. Draw in the white lines around the sentiment to help it pop more on the bottom portion. Take the Collage Medium and add it over the cat to give it some dimension and make it a little easier to see once the medium dries. Set this aside for a bit to dry. 
 
Cut two pieces of Black Kraftstock to about 3/4 x 5 inches. Fold one side about 1/2 inch and secure the fold with two sided tape. Make another fold about 1.5 inches above that. Adhere the 1.5 inch side to the back of each headstone. Lay the headstone face down on the bottom piece, matching up the tree tops to the bottom edge of card (along the center and right sides more or less). Secure the 1/2 inch piece to the bottom of the bottom piece with two sided tape, so that the headstone is now secure to the bottom portion only. Flip the headstone up straight parallel to the top portion, and figure out where you need to fold the strip in order to secure it to the top portion. Make the fold and then trim the piece that will be adhered to about 1/2 inch. Add two sided tape to that piece and then stick it on to the top portion nice and straight. Fold the card shut to make sure the headstones are folded flat and not seen, and make any hard crisp folds to make that happen. Open and close the card a few times to make sure all pops up and doesn't catch anywhere. Finished. ***I think it would be great to add an open and closing strap to the front of the card just to make it more interesting to open, but I wasn't able to make time to do that. 


Supplies:
(Paper Trimmer, Deckle Trimmer, Die Cut Machine, Die Pick, Scissors, Ink Blending Tool, Water Mister, Distress Tool, Two Sided Tape, Detail Water Brush, Sanding Disk Tool, Craft Hammer, Remnant Rub Tool)
-Ranger Surfaces: Kraft Cardstock
-Ranger Tim Holtz Distress Woodgrain: Gray Two Tone
-Sizzix Tim Holtz Thinlits: Wood Slice
-Ranger Tim Holtz Distress Ink:  Gathered Twigs, Antique Linen, Lost Shadow
-Ranger Tim Holtz Distress Collage Medium: Matte
-Ranger Tim Holtz Distress Archival Ink: Hickory Smoke, Black Soot
-Sizzix Tim Holtz 3D Texture Fade (Halloween 2023): Cracked
-Tim Holtz Idea-ology: Black Kraftstock , Long Fasteners, Halloween Trim Tape, Classic Kraftstock, Neutral Kraftstock, Cool Kraftstock, Halloween Remnant Rubs, Curiosities Remnant Rubs
-Sizzix Tim Holtz Thinlits (Halloween 2023): Colorize Graveyard, Layered Dots, Artsy Leaves
-Ranger Tim Holtz Distress Watercolor Cardstock
-Sizzix Tim Holtz Movers & Shapers: Sized Circles (medium)
-Stamper's Anonymous Tim Holtz Layering Mask: Moon Mask
-Adhesive Spring, White Pen
 
Thank you so much for coming by here! I appreciate you all so much! I will be back soon, so until then I hope your hands get creatively dirty soon!

Saturday, August 12, 2023

Tim Holtz Sizzix Halloween 2023 - Tapestry and Artsy Leaves Autumn Scene Etcetera Mini Tag

Hi Everyone! I hope you were able to watch the Tim Holtz Sizzix Halloween Live today to see the mounds and mounds of inspirational projects. It always blows my mind. If you missed it be sure to watch the replay. This is one of my projects that was shown in the Live, an Alcohol Ink Autumn Scene on a Mini Etcetera Tag made from the new Artsy Leaves Thinlits and Multi Level Texture Fade. I am totally in love with this, and wish it was way way bigger, LOL! Enjoy!

 
I took two of the Gloss Alcohol Ink Cardstock pieces from Ranger and pounced on Terracotta, Honeycomb, and Willow Alcohol Ink with an Alcohol Ink Applicator Tool covering the sheets completely. Then I added Radiant and Envy Alcohol Pearls to the Applicator along with Blending Solution and pounced that on while blowing with my mouth to create tiny marbled bubble looking shapes. 
 
 
I placed one of the pieces into the Multi Level Tapestry Texture Fade and ran through the machine twice, then did the other. I rubbed the pad of Peeled Paint Archival Ink directly over the raised areas, then the pad of Vintage Photo Archival over to bring out the design even more, then set these aside. 
 
 
Using another sheet of Gloss, I pounced on Cloudy Blue Alcohol Ink over the top portion only on a fresh piece of felt on the tool. Then I added Snow Cap Mixative on the Applicator and pounced it over the Cloudy Blue to create cloud looking shapes. I added Aquamarine Alcohol Ink, Tranquil Pearls, and Blending Solution to the same piece of felt, and on the lower end of the Gloss I swiped the tool over to create stripes of color for more of a water look. Then I lightly misted a bit of 91% Rubbing Alcohol in the air and ran the piece through the droplets to create some water bubbles on the stripes of color. 
 
Taking the Tapestry pieces, I tore towards me to reveal the white paper core, about three pieces each, just following the spaces between the round parts. I inked the white edges with Peeled Paint Archival Ink, except the piece that would be the very bottom. Then I tore the blue piece between the sky and water, again towards me to reveal the white core, and inked the water edge only (as the sky edge will be covered up) with Speckled Egg Distress Archival Ink, as well as that last piece, so it looks like the waters edge. I took a Mini Etcetera Tag from Stamper's Anonymous and played with the torn pieces, layering them to make a pattern of sky, hills, and water. Once I knew the pattern I set these aside, and painted the tag hole with Fossilized Amber Distress Paint, to mimic the sun. 
 
 
I took another piece of Gloss Cardstock and added Deception, Scorch, Splendor, Radiant, and Envy Alcohol Pearls to the Applicator with Blending Solution and pounced it on covering the piece completely. Then I took all 9 of the solid leaf (now tree) shapes from the Artsy Leaves Thinlits, and die cut all of them with this piece. I set these aside. 
 
 
I took a piece of Gray Two Tone Woodgrain and added two sided tape to the back. I laid the stem (now trunk) pieces that I wanted to use (two different ones) and die cut them, repeating until I had 9 total. I took a Hickory Smoke Distress Watercolor Pencil and Detail Waterbrush and created lines on each that look like Birch/Aspen tree trunks. I set these aside. 
 
 
Taking another piece of Gloss Cardstock, I pounced on Willow and Everglades Alcohol Ink to half the sheet, and then Envy Alcohol Pearl and Blending Solution over the top. I added two sided tape to the back. I die cut two of the leafy stem looking pieces three times each, so that they might look like pine trees. I set these aside. 
 
 
I decided to paint the background of the Etcetera Tag, so I painted the edges only with Walnut Stain Distress Paint. When dry, I added two sided tape to the back of the sky, hills, and and water and adhere those on the tag, leaving a border, and punch a hole where the tag hole is using a hole punch. I adhered the tag hole over using Collage Medium. Then I added some more Vintage Photo Archival Ink around the sides to further darken the border. I selected phrases from the Clippings Sticker Book, inked the edges with Vintage Photo Archival, and mounted those onto Kraft Cardstock, cut around them and inked those edges the same. I took 6 Tack Nails and nailed each of those onto a corner point on the very edge of the tag around the pieces about half way in, using a Mini Craft Hammer, but first adding a tiny hole with a Craft Pick to make hammering them in a little easier.  
 
 Here is a side view so you can see the nails a little better.
 
 
I shook the Gilded Foundry Wax up well and added a tiny drop to the white mat, and then using my finger, I dotted each nail head with the Wax. Then I heated up the wax with a Heal Tool to melt and set it.
  
 
I inked the edges of the trees with Crackling Campfire Archival Ink and Adhered them in place with two sided tape and foam tape in spots. I added the white trunks on each tucking the ends under the hills. I used Vintage Photo Distress Archival Ink to color in the bottom part of the trunks on the pine trees and then adhered them in place. I adhered the wording on as well with two sided tape. Then taking some Jute String, I wrapped the string around the top part of the nail heads and then went on to another continuing to wrap until I ended up where I started and then I tied a knot. Finally, I added more Jute String to the tag hole.
 

Supplies:
(Alcohol Ink Applicator, 91% Rubbing Alcohol in Sprayer, Die Cut Machine, Die Pick, Scissors, Ink Blending Tool, Paintbrush, Hole Punch, Water Mister, Two Sided Tape, Detail Water Brush, Mini Craft Hammer, Heat Tool, Foam Tape, Jute Twine)
-Ranger Tim Holtz Alcohol Ink Cardstock: Gloss
-Ranger Tim Holtz Alcohol Ink: Terra Cotta, Honeycomb, Willow, Everglades, Cloudy Blue, Aquamarine
-Ranger Tim Holtz Alcohol Pearls: Deception, Scorch, Splendor, Radiant, Envy, Tranquil
-Ranger Tim Holtz Alcohol Blending Solution
-Sizzix Tim Holtz Multi Level Texture Fade (Halloween 2023): Tapestry 
-Ranger Tim Holtz Distress Archival Ink: Peeled Paint, Vintage Photo, Speckled Egg, Crackling Campfire
-Ranger Tim Holtz Alcohol Mixative: Snow Cap
-Stamper's Anonymous Tim Holtz Etcetera Tags: Mini
-Ranger Tim Holtz Distress Paint: Fossilized Amber, Walnut Stain
-Sizzix Tim Holtz Thinlits (Halloween 2023): Artsy Leaves 
-Ranger Tim Holtz Distress Woodgrain: Gray Two Tone
-Ranger Tim Holtz Distress Watercolor Pencils: Hickory Smoke, Black Soot, Vintage Photo
-Ranger Tim Holtz Distress Collage Medium: Matte
-Tim Holtz Idea-ology: Clippings Sticker Book, Tack Nails, Jute String
-Ranger Surfaces: Kraft Cardstock 
-Ranger Tim Holtz Distress Foundry Wax: Gilded

Thank you truly for stopping by today! I will be back soon with a Halloween make from the Live. Until then, I hope your hands get creatively dirty soon!

Saturday, July 15, 2023

Distress Embossing Glaze Blossoms in a Talavera Planter Mixed Media Canvas

Hello Everyone! It's been awhile since I've been here and it's a little dusty. Today I have exciting news...Tim Holtz and Ranger have just added 12 more colors to the Distress Embossing Glazes line, many that we were needing so much! I hope you are watching Tim's Live today so you can see some fabulous ways to use the Glazes, if not be sure to watch the replay. I've used six of the colors on this Mixed Media 8x10 inch canvas to create the Talavera Pottery Planter and centers of all the flowers. I've collected Mexican Talavera Pottery for years and try hard to find the ones that are signed by the Artists. With all the new colors of Glazes it was easy to create a pot that has my favorite colors, all the oranges and blues. The pot below is my favorite one, so I tried to create this one very similar to it. The paneling  as well as decking on the canvas also matches perfectly with the real house, and that is because I used the same colors of inks and paints as the new Glazes, so this new collection was perfect for this project. Thanks so much Tim and Ranger for bringing forth the new colors!
 
 
I used Distress White Heavystock and die cut the largest Oval and biggest Scallop from the Stitched Ovals Thinlits from Sizzix. I placed the Oval under the Flames Layering Stencil from Stamper's Anonymous centering it for the part of the design I wanted and taped the stencil down. Starting with Abandoned Coral Distress Ink, I inked in the top and bottom heart shape using a Detail Ink Blending Tool as it's the only tool I have to get into those tiny parts of the stencil, then I removed the oval from under the stencil and immediately poured Abandoned Coral Distress Embossing Glaze over and then heat set it with the heat tool. I repeated this again with Spiced Marmalade next, then Squeezed Lemonade,  then Mermaid Lagoon, then Chipped Sapphire, and finally Crushed Olive last as there was more to ink with the green. I used a small paint brush to brush off any powder that got on the areas where I didn't want it. For the Scallop I only inked in the half circle areas using Chipped Sapphire Ink and Glaze.

 I snipped off a segment of three Scallops for the top of the pot, two for the bottom, and one each for the handles. I used a hole punch to punch off the center of the Scallop for the handles. Then using Collage Medium, I adhered the pieces onto the pot. To give the pot an even more Talavera Pottery look I used a dark blue permanent pen and traced around each part and also added some lines and circle dots. I set this aside for now.
 
 Using more White Heavystock with two sided tape on the back (I used two sided tape on all the die cuts), I die cut three of the flower parts (orange ones on lower left corner of the die picture) from the Mini Brushstroke Flowers along with three each of the leaves. I also die cut three of the top flower part from the Blossom Thinlits, three each of the leaves parts, and three each of the centers. I used Ivory Heavystock to die cut three of the base parts from Blossom, and Watercolor Cardstock for the second middle part of the Blossom. Taking only the three bottom center parts from Blossom, I inked over them with Orange Marmalade Distress Ink and then poured the same Embossing Glaze over and heat set. For the top center part I inked them with Squeezed Lemonade and matching Glaze. I did the same for the center rings of the Mini Brushstroke Flowers. At this point I wasn't sure about my flower colors so I set them all aside for a bit to concentrate on the canvas.
 
 
Taking an 8x10 inch canvas panel and the Stripes Layering Stencil with Crackle Texture Paste, I stenciled in the top areas of the canvas about two inches up from the bottom, letting the areas dry a bit, and then continuing in the pattern until the whole top area was striped. When dry, I painted in the area with Chipped Sapphire Distress Paint, and then added Stormy Sky paint to the center area and blended it out to create a halo of color.

 Taking a 2 x 8 inch piece of Woodgrain Cardstock, I inked over it with Wild Honey Archival Ink, pressing the ink into all the debossed areas, and then ran the pad of Frayed Burlap Archival over the raised areas. I trimmed this into three graduated widths, and then inked the edges heavily with the Frayed Burlap. I adhered these onto the bottom of the canvas using Crazing Collage Medium and also covered the whole rest of the canvas with it for a beautiful textured sheen. Now I had the outside walls and decking of my house with all the Talavera Pottery that I collect, and it was a perfect match with the real house.  

 
I decided on orange for the Mini Flowers, so I inked over the petals of all of them using Spiced Marmalade Archival Ink, and inked the centers with Vintage Photo. Then I adhered all the parts together. Using Wild Honey Distress Paint I added stripes to the petals, and dots to the centers with Walnut Stain Distress Paint. I brought the pot onto the canvas to figure out sizing and position of everything, and then cut stems from White Heavystock for the three Mini groupings of flowers and cut the ends into strips for each flower stem, and two thicker for the large Blossoms that I know would be seen. I painted the stems and base leaves with Crushed Olive Distress Paint, and inked in the other parts of the leaves with Crushed Olive Archival Ink. Even though it's the same color, there still is slight difference on the leaf parts to give the look of texture. I adhered the stems into place first with the Crazing Collage Medium, added the pot, and then added the Mini Brushstroke Flowers and leaves, coating all in the medium.
 
 
For the large Blossoms, I adhered the three petal parts together and the centers as well, but I did not add the centers on yet. Taking Antique Linen Distress Paint, I randomly painted in the Ivory areas in the center and into the open parts on the petals. Then I used Picket Fence to paint in a few stripes on the top petals for some texture. I adhered the centers into place, and used the Walnut Stain Distress Paint to add tiny dots on and around the centers. I also created a petal from the negative die cut pieces. I figured out the placement of the flowers and leaves and then adhered the leaves on covering them with the Crazing, then I added the Blossoms. I signed the canvas and then coated the whole thing again with the Crazing. 


Supplies:
(Paper Trimmer, Two Sided Tape, Scissors, Die Cut Machine, Die Pick, Detail Blending Tool, Small Paint Brush, Heat Tool, Hole Punch, Palette Knife)
-Ranger Surfaces: Kraft Cardstock
-Ranger Tim Holtz Distress Heavystock: White, Ivory
-Sizzix Tim Holtz Thinlits: Stitched Ovals (Largest and Biggest Scallop Trim), Blossom, Mini Brushstroke Flowers
-Stamper's Anonymous Tim Holtz Layering Stencil: Flames, Stripes
-Ranger Tim Holtz Distress Ink: Abandoned Coral, Spiced Marmalade, Squeezed Lemonade, Crushed Olive, Mermaid Lagoon, Chipped Sapphire
-Ranger Tim Holtz Distress Embossing Glaze: Abandoned Coral, Spiced Marmalade, Squeezed Lemonade, Crushed Olive, Mermaid Lagoon, Chipped Sapphire
-Ranger Tim Holtz Distress Collage Medium: Matte
-Ranger Tim Holtz Distress Watercolor Cardstock
-Ranger Tim Holtz Distress Texture Paste: Crackle
-Ranger Tim Holtz Distress Paint: Chipped Sapphire, Stormy Sky, Crushed Olive, Wild Honey, Antique Linen, Picket Fence, Walnut Stain
-Ranger Tim Holtz Distress Woodgrain Cardstock
-Ranger Tim Holtz Distress Archival Ink: Wild Honey, Frayed Burlap, Crushed Olive, Spiced Marmalade, Vintage Photo
-Ranger Tim Holtz Collage Medium: Crazing 
-8x10 Flat Canvas Panel, Dark Blue Permanent Pen
 
Thank you so so very much for stopping by here today. I hope you are inspired to use the new goods. Until next time, I hope your hands get creatively dirty soon!