Wednesday, August 26, 2020

Eileen Hull Field Notes Junk Journal

I'm back again this week, but this time with a junk journal using a whole bunch of Eileen Hull Sizzix Dies, a whole bunch, as well as a lot of Tim Holtz Idea-ology and vintage goods for the inside. Eileen challenged her Design Team and those of us who are Educators to make a journal and focus on the inside, the guts as I like to say. Good thing I made a junk journal, because I decided to sew the majority of it, and the sewing machine decided to give me fits, so there is absolutely no perfection in this messy album, and I'm not very good on the guts of albums and journals. I'm more of a cover girl. ;0) This journal will be on going as well, as I have a slew of pages to fill that will take some time, so I am sure I'll be back someday to show you the rest of the guts. Until then, this is what I have so far, and it's a very long photo heavy post.  Enjoy!
 
I used heavy felt material for the base of the journal, the bones.. It's quite thick and rigid compared to regular felt. I adhered it together with two sided tape, and then added stretchy string to hold the pages in the middle. I saved all the scraps from the die cuts to use as the tabs for the inside of the journal.
Using the Notebook Pocket Die, I die cut with more thick felt this time in a grayish color. I only used the front area of the die, and not the back with all the tabs as I sewed this flat, so keep that in mind. I sewed the shiplap fabric to the front of the panels of the pocket. Then I die cut the words 'one' and 'two' in felt and hand-stitched (yup, you read hand-stitched...lol) those to strips from Idea-ology Stitched Scraps, and onto the base of the pockets using black thread. I am in love with those strips. I used every piece from one package on this journal.
After both of the pockets were finished on the inside panels, I started the front of the album, that way no stitches would show through on the inside covers. I cut a panel of the shiplap fabric to fit the front of the album, but DID NOT adhere it until the end. I stitched everything on first. I began with the doily die cut that I used the heavy gray felt with. I only used about 3/4 of the doily, and stitched two circles around the inside of the die to hold it on. Then I die cut the cup, to use as a pitcher, out of regular felt. I stitched it over the doily. I added pieces of the Stitched Scraps to the pitcher, and the spine (or where the spine is going to be). It was at this point that I was falling in love with this. There is just something special about sewing.
Then, I discovered something MARVELOUS. Something I probably already know, but forgot. REMNANT RUBS WORK ON FABRIC!!! I knew they worked on canvas obviously, but on felt?!! I was blown away!!! Seriously, blown away. I was so excited to know this, and tried the rubs on every piece of fabric I used in the this journal. THEY ALL WORKED. Remnant Rubs really transformed this from cool to WOW! for me. I was so worried about all the journaling in this, and thought I would have to either stitch or hand write, but the Remnant Rubs saved the day. Anyway I digress. Next, I die cut the 'journal' using the heavy felt, and hand-stitched that on with a light blue thread (the only time I used anything but black thread).
Then came the flowers. I die cut the Heart Petals with layers of fabric and heavy felt, and layered them up, making several stacks of flowers for the outside and inside. I adhered the layers together by hand-stitching a button to the center, and then stitching to the cover. I wanted pops of red, but only had a few sheets of this weather proof type of fabric that I have no idea where it came from, but I die cut the pansy flowers out of it, and stitched a black potbelly type button to the center, and then onto the cover. Then I needed leaves, so I die cut leaves from the Spring Leaves Die, out of a brownish colored felt. I just love this die as there are many leaves to choose from. Then I hand-stitched those leaves on randomly around the flowers. Then I finally stitched this piece of shiplap onto the base cover piece, leaving the blue from the felt being seen around the edges. I scruffed up the edges of the shiplap fabric to give it a more shabby feel. I am in love with this cover...yup, I am a cover girl! Oh and, as I was sewing the cover on, I added the tulle and velvet ribbon to the back of the album to wrap around and hold the album closed. I had a large bee charm from my stash, and tied to onto the tulle ribbon.
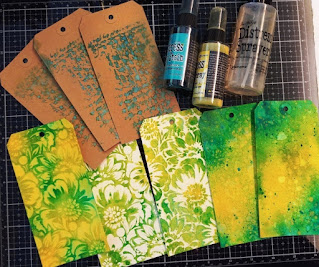
Then it was time for the guts of this album. I cut six pieces of each of the fabric prints I used, plus I used left overs of the soft felt pieces. So once I stitched the fabric pieces together, I ended up with 13 pieces for the pages. The pages would obviously be folded in half around the stretchy bands, so really I had 26 pages. Ugh, so many I know. I left the tops of the stitched pages unstitched, so I could hand-stitch things onto the fronts and backs of the pages so the stitches would not be seen on the other side. Confusing for sure, and I did mess up a few times, but I am all about details. ANYWAY, I used tags from all the Tim Holtz Demos over the summer for the main parts of the pages. I adhered and stitched on the tags as well as ephemera from Idea-ology and some from my stash for the guts of the album and on the tags. I fell in love with the whole Idea-ology Field Notes Ephemera line. There are so many butterflies and flowers to choose from. These pieces really transformed every part of this for me, and made the pages so easy to put together.  I adhered using Collage Medium and two-sided tape as well as stitching. I inked every piece of ephemera as well, and added more tulle for the tag tops. Lots more Remnant Rubs were used throughout, as well as scrap fabric pieces to make plain pockets. Nothing was formal about this, just willy-nilly. I truly had fun putting all the pieces together, and I am no where near finished, so the pages you will see below still need stuff in my opinion...remember it's on going. 


Supplies: 
(Die Cut Machine, Scissors, Sewing Machine, Needle w/Black, Light Blue Thread, Rub-on Tool, Ink Blending Tool, Two Sided Tape)
-Sizzix Eileen Hull XL Scoreboards Die: Journal, Notebook Pocket
-Elastic String, Heavy Felt, Regular Felt, Shiplap Fabric, Flower Script Fabric, Tulle Ribbon, Velvet Ribbon, Mother of Pearl Buttons, Small Black Buttons
-Tim Holtz Eclectic Elements Fabric: Memoranda
-Sizzix Eileen Hull Bigz Die: Lace Medallion Doily, Mug and Spoon, Spring Leaves, Flower Layers with Heart Petals, Pansy Flower
-Sizzix Eileen Hull Thinlits: Homemade Alphabet, Journaling Words
-Ranger Tim Holtz Distress Heavystock Tags: #8
-Tim Holtz Idea-ology: Stitched Scraps, Specimen Remnant Rubs, Tiny Text Remnant Rubs, Field Notes Ephemera Pack, Field Notes Snippets Ephemera Pack, Botanical Layers, Paper Dolls
-Ranger Tim Holtz Distress Ink: Speckled Egg, Gathered Twigs
-Ranger Tim Holtz Collage Medium: Matte
-Vintage Floral Postcards, Floral Ephemera, Bee Charm
-Faber-Castell Pitt Pens

If you are looking for themes for journals, measurements for use in Eileen's journal dies, journal inspiration, or just entertainment, then visit Eileen's blog for several informational posts the last few weeks, as well as links to so many blogs filled with beautiful journals.
I'll be back again soon. Until then, I hope your hands get creatively dirty!

Sunday, August 23, 2020

Stamper's Anonymous Halloween 2020 - Skull Full of Flowers

Hi Everyone! Today I have my first card for Tim Holtz's new Stamper's Anonymous Halloween 2020 Stamp release. To say that I was happy to be asked to design some cards for Tim for this release is an understatement. I was absolutely moved and honored, and I had the most fun doing so. It truly rejuvenated me, and I just couldn't stop making. Thank you Tim, Mario, and Paula. All of the samples by the other designers are wonderful so don't miss their blog posts, or Tim's so you can see where to go. Here is my first card, a Skull Full of Flowers, using the Anatomy Chart and Dearly Departed Sets, as well as the Mini Script Layering Stencil. By the way, a lot of people of Tim's Live typed that this looks like something from Day of the Dead. That was not my original intent, but I totally see that now, and I like that idea too. Enjoy!
(Hint: Always prime your new red rubber stamps by applying ink (I use Jet Black Archival.) and letting it dry a few minutes or longer before using so your images will be crisp the first time you stamp, especially if you are not using a Stamping Platform.) Cut watercolor cardstock to 4 1/4 x 6. Stamp skull along bottom left using Jet Black Archival and Stamping Platform. Using the platform enables you to stamp again and again to make a crisp image on the watercolor, as watercolor paper soaks up the ink and doesn't give you a super crisp look the first stamping.  Stamp the flower shop label on the lower right with Jet Black.
Stamp the flower image on top of skull so it angles to the right...use sticky notes to mask the top of the skull if needed. Mask off some of the flower portions and stamp the flower again so that the bouquet will be more full looking. Stamp two extra flower images onto a separate piece of watercolor to cut out later for layering.
Apply Antique Linen, Hickory Smoke, and Gathered Twigs Distress Ink to the silicone mat and water color in the skull using a Detail Water Brush. Dry.
Use the Distress Embossing Dabber and apply the medium over the skull and spread it with a paintbrush. Pour Antique Linen Embossing Glaze over it (on top of a sheet of paper for easier clean up), and heat emboss. Do the same with the flower label using Rusty Hinge Embossing Glaze. Use Distress Crayons and the silicone mat to water color the flowers on the card and the extra flowers you stamped, using the Detail Water Brush.
Lay the Mini Script Stencil over the right side of the card, and use a clean ink blending tool foam and Micro Glaze over the stencil, taking care not to cover up any of the stamped images. Mist the card lightly with water, and then mist Antique Linen and Speckled Egg Spray Stains over the card. Let it blend and soak in, and respray if desired. Use a paper towel to clean off sprays from glazed areas and flowers, and to remove the left behind Micro Glaze. Dry. Ink edges of card with Antique Linen Distress Ink. Using the Distress Crayons on the flowers made them resist the spray.
 Sew around card if desired. Mat card onto black cardstock, distress the edges, then mat again onto rust colored cardstock, and finally onto card base. Cut out extra flower and leaf pieces, and ink their edges. Adhere flowers and leaves to the arrangement, bending edges if desired so it looks more 3D, using Collage Medium.
Mist 5 bouquet flowers with Squeezed Lemonade and then Antique Linen Spray Stain, and let dry. Spray Antique Linen on one beaded berry and let dry. Adhere dried bouquet flowers on, cutting stems off first. Cut the berries off of each end, and adhere those to the large flower centers.


Supplies: 
(Glass Mat, Heat Tool, Scissors, Sticky Notes, Distress Tool, Stamp Platform, Ink Blending Tool,
Detail Water Brush, Paint Brush, Water Mister, Two Sided Tape )
-Ranger Surfaces: Water Color Cardstock, Black Cardstock, Kraft Cardstock
-Ranger Archival Ink: Jet Black
-Stamper's Anonymous Tim Holtz Stamp Set: Anatomy Chart, Dearly Departed 
-Ranger Tim Holtz Distress Ink: Antique Linen, Hickory Smoke, Gathered Twigs
-Ranger Tim Holtz Distress Embossing Dabber: Clear
-Ranger Tim Holtz Distress Embossing Glaze: Antique Linen, Rusty Hinge
-Ranger Tim Holtz Distress Crayons: Twisted Citron, Pine Needles, Peeled Paint, Scattered Straw, 
 Rusty Hinge, Squeezed Lemonade
-Ranger Tim Holtz Distress Micro Glaze
-Stamper's Anonymous Tim Holtz Collection Layering Stencil: Mini Script 
-Ranger Tim Holtz Distress Spray Stain: Antique Linen, Speckled Egg, Squeezed Lemonade
-Ranger Tim Holtz Distress Collage Medium: Matte
-Tim Holtz Idea-ology: Bouquet, Beaded Berries, Classic Kraft Stock

I will be back very soon, and here is a huge cyber hug for stopping by. Thank you so much for all the wonderful comments during the Live as well. My cup runneth over! I hope your hands get creatively dirty soon!

Friday, August 07, 2020

Wildflower Bouquet Collaged Birthday Cards

Hello All and happy August! August is the month for Mother's birthdays around here, so today I have my Mother's and Mother In Law's birthday cards made with lots of Tim Holtz botanical goodies.
These are all tag I made during the Distress Sprays demo, and I decided to use them on these cards.
I die cut the Bouquet Thinlits from Tim and Sizzix using two of the tags. I used the Wallpaper for the background of the cards.
I collaged on the Bouquet designs with Matte Collage Medium, and trimmed off the excess. I added on the tags, and stitched around them. Everything got inked using Ground Espresso Archival from Tim and Ranger.
I die cut the flowers from Wallflowers 1 and 2, and the Bigz Large Stems. I inked over them in Oxides and misted with water. I added a few details with markers.
I collaged the flowers on and used Wendy Vecchi's Sunflower Liquid Pearls for the centers and also on the Bouquet cut outs.
I die cut the base of the birds with the text tags and the bodies with another tag from the sprays. I crinkled up a piece of Kraft cardstock, misted it with Walnut Stain Distress Spray, and inked over it with Oxides. Then I misted the whole piece, and rubbed the Archival Ink over it to highlight the wrinkles. Then I die cut the wreaths.
I cut the wreaths in  half and layered them on top of each other. I used the inside of the wreath as a base for the nest, added the bird, and then added the twig parts under the bird to form the nest. Then I foam taped the bird and nest onto the card.
I used Clippings to form my sentiments, inked them, and added to cardstock.
I die cut and stamped a bee from the Entomology Stamps and Dies, and colored them with markers  before adding to the cards.
Supplies:
(Paper Trimmer, Scissors, Ink Blending Tool, Die Cut Machine, Hemp String, Foam Tape, Two Sided Tape, Stamping Block)
-Ranger Surfaces: 8.5x11 Inch Mixed Media Heavystock, Kraft Cardstock
-Ranger Tim Holtz Mixed Media Heavystock #8 Tags
-Stamper's Anonymous Tim Holtz Collection Layering Stencil: Bouquet
-Ranger Tim Holtz Distress Spray Stain: Peacock Feathers
-Ranger Tim Holtz Distress Oxide Spray: Mustard Seed, Frayed Burlap, Walnut Stain
-Ranger Tim Holtz Distress Sprayer
-Stamper's Anonymous Tim Holtz Background Stamp: Ledger Script
-Core-dinations Color Core Cardstock: Turquoise
-Ranger Tim Holtz Collage Medium: Matte
-Sizzix Tim Holtz Thinlits: Bouquet, Wildflower Stems 1, Wildflower Stems 2, Funky Wreaths, Feathered Friends, Entomology
-Sizzix Tim Holtz Bigz Die: Large Stems
-Ranger Tim Holtz Distress Archival Ink: Ground Espresso
-Ranger Tim Holtz Distress Ink: Gathered Twigs
-Ranger Tim Holtz Distress Oxide Ink: Mustard Seed, Lucky Clover, Twisted Citron, Brushed Corduroy, Vintage Photo
-Tim Holtz Idea-ology: Worn Wallpaper- Halloween, Clippings Sticker Book
-Ranger Wendy Vecchi Liquid Pearls: Sunflower
-Ranger Archival Ink: Jet Black
-Stamper's Anonymous Tim Holtz Stamp Set: Entomology
-Faber Castell Pitt Pens

Thanks for stopping by today, and as always I hope your hands get creatively dirty soon!