
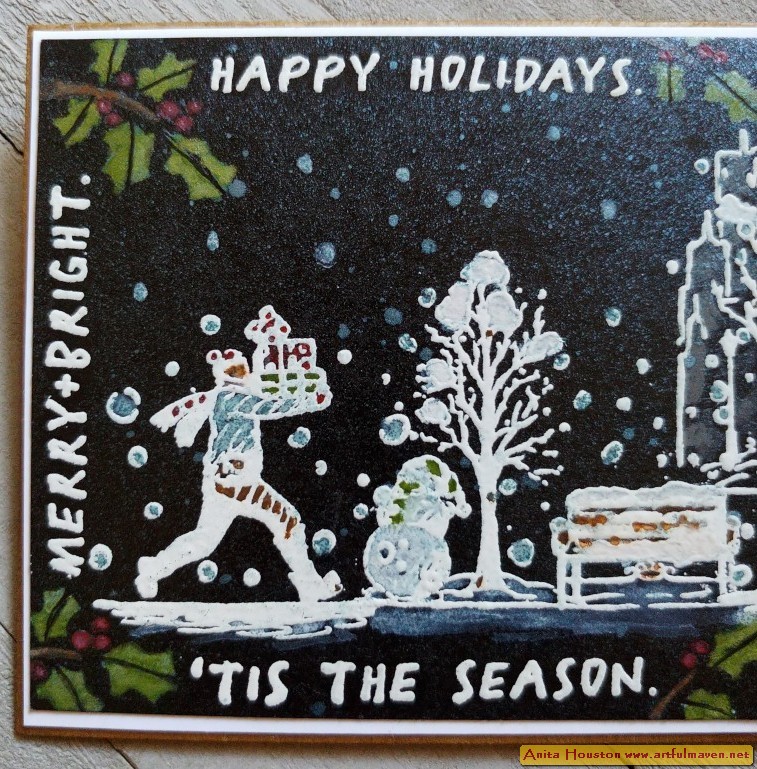
Hello Everyone and Happy November! Christmas is just around the corner, and I gotta really start getting ready. Today I have one of the makes from the Tim Holtz Stamper's Anonymous Christmas Live to show you, made with the Holiday Sketchbook Stamp Set and Mini Holly Stencil (Set 54). My goal for this card was to make it look like that long and wide sidewalk in Central Park in New York City...you know, the one in all the movies. The couple in the center is walking back from some posh department store with a few small gifts, into the entrance of the park and have to decide whether to go left or right. Either way, the sights and sounds look fun and festive for them. I can smell chestnuts roasting just looking at this scene. Can you?!! This card was pretty simple to make and color in as well. Enjoy!


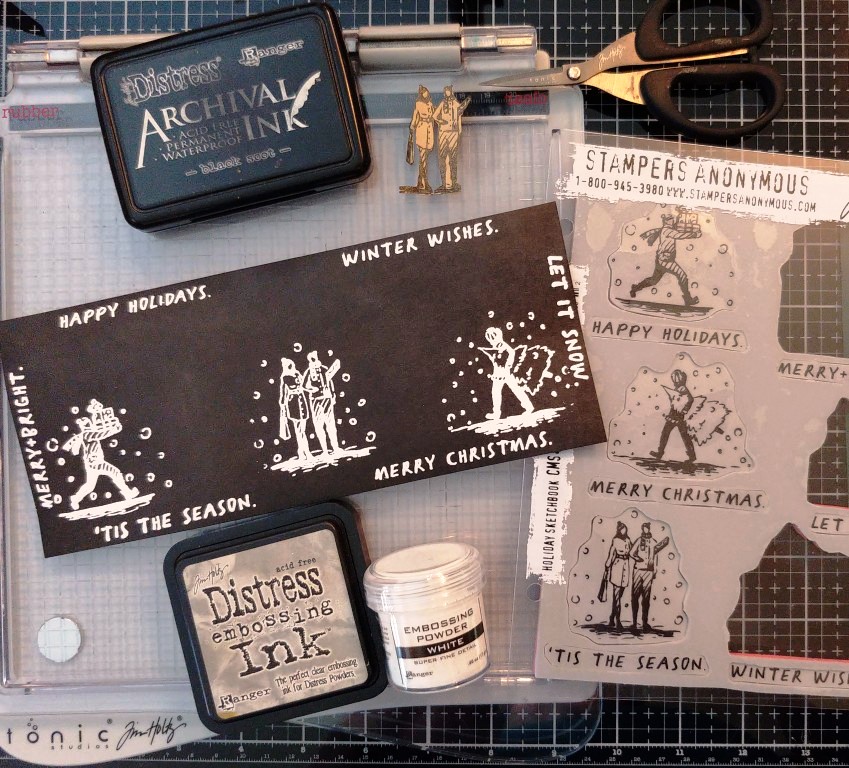
Cut a piece of Black
Kraftstock to 3.75 x 8.75 inches, and place into the largest Stamp Platform.
Arrange all the sentiments from the Holiday Sketchbook Stamp Set along all the
borders of the paper evenly (2 on top and bottom and one on each side) and close
the platform to secure the stamps. The sentiment on the right side will
probably not fit in so you can do that one after all the others. Pounce any
Anti Static Pouch over the paper to make sure the powder won't stick where you
don't want it to. Ink the stamps with Distress Embossing Ink and stamp all the
sentiments onto the paper, and then immediately pour White Embossing Powder
from Ranger over them. Brush away any powder if it is where it shouldn't be.
Heat emboss. Do the other sentiment the same way. Make sure to clean the stamps
with water to remove all the Embossing Ink before putting them away so it
leaves a little ink behind after stamping.
Place the paper back
into the platform, and add the center and two far side images from the set
keeping them on the same sidewalk/snow line so it will look like one long
sidewalk, like the one in Central Park in New York City. Close to secure the stamps. Pounce over the paper again with the
Pouch. Ink over the with the Embossing Ink, and immediately pour White
Embossing Powder over the whole paper. Remove excess powder and heat emboss.
Clean the stamps again, and then stamp the middle image (the one with the
couple) onto a sticky note with Black Soot Archival, and cut out for masking.
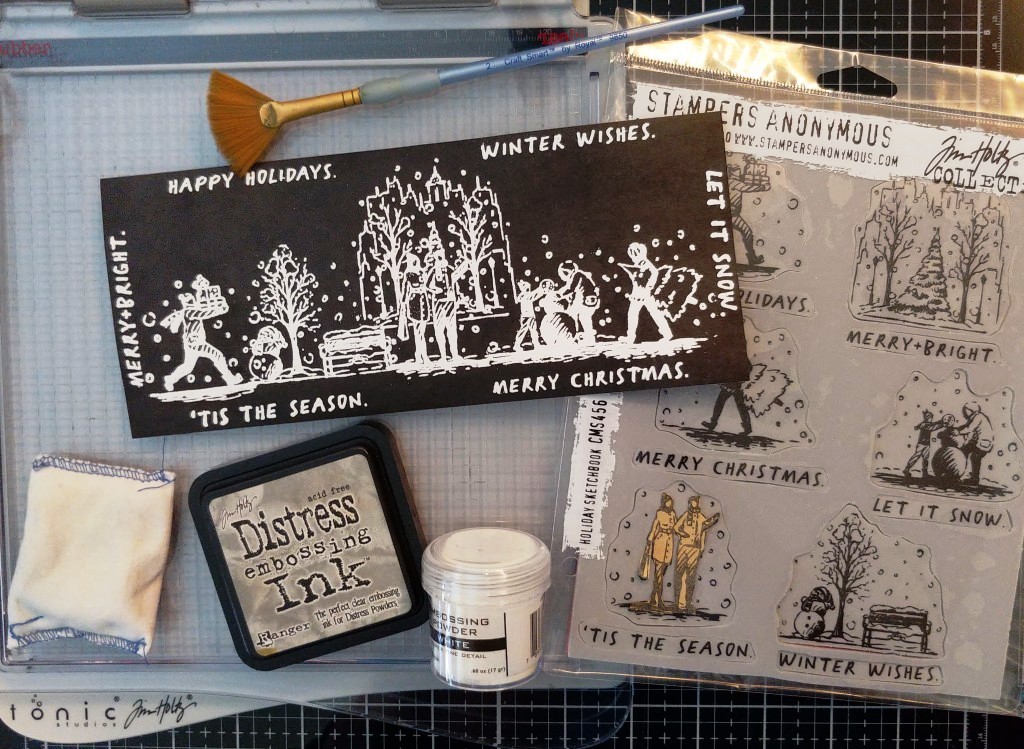
Place the paper back into
the platform, and add the top center image with the city buildings above the
couple, and mask the couple. Close to secure the stamp. Pounce over the paper
again with the Pouch. Ink over the with the Embossing Ink, and immediately pour
White Embossing Powder over the whole paper. Remove excess powder and heat
emboss. Remove and clean that stamp, and then add the last two images each
between the other three matching them up to the line on snow so that it will
all be even. Close to secure the stamps. Pounce over the paper again with the
Pouch. Ink over the with the Embossing Ink, and immediately pour White
Embossing Powder over the whole paper. Remove excess powder and any extra
snowflakes that look too bunched up using the fan brush, and heat emboss.

Take the Holly
Layering Stencil from the Set 54, and using a Detail Ink Tool, pounce over
parts of the Holly along the open border parts of the card using Glacier White
Pigment Ink. Do all the open border parts. Let the ink dry or use a heat tool.
Clean your stencil.

Using a Detail Waterbrush, color in the Holly
Stencil parts and all the open parts of the images with Distress Watercolor
Pencils from Ranger. Let paper dry completely. Shake the Winter Frost Distress
Mica Stain, and lightly mist over the paper. Let it sit for a few minutes, then
use a paper towel to clean the Mica Stain off of the white embossing. You might
need a little water on parts that have dried. Shake the Tart Cranberry and
Wicked Elixir Distress Mica Stains, and remove the lid to add a few drops of
each to the silicon mat. Pick up the color with the water brush and color over
the leaves and berries from the stenciled parts. Let dry. Add two sided tape to the back and set aside.
Cut and fold a Kraft Cardstock base card to 4 x 9 inches. Ink the edges with
Gathered Twigs Distress Ink. Cut a piece of White Heavystock or other white
cardstock to 3 7/8 x 8 7/8 inches, and mount on the Kraft base with two sided
tape. Mount the card front to this.


Supplies:
(Paper Trimmer, Large Stamp Platform, Anti
Static Pouch, Heat Tool, Sticky Note for Masking, Scissors, Fan Brush, Detail
Blending Tool, Detail Waterbrush, Water Mister, Two Sided Tape, Ink Blending
Tool)
-Tim Holtz Idea-ology: Black Kraftstock
-Stamper's Anonymous Tim Holtz Stamp Set: Holiday
Sketchbook
-Ranger Tim Holtz Distress Ink:
Embossing
-Ranger Embossing Powder: White
-Ranger Tim Holtz Archival Ink: Black
Soot
-Stamper's Anonymous Tim Holtz Mini Layering Stencils: Set
54 (Holly)
-Ranger Pigment Ink: Glacier White
-Ranger Tim Holtz Distress Watercolor
Pencils: Picket Fence, Tattered Rose, Candied Apple, Peeled Paint, Speckled
Egg, Faded Jeans, Vintage Photo, Hickory Smoke
-Ranger Tim Holtz Distress Mica Stain:
Winter Frost, Wicked Elixir, Tart Cranberry
-Ranger Surfaces: Kraft Cardstock
-Ranger Tim Holtz Distress Heavystock:
White
-Ranger Tim Holtz Distress Ink: Gathered
Twigs
Thank you so much for stopping by today and especially for commenting. I have one more project to show you from the Live so I'll be back quick. Until then, I hope your hands get creatively dirty soon!


Beautiful scenery with all the stamps together. Brilliant Idea. Love these little winter scenes.
ReplyDelete