Welcome back! This is the fourth post on my adventures into Encaustic Wax. As promised I have a step out photo tutorial of how I created a landscape piece. This took me all of 15 minutes and that is stopping to take photos (Albeit some are very fuzzy as it was hard to hold things and photograph at the same time.), and I haven't touched the wax in over two weeks. I've been busy busy busy. But needless to say, it was simple to pick it back up again, and I get so crazy wrapped up in it, that if it wasn't for having to pick up those darn kids from school, I could play ALL DAY easily. So keep that in mind if you decide to start playing with wax...it's easy to do and so addicting!!!! It took me 45 minutes to make these three. That's mind boggling!!!
Enough blabber...here are my step out photos, and I did more than one project, of course, so grab a bevvy and a biscuit because you are going to need sustenance to get through all these pics!!! Sometime soon I'll try to do a video, as it's much better to see the process that way.
 |
| I started with a clean sheet of paper as a base to absorb extra wax that I get off of the card, and even a craft sheet underneath for protection to the table. The card is on top of that, and the rest of the table is surrounded by the wax blocks I'll use, and me plugged in big and mini irons on the low setting. I have a box of Kleenex close by to clean the irons between colors as well. |
 |
| I start with sky first, as you want to work top to bottom, so it's white, light blue, and a pinkish color of wax that go onto the left part of the iron. I turn the card vertically to make the sky as well. I apply the iron onto the card and swipe it top to bottom. |
 |
| When the card is turned the horizontally you can now see the sky. It's amazing that clouds are somehow formed and the wax blends gorgeously. If you don't like the look you can keep swiping the iron until you reach the sky look you want, even adding more color as you go. |
 |
| After the sky was formed, it was time for the horizon,. I cleaned off the iron, and then went with a dark green and only on the right side of the iron so as to not cover the rest of the card. |
 |
| I went straight across under the sky and moved the iron a little back and forth to create a few wavy patterns to mimic hills. |
 |
| Without cleaning the iron, I added yellow and did the same thing as I did with the green above. |
 |
| To create texture and the look of foliage on this area, I picked up the card and touched the left portion of the uncleaned iron to the card in quick and light pounces. It creates whips and lines for added texture. You can see the designs as you go, so you know where to keep adding the texture. This is the part of the process that entices me most and it's so EASY to do. |
 |
| I wanted to add a stream, so I cleaned off the iron and added blue and white. |
 |
| After 3 swipes across the remainder of the card, I got the look I wanted. |
 |
| After cleaning the iron, I added more green and yellow to the tip to add in some more land. |
 |
| I swiped this only on the right corner and wiggled the iron as I went. LOVE this portion! The scene is really starting to take shape now. I pounced the very tip of the iron onto parts of this to add more texture as well. |
 |
| I decided to use the mini iron now to do some detail work. I added yellow to cut in some grass only using the side of the iron. |
 |
| I kept on adding grasses and dots of yellow here and there. |
 |
| I added orange and darker green to the grasses as well. |
 |
| I rubbed a little of the water area away with a Kleenex to bring in some more white. |
 |
| I scribbled in a little more blue using wax directly from the block. It's a cool effect and really adds texture. |
 |
| I added dots of white wax in dots using only the tip of the mini iron, and drew in birds as well with the tip in a dark blue. |
 |
| Once I was finished, I rubbed the whole thing with a Kleenex. This brings out the shine of the wax and buffs everything up. |
 |
| I kept on going, and wanted to make a poinsettia. The mini iron is a perfect shape to do this. I covered the whole iron with red and just pushed down and turned the card to keep adding more of the red petals. BUT THEN...ugh...I decided to add green leaved to it and I muddled it all up. It was horrible, but instead of throwing it away, I added a glob of dark blue to the larger iron and swiped across the whole card to see what would develop. That is the beauty of wax...you can start all over and rework any piece over and over again. Nothing should ever go in the trash!!! |
 |
| Once the dark blue was on, a gorgeous combination of the red, green, and blue made an icy glacial look, as I went with it. I added more dark blue and white this time to create spiky glaciers, and then water, and finally a piece of land, exactly as I did the first one only using the blue and white. Cool huh?!! If you look closely you can see the lines of the flower in the white portions of this from when I tried to make the poinsettia. NO MISTAKES IN ART!!! |
 |
| So it was back to the poinsettia on a new card. This time I started with the leaves first in dark green, then cleaned the iron and added the red petals. |
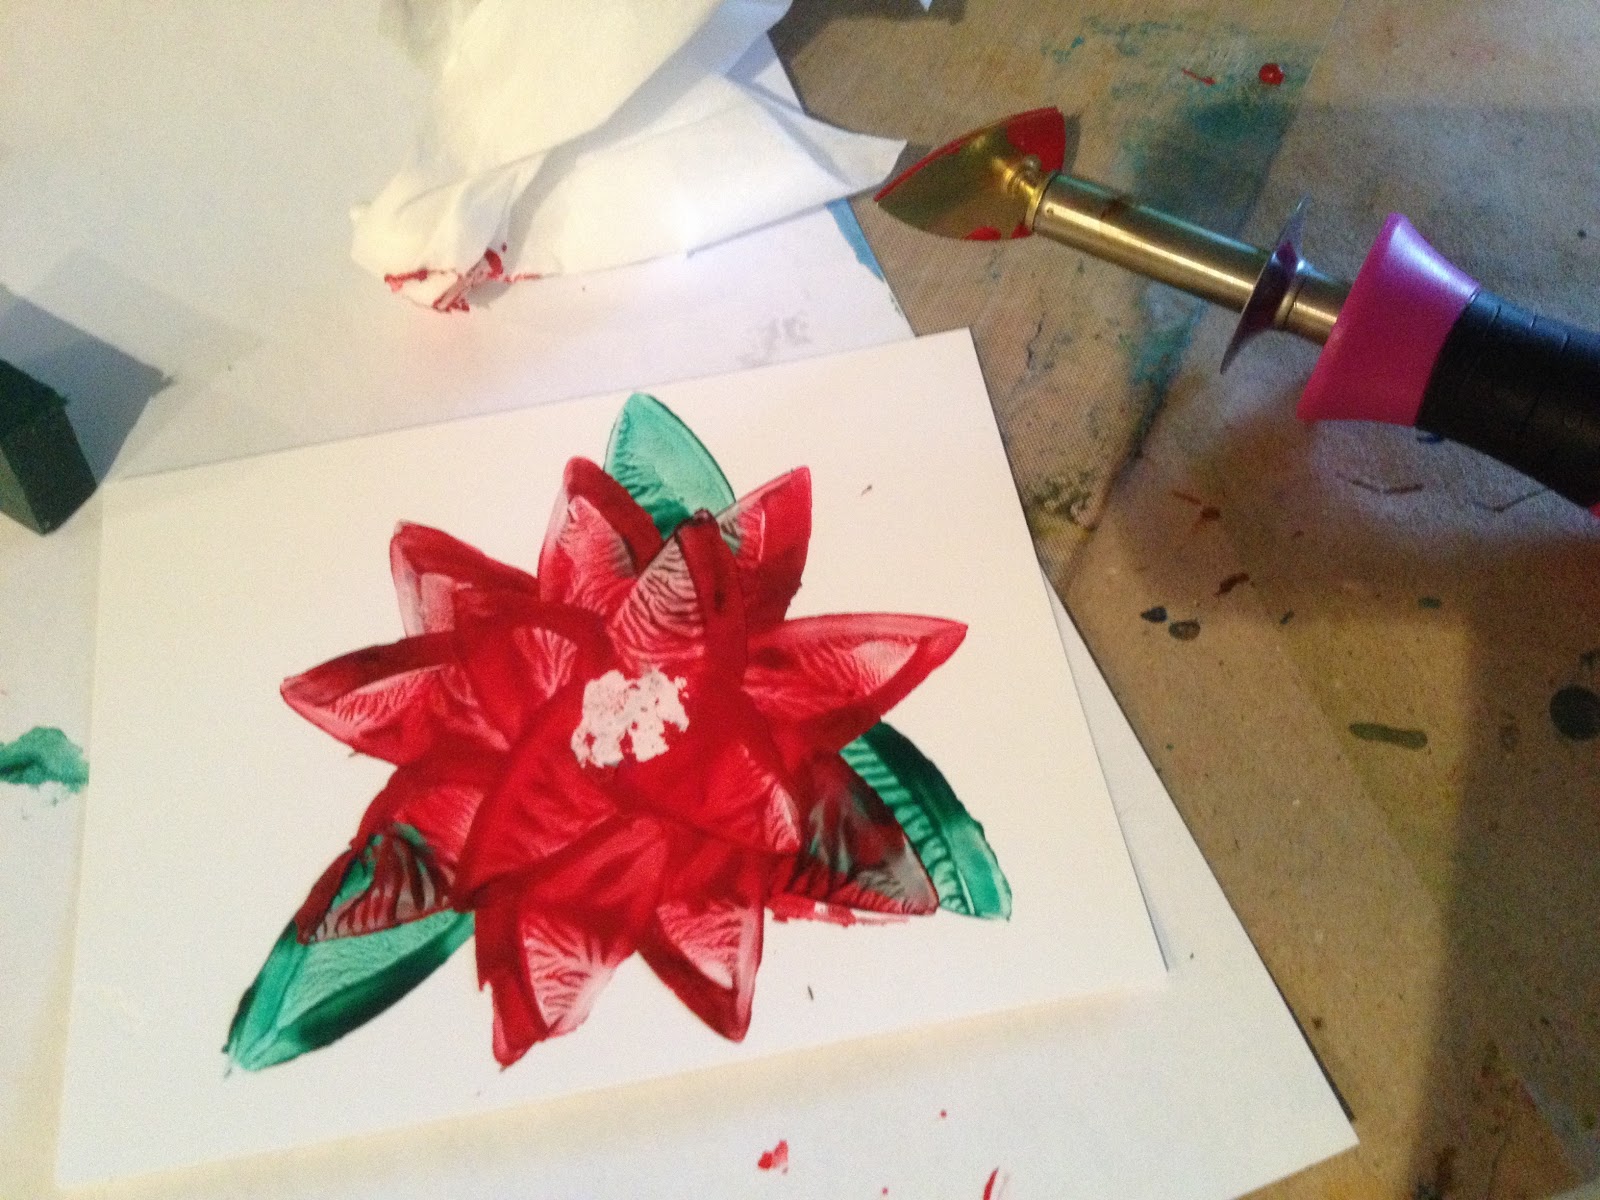 |
| I overlapped the colors a bit, but just kept going with it. The wax was still warm in the middle of the flower, so I wiped a little away to allow for a center where I added drops of yellow wax. |
 |
| I added more leaves and petals around the borders, then misted a Kleenex with Dyan's Dylusions Ink Mist from Ranger and rubbed that into the background portion. The wax resists the ink. |
 |
| Then I decided that each of these cards needed a border. I rubber a thin line of Metallic Gold wax across the middle of the large iron, and touched each side of the card into the wax pushing as I went. This creates a thin border around the cards, and once shined up with Kleenex, gives the card a gorgeous metallic gilded border. LOVE that technique. I used Silver on the glacier card. |
 |
| In 45 minutes I had these 3 cards, mounted and inked with Tim's Distress Ink. |
That's it...finally...for this week! Next week I think I am going to try some abstract patterns on the cards using the wax...hopefully. Until then...and thanks so much for joining me on this new adventure!!!
Supplies:

I hope your hands get creatively dirty soon!