Showing posts with label Mother's Day. Show all posts

Tuesday, May 09, 2023

Bold Botanicals and Floral Trims Watercolor Mother's Day Cards

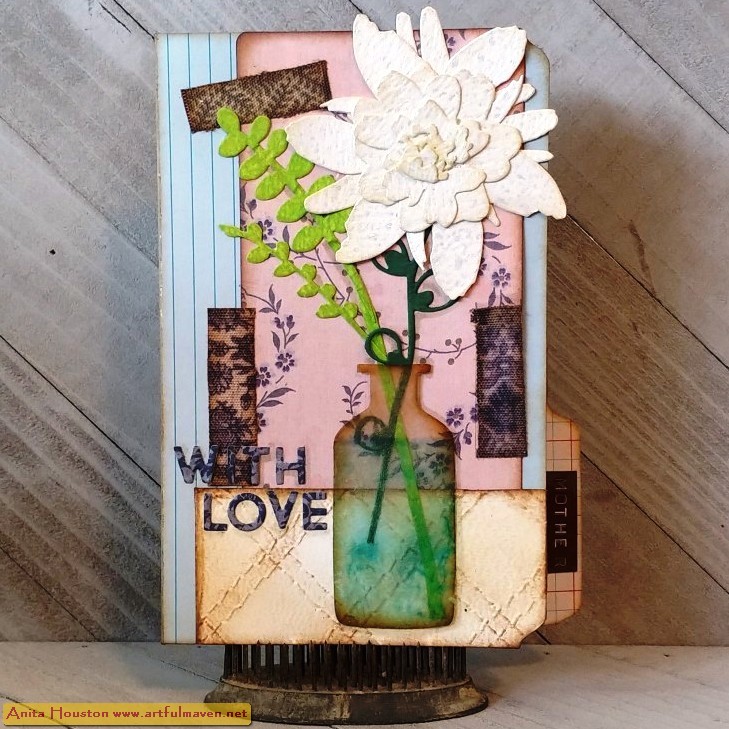
Hello Everyone!!!!! Today, I have a couple of cards made with the new Bold Botanicals and Floral Trims Stamp Sets from Tim Holtz and Stamper's Anonymous, that I am using for Mother's Day Cards, BUT really they can be used for pretty much any occasion that a gorgeous flower or flowers would be great for. I love that you can just stamp and color in these beauties, which made the card making really simple and fast too. Enjoy!

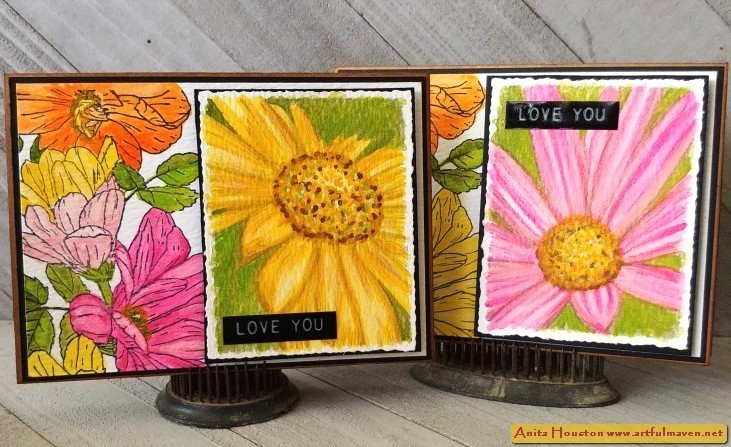
 I cut Watercolor Cardstock from Ranger to 3.75 x 5.25, and stamped one of the Floral Trims on the left edge lengthwise using Black Soot Archival Ink. I colored the flowers in with the Distress Watercolor Pencils and a Detail Waterbrush. 

 
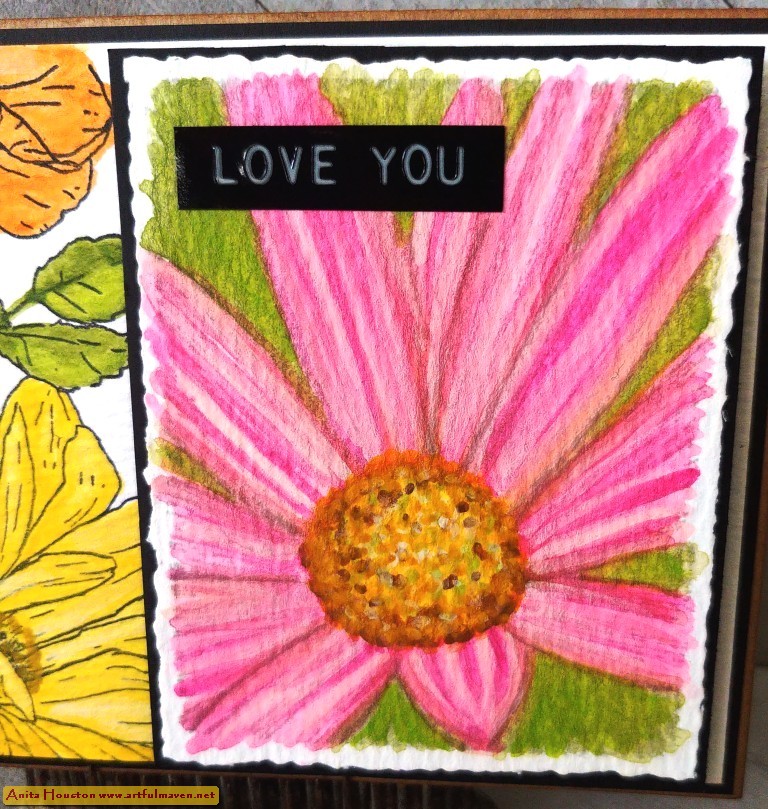
On more Watercolor Cardstock, I stamped the two flowers from the Bold Botanicals Set using Lost Shadow Distress Ink so that they would have a more natural watercolor look. I colored these in with the Pencils as well. 

I trimmed around the Bold Botanicals with the Deckle Trimmer, and matted them onto Black Kraftstock, and then onto the right side of the other Floral Trims part. I matted this onto more Black and then onto Kraft Cardstock base cards cut and folded to 4 x 5.5 inches. I used a sentiment from the Thoughts Label Stickers, and then inked around the Kraft card with Gathered Twigs Distress Ink.


Supplies:
(Paper Trimmer, Stamp Platform, Detail Waterbrush, Water Mister, Two Sided Tape, Deckle Trimmer, Scissors, Foam Tape, Ink Blending Tool)
-Ranger Tim Holtz Distress Watercolor Cardstock
-Ranger Tim Holtz Distress Archival Ink: Black Soot
-Stamper's Anonymous Tim Holtz Stamp Set: Floral Trims, Bold Botanicals 
-Ranger Tim Holtz Distress Watercolor Pencils: Spiced Marmalade, Mustard Seed, Fossilized Amber, Twisted Citron, Peeled Paint, Seedless Preserves, Kitsch Flamingo, Picked Raspberry, Vintage Photo, Picket Fence
-Ranger Surfaces: Kraft Cardstock
-Tim Holtz Idea-ology: Black Kraftstock, Thoughts Label Stickers 
-Ranger Tim Holtz Distress Ink: Lost Shadow, Gathered Twigs
 
Thank you so much for stopping by today. And to all the Mommies out there, I wish you a love filled and relaxing day! Until next time, I hope your hands get creatively dirty soon!

Thursday, May 05, 2022

Modern Floristry and Artsy Stems Gardenia In A Crackled Bottle Mothers Day Cards

Hello Everyone! I just figured out that Mother's Day is this Sunday...I thought I had another week, so it was time to get cracking!  Every year I give my Mother and Mother-In-Law a gardenia (mine and their favorite flower) corsage if we are going to be together, but this year we are not, so I decided to put their gardenia on a card. I've said so many times that the new Modern Floristry and Artsy Stems Thinlits from Tim Holtz and Sizzix can make almost any flower, so I thought I'd try with the gardenia, and presto...I think the dies did pretty good. These gardenias look wildly gorgeous, and I can almost smell them. Actually, I can smell them. I have an old perfume that is an overly gardenia scent that I rarely use, but it was the perfect accent on the flowers, so when the Moms open them they will get the sweet sweet scent of the flower! With the help of Sizzix Bigz Bottled Up Die (and Distress Crackle Paint) and the new Quilted 3D Texture Fade, and lots of new Idea-ology, I think the Moms will love their gardenia cards.  Enjoy!

Using Distress Watercolor Cardstock and the Artsy Stems Thinlits, I die cut one of the stems with the open leaves and sunflower looking center. Since I made two cards, I actually die cut two. The stems were inked over with Rustic Wilderness Distress Ink from Ranger. Using the Modern Floristry Thinlits and Watercolor Cardstock, I die cut the fern looking pieces and inked those with Twisted Citron Distress Ink. I die cut one large flower (you don't need the center part), three leaves, three bulb looking leaves, one medium flower and all the parts, and both small flowers with all the parts. I inked only the edges of all flower parts with Antique Linen Distress Ink.

Since I made two flowers I arranged them first in singular die cut pieces in three groups (big flower and leaves, medium flowers, and tiny center flowers) that are in the center of the picture above, so you can see which pieces you will need for each part if you want to make a gardenia. The bottom portion of the picture has the three parts layered up and adhered using Collage Medium. The leaves go around the large flower in the first group. The two smaller flowers on the larger flower in the second group. The four tiny parts layered up smallest to biggest in the last group. Once all are adhered, then you can adhere the tiny center part to the medium flowers, and that to the large flower base to create your gardenia. 

I wanted to join the two fern looking pieces together on one long stem to go in the bottle better, so I used scrap Watercolor Cardstock, inked it up in Twisted Citron, and cut a long thin stem. I adhered the pieces on the stem and cut off the excess piece I didn't need at the top. It's up to you if you want to have those on one long stem. I also cut the second leaf off of the Artsy Stem so it wouldn't be in the way of the bottle top to look more natural. Do not adhere the gardenia to the stem yet. It's easier to adhere the stems first and add the flower top last, which you will do in the last step. 

I die cut the bottle from acetate using the Bottled Up Bigz Die. I used the smallest bottle on the right side of the die. I flipped the acetate over, and on the back I pounced on Cloudy Blue Alcohol Ink (or a light color blue) making a definitive line at the top of the bottle so it looks like water in the bottle. I turned the bottle over to the front side and used my finger to add a thin layer of Collage Medium. The Collage Medium will give the acetate some tooth to hold on to the crackle so it won't flake off later. When dry, I used my finger to add Translucent Distress Crackle Paint onto the bottle, and I let it dry naturally. 

 For the table cloth under the bottle, I decided to use the new Quilted 3D Texture Fade. I added Antique Linen Distress Ink directly from the pad to the inside of the folder (the top part) and really pushed it into the debossed areas, then I wiped the ink off that was not in the cracks. I lightly misted more Watercolor Cardstock, and placed it into the folder and ran it through the die machine three times. It was so gorgeous. I decided to give the quilted a plaid look, so I used an Ink Blending Tool and Antique Linen Distress Ink and rubbed it over the diagonal columns, skipping one, and continuing the pattern, then turning the paper and repeating the pattern. It's very light but noticeable. Then I thought it would be cool to have the table cloth at an angle and cut the paper down the middle diagonally, but when I went to see how it looked, it was a bad design. So if you do this, you can just cut the paper in half (either vertically or horizontally depending on how much you want to be seen). After cutting I inked the edges in Vintage Photo Distress Archival and thought I'd try inking over the tiny embossed sewing threads on the paper, so I used a Detail Inking Tool to lightly rub over the threads using the Vintage Photo and it worked really well, so you can see the threads much better in the design. I set this aside.

 I used the new Mini Filing Folders for the base of the card (the largest size), but I liked the design inside the folder better, so I opened it up and folded it back so the inside design was now on the outside. Keep that in mind as you can pick which side to use with these cute folders. I choose patterned Pocket Cards that went with the design on the folders (the largest size) and inked the edges with the Vintage Photo, and adhered the Pocket Cards to the top right side of the card front with two sided tape. 

I added the Quilted table cloth to the bottom with two sided tape and cut around the over hang (wouldn't have been much if I cut the paper in half regular style). I cut the Patchwork Linen Tape in half lengthwise, and placed strips of the tape over the tape designs (they are faint but it looks like traces of tape are on the paper) on the Pocket Card pieces. I love this tape! I selected more patterned paper from the Pocket Cards (the smallest size) and added two side tape the back, and die cut only the portion 'Love With' from the 'love with all your heart' die from the Bold Text #2 Thinlits. I popped the letters out and reversed the words so it will be 'with love'. I added the words to the bottom left side of the card.

I flipped the bottle over and added two sided tape over the water area only, and stuck both stems down on the tape the way I wanted them to look when the bottle is right side up. I added a little Collage Medium to the back of the stems and adhered the bottle and stems down. I wanted the flower to have a bit more glitz, so I misted it with Pearl Mica Spray from Wendy Vecchi and Ranger. It was now perfect, and then I adhered it over the sunflower looking part of the stem. I used a Dymo Label Maker with brown tape to make the words 'Mom' and 'Mother' and stuck those down on the tabs of the cards. 

Supplies: 
(Die Cut Machine, Die Pick, Ink Blending Tool, Scissors, Glass Mat, Alcohol Ink Tool, Water Mister, Detail Ink Blending Tool, Two Sided Tape) 
-Sizzix Tim Holtz Thinlits (Chapter 2 2022): Modern Floristry, Artsy Stems, Bold Text #2 
-Ranger Tim Holtz Distress Watercolor Cardstock 
-Ranger Tim Holtz Distress Ink: Antique Linen, Twisted Citron, Rustic Wilderness 
-Ranger Tim Holtz Distress Collage Medium: Matte 
-Sizzix Tim Holtz Bigz Die: Bottled Up 
-Ranger Tim Holtz Alcohol Ink: Cloudy Blue 
-Ranger Tim Holtz Distress Translucent Crackle Paint 
-Ranger Tim Holtz Distress Archival Ink: Vintage Photo 
-Sizzix Tim Holtz 3D Texture Fade: Quilted 
-Tim Holtz Idea-ology: Mini File Folders, Pocket Cards, Patchwork Linen Tape 
-Ranger Wendy Vecchi Mica Spray: Pearl 
-Acetate, Dymo Label Maker with Brown Tape

Thank you so much for stopping by! Happy Mother's Day to all you Moms out there. I hope it's a love filled weekend for you! Until next time, I hope your hands get creatively dirty soon!

Sunday, May 02, 2021

Perspective Butterfly and Wildflowers Mother's Day Cards

Happy May everyone! Mother's Day is next Sunday here in the U.S. so don't let it creep up on you like it normally does me. I managed to make these a few weeks ago for my Mom and Mother in Law using the Perspective Butterfly and Wildflower Stems 3 Thinlits from Sizzix and Tim Holtz.  They were probably the easiest and fastest cards I've ever made either one of the Moms as well, but no less wonderful as all the others. ;0) I know they will like them...they love every card I make and ALWAYS EXPECT handmade...lol! Gotta love our Mommies! Enjoy, and as always feel free to scrap lift away anything I ever share. 
 
Have a kraft cardstock card base ready at 4.5 x 7.5 inches. Die cut one Perspective Butterfly using black cardstock for each card you are making, and use the die brush to remove all the little pieces.  Trim a #10 Mixed Media Tag from Dina Wakley and Ranger down to 7 inches long. Adhere a portion of the butterfly (more than half) to the upper portion of the tag at an angle using Collage Medium or a spray adhesive. Trim off the other portion and save it for another project.

 
For the background, use a Blending Brush for blues to lightly ink in around the butterfly and the rest of the tag using Tumbled Glass Distress Ink. If you get ink inside the butterfly it is fine.
 
 
Using a Blending Brush for pinks, lightly ink around the butterfly and the rest of the tag with Kitsch Flamingo Distress Ink to create a nice blended look with the blue. 
 
 
Lay the Ironwork Layering Stencil from Tim and Stamper's Anonymous randomly over the tag and around the butterfly and using the Blending Brush, ink in portions of the design with Tumbled Glass.

 
Lay the Typo Layering Stencil randomly over the tag and around the butterfly and using the Blending Brush, ink in portions of the design with Kitsch Flamingo.

 
Lay the Halftone Layering Stencil randomly over the tag and around the butterfly and using the Blending Brush, ink in portions of the design with Tumbled Glass.
 
   
For the butterfly, apply Hickory Smoke Distress Ink directly from the pad to the silicon mat and pick up with the Detail Waterbrush. Color in the body of the butterfly. Color in the wings with Squeezed Lemonade Distress Ink first, and then add darker shades to portions using Mustard Seed and then Fossilized Amber Distress Ink. Let dry.
 
 
Using a regular paintbrush and Distress Resist Spray, open the top and dip the brush in and brush over the whole butterfly to add a nice sheen and protection layer. Wash the Resist out of the paintbrush immediately using warm water and soap. Ink the edges of the tag with Gathered Twigs Distress Ink, and stitch around the portion of the tag around the butterfly with black thread. Set aside.
 
 
For the flowers, use Distress Watercolor Cardstock and die cut at least six of the Wildflower 3 Stems (I used three stems per card and even added the cut off stems for extra fill in.). Add Distress Inks directly to the silicon mat and pick up with the waterbrush to color in the flowers and stems. I used Squeezed Lemonade, Mustard Seed, Fossilized Amber, and Kitsch Flamingo Distress Inks for the flowers, and Twisted Citron and Rustic Wilderness for the stems. 
 
 
Use the darker of the inks to add in detail lines on the petals and leaves. Color in the centers of the few flowers that have them with Gathered Twigs Distress Ink. Add a few dots of Tumbled Glass on top of the pink flowers for depth. When dry, add dots of a brown marker to the centers of the yellow flowers. 
 
 
For the sentiment and card base, cut burlap to fit over the front of the card base, and remove some of the strings off each side for a tattered look and adhere with two sided tape. Ink the edges in Gathered Twigs. Add a sentiment from the Chit Chat Stickers to kraft cardstock, and ink the edges in Gathered Twigs. Adhere this to a piece of burlap, remove a string from each edge and cut around the sentiment leaving 1/4 inch border. Ink the string edges with Gathered Twigs. Adhere the sentiment to the card below the top wing with two sided tape. Do not adhere the tag on yet though.
 
 
Now it's assembly time. Arrange the flowers to the bottom of the tag the way you want them and then adhere with Collage Medium. Trim off the stems that are hanging off the tag, and even add those on to fill in gaps. Ink the edges of the tag with Gathered Twigs. Use two sided tape to adhere the tag onto the card base.

 
Using a paintbrush and more Distress Resist Spray and brush over the flower heads of each flower as well as the sentiment. Let dry. 
 

Supplies: 
(Die Cut Machine, Die Brush, Die Pick, Scissors, Paper Trimmer, Blending Brushes, Distress Sprayer with Water, Detail Waterbrush, Paintbrush, Ink Blending Tool, Sewing Machine with Black Thread, Two Sided Tape) 
-Sizzix Tim Holtz Thinlits: Perspective Butterfly, Wildflower Stems 3 
-Ranger Surfaces: Black Cardstock, Kraft Cardstock 
-Ranger Dina Wakley Media: #10 Journaling Mixed Media Tags 
-Ranger Tim Holtz Collage Medium: Matte 
-Ranger Tim Holtz Distress Ink: Tumbled Glass, Kitsch Flamingo, Squeezed Lemonade, Mustard Seed, Fossilized Amber, Hickory Smoke, Gathered Twigs, Twisted Citron, Rustic Wilderness 
-Stamper's Anonymous Tim Holtz Layering Stencils: Ironwork, Typo, Halftone 
-Ranger Tim Holtz Distress Resist Spray 
-Ranger Tim Holtz Distress Watercolor Cardstock 
-Tim Holtz Idea-ology: Chit Chat 
-Brown Marker, Burlap

Thanks so much for stopping by and commenting. If you are a Mommy, I hope you are pampered and loved dearly on Sunday...well everyday really. I hope your hands get creatively dirty soon!