Showing posts with label Thank You. Show all posts

Friday, April 29, 2022

Wendy Vecchi Make Art Doodle Stamps Note Card and Envelopes Set

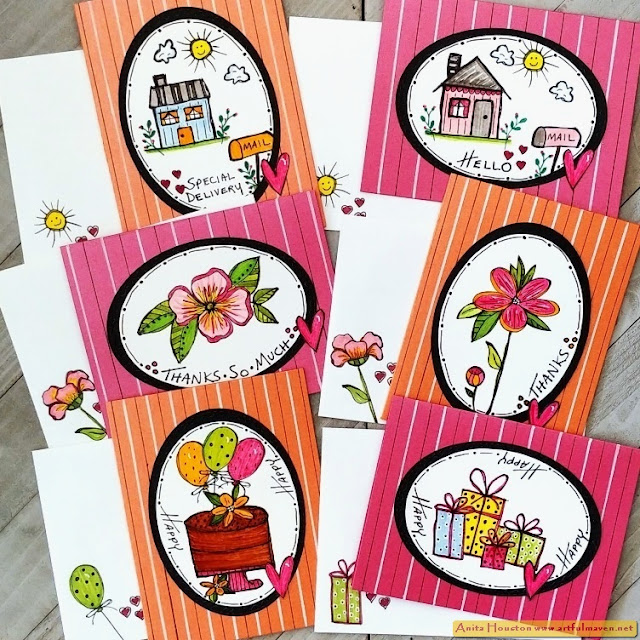
Hi everyone!!! Wendy Vecchi has just come out with the three cutest sets of Doodle Stamps from Ranger. She has been drawing these cute little images for awhile now and even teaching people to do it, so she thought she would just come out with stamps of the images so people don't have to draw them. Perfect! I made a set of note cards and envelopes with all the stamps. Since I have a bunch of blank colored note cards and envelopes that I rarely use, I thought using Wendy's new Doodle Stamps on them would be perfect and fun too, plus I can't remember the last time that I didn't create a background on a card, so using the premade cards just freed me up to Doodle! These stamps are so stinking fun and take me back to the days of talking on the kitchen wall phone with the stretched out 10 foot cord while 'doodling' all over the back of the extra thick phone book. How I wish I would have saved the backs of all those phone books. Anyway, these stamps make it easy to just have fun and not over think anything or any set type of design...it's fun to just stamp and color in. And speaking of coloring in, I literally did just that, with markers, and I can't remember the last time I did that either. I got so lost in the coloring that I barely remember doing it. Even though these cards are super simple looking, maybe even too clean compared to what I usually do, it was so great to just go back to basics...stamp and color in. AND...these were super fast to make. Now I have a set to use or give away. Enjoy!

I used three orange and three pink colored note cards. I die cut six Ranger Specialty Stamping Paper with the largest of the Sized Ovals Movers and Shapers from Tim Holtz and Sizzix for the stamping, and saved one of the negatives to help me stamp in the next part. I die cut six of second largest oval from the Stitched Ovals Thinlits to mount behind the SSP, using black cardstock. 

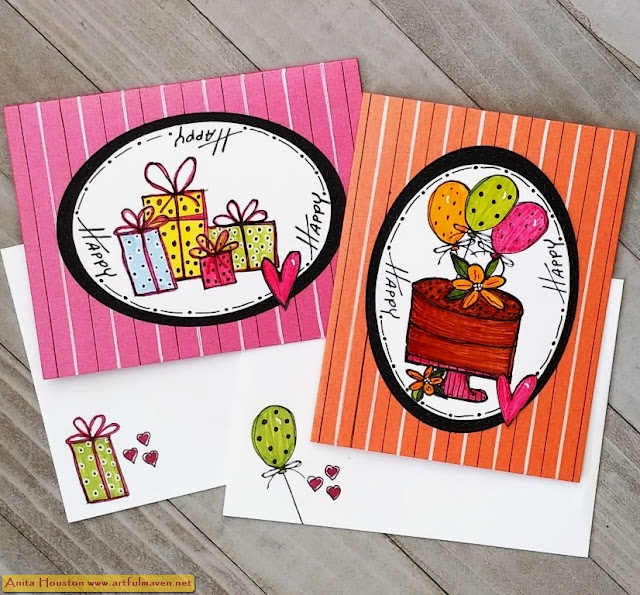
I placed the negative from the die cutting to use in the platform to help hold my oval in place. I stamped the images from the Celebration set in the oval and made a few masks with Sticky Note for the images that will overlap. I used this set twice, stamping the balloons and cake vertically and presents horizontally, all using Black Soot Archival. I also stamped six of the hearts and cut those out to use later. 
 
 
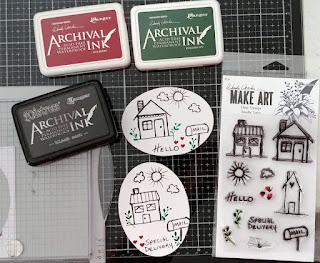
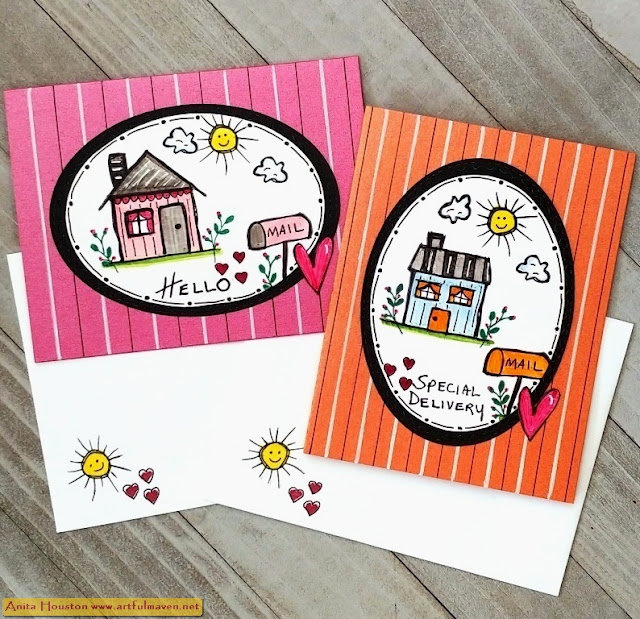
I did the same here using the Doodle Town Set, except I didn't have to do any masks as all the images were spaced out. I also used Mulberry Archival for the hearts and English Ivy for the plants.  One goes vertically and one horizontally again, and the same with the next set.

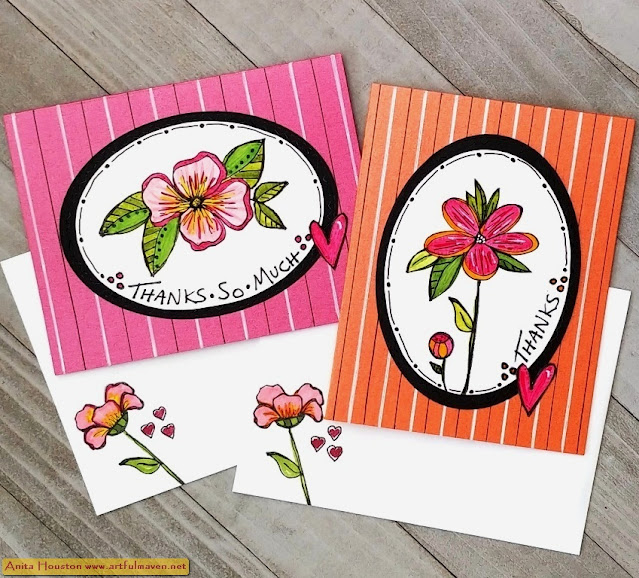
No masks for this set (Floral Doodle) and no other inks besides Black Soot. 
 
I used a permanent fine black Pitt Pen from Faber-Castell to add more doodles, like the borders on all six ovals. I also added a few circles and stripes to some of the images. Doodling is fun! I didn't like the stark background (go figure) so I used the Mini Stay-tion and ruler it comes with to add lines of white and black pen, vertically for the vertical ovals and horizontal for the horizontal ovals. 

I colored in all the images with more Pitt Pens. They are permanent.  I had forgotten how much I love to color with markers. Super fun! I mounted the ovals to the black Stitched Ovals with two sided tape, and then mounted those to the card fronts. 

 
I colored in the hearts and cut them out. I used a black marker to color the white edging from the hearts as I didn't like the white showing. I added to the hearts to the lower right side of each card. I stamped matching Doodles to each envelope for it's card, and colored those in with the markers as well. I added a few white details on some of the images, like a shine mark on each heart and outlining some of the dots on the presents. 
 
Supplies: 
(Die Cut Machine, Stamp Platform, Sticky Note for Masking, Scissors, Stay-tion, Small Stamping Block, Two Sided Tape) 
-Ranger Surfaces: Specialty Stamping Paper, Black Cardstock 
-Sizzix Tim Holtz Movers & Shapers: Sized Ovals 
-Sizzix Tim Holtz Thinlits: Stitched Ovals 
-Ranger Wendy Vecchi Make Art Clear Stamp Set: Doodle Celebration, Floral Doodles, Doodle Town 
-Ranger Tim Holtz Distress Archival Ink: Black Soot 
-Ranger Wendy Vecchi Archival Ink: Mulberry, English Ivy 
-Faber-Castell Pitt Artist Pens 
-Sakura Gelly Roll Pen: White 
-Solid Color Notecards with Envelopes
 
Thank you all so much for stopping by. I'll be back soon. Until then, I hope your hands get creatively dirty soon!

Sunday, June 27, 2021

Stamper's Anonymous Summer 2021 - Bold Sayings and Floral Outlines Cards

Hello everyone!!! I hope all of you are doing well. I'm sorry it's been a bit since I've been here, but there has been lots of creating going on. It's finally time for some stamping goods. Tim Holtz and Stamper's Anonymous have just released five new sets and stencils as well. Did you catch the LIVE yesterday?!! Talk about some beautiful makes. Today, I have the first of five posts using the new stamps...these made with the Bold Sayings and Floral Outlines sets. Enjoy and happy Summer!!! 

Using a paper trimmer, trim Ivory Heavystock from Ranger to 4 5/8 x 6 1/8 inches. Go ahead a cut a black cardstock mat to 4 7/8 x 6 3/8 inches, and fold a kraft card base to  5 x 6.5 inches, and mount the black on the kraft with two sided tape and set that aside. Note: I made two cards, so double up if making two.  Pick out the sentiments from the Bold Saying set and place on the right side of the Heavystock for each card. Add the Floral Outline Stamps around the sentiment and figure out the layout. Remove the Bold Saying for now, and add the Floral stamps to the large platform and secure the stamps. Stamp them over the heavystock using Black Soot Archival. Do the same for the other panel if you are making two cards. Do not remove the floral stamps sets as you will stamp this again later.
 
 Using the silicon mat as a palette, add a tiny bit of Black Soot Distress Spray Stain straight from the bottle to the mat. Pick the ink up with a Broad Water Brush and paint in a stripe between the flowers up at the top of the panel, freehand for an organic feel. Leave about 3/4 inch space and paint another line, and repeat this until you've covered the paper. Dry with a heat tool. Clean you brush well, and add a tiny bit of Picket Fence Distress Spray Stain (remember to shake this color as it has pigment in it and a mixing ball) straight from the bottle to the mat. Pick the ink up with the Broad Water Brush and paint in a stripe below the black one leaving a tiny little ivory border between the stripes. Continue this pattern until the paper is filled up between the black stripes and the floral parts. Do the same for the other card. Let the panels dry or use a heat tool. 
 
 
Using  more Distress Spray Stain and the silicon mat as your palette, pour a tiny bit of the stain out and color in the parts of the flowers and leaves with a Detail Water Brush on both of the cards. I used Twisted Citron and Rustic Wilderness on the leaves, Salvaged Patina and Peacock Feathers on the flower petals, and Mustard Seed for the centers of the flowers.

 Place the Heavystock panel back into the large platform with the flowers and stamp them again over the existing images using Black Soot. This is in case you got some striped Picket Fence Spray Stain over the floral parts, and it deepens the depth of the flowers. Remove the Floral Stamps and dry the pieces or let dry.
 
 Place a panel in the platform and place a Bold Saying on it and secure it by closing the lid. Stamp it several times using Black Soot Archival until it is nice and bold, and then after the last stamping add Gold Embossing Powder over it and heat emboss. Do the same for the other panel using another saying.
 
 Using a fine gold paint pen, draw lines freehand again, parallel to the black lines in the ivory area between the white and black lines. Use the pen to draw dots in the middle of the flowers around the stamen. Using a bold gold paint pen, draw a gold border around the edges of the panel. Let dry. Ink the edges of the kraft card with Gathered Twigs and adhere the panels to the front of the cards with two sided tape.
 

Supplies: 
(Paper Trimmer, Large Stamp Platform, Glass Mat, Broad Water Brush, Heat Tool, Detail Water Brush, Ink Blending Tool, Two Sided Tape, Scissors) 
-Ranger Tim Holtz Distress Heavystock: Ivory 
-Ranger Surfaces: Black Cardstock, Kraft Cardstock
-Stamper's Anonymous Tim Holtz Stamp Set: Floral Outlines, Bold Sayings 
-Ranger Tim Holtz Archival Ink: Black Soot 
-Ranger Tim Holtz Distress Spray Stain: Black Soot, Picket Fence, Twisted Citron, Rustic Wilderness, Salvaged Patina, Peacock Feathers, Mustard Seed 
-Ranger Embossing Powder: Gold 
-Ranger Tim Holtz Distress Ink: Gathered Twigs 
-Marvy Uchida Premium Deco Color Pen: Gold Fine, Gold Bold
 
Thank you so much for stopping by today and looking! I'll be back again with another stamping make. Until then, I hope your hands get creatively dirty soon!