Showing posts with label Autumn. Show all posts

Saturday, August 03, 2024

Tim Holtz Sizzix Autumn/Halloween 2024 - Autumn Brooches

It's already August and Autumn will be here before you know it, so I love that Tim Holtz releases products early enough to be in hand before the season. Today was the Live for the Sizzix Autumn/Halloween Dies. If you missed it, watch the replay, or just watch it again and again because the makes were crazy outstanding and inspiring from the Makers! I'm always in awe and my head explodes with ideas after every Live. I'd like to give you a little personal side note as to why I made Brooches for not only Autumn but also for Halloween (Don't be surprised if you see some for Christmas!) with the new Dies, and YES they are made with paper.  My Mother and I shared a love for vintage jewelry and especially brooches. We gifted each other many over the years. She passed away in January of this year, and I was entrusted to clean out her house. When I came to large collection of jewelry, so many pieces were brooches of course. Memories flooded back, and I found so much joy in them. I researched every single piece and discovered some valuable pieces as well as learned so much. My love for them was renewed, and I decided to start making my own, but I had no idea where to start and didn't know how I was going to shape real metal. Then Tim sent the dies, and I decided to try making one brooch with the dies and PAPER. I started with several layers of metallic paper, and it proved sturdy but not quite as I would have liked, so I thought I'd coat it in resin, and WOW it worked! It was not only sturdy, but I think it will last years. Next thing I knew, the one brooch turned into many and I just couldn't stop making them. Each one brought joy and strangely enough a closeness with my Mother. It was absolute therapy. I hope you enjoy these as much as I did making them.  

Add two sided tape to the back of Silver, Light Gold, Dark Gold, and Copper Metallic Kraftstock, and then start die cutting the parts that you want from the Vault Foliage Wreath Thinlits as well as the two pumpkin parts from the Vault Wicked Thinlits.  You will also need to die cut the same pieces again for about three layers to add to the thickness of the piece but don’t adhere them yet, and then die cut the same again BUT from the backside of the Kraftstock with the two sided tape side up to be able to back your pieces so that the backside of the brooch looks nice and finished, MINUS the detail pieces like the centers of flowers and leaves as you don’t really need to have those on the back.  Do not add the backs on the pieces yet though. Start playing with the pieces to figure out the layout and size of the brooch you want keeping in mind the closeness of the parts so that your pin won’t show through from the front, so keep a pin handy to help guide you, as well as when to add another layer so the depth makes sense for a 3D look. You will want to layer the pieces and keep them close together to add to the sturdiness of the brooch as well. Add a bit of Collage Medium to the detail parts to make sure they stay in place. This is the hardest part of making the brooches as it takes some thinking and planning. 

Once you figure out the depth and closeness of the pieces and have added all the layers, then you can add the backing so that all the pieces are covered with metallic paper on the back and Kraft is not showing. For the pieces that won’t be showing on the back, you don’t need to add a backing of course. 

Here are all the pieces with all the layers adhered on up a little closer. I should have taken a picture of the backs as well, sorry. But they are just solid metallic paper with no detail parts. The pin will not be adhered until the very end, so don’t worry about those now.

Since the edges of the pieces are brown from the Kraft, I used metallic leafing paint pens to color the edges. I used a tiny craft Qtip with the paint from the pens to get into the tiny open areas. Doing this also allowed me to see all the edges were adhered down well, so when they were not I added a bit of Collage Medium to fully secure them. 

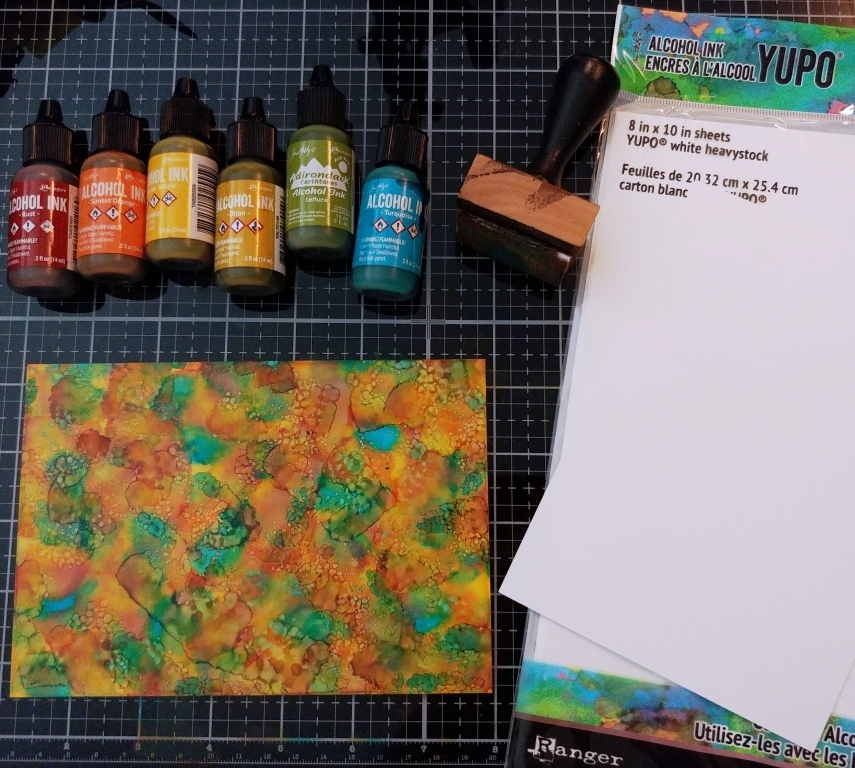
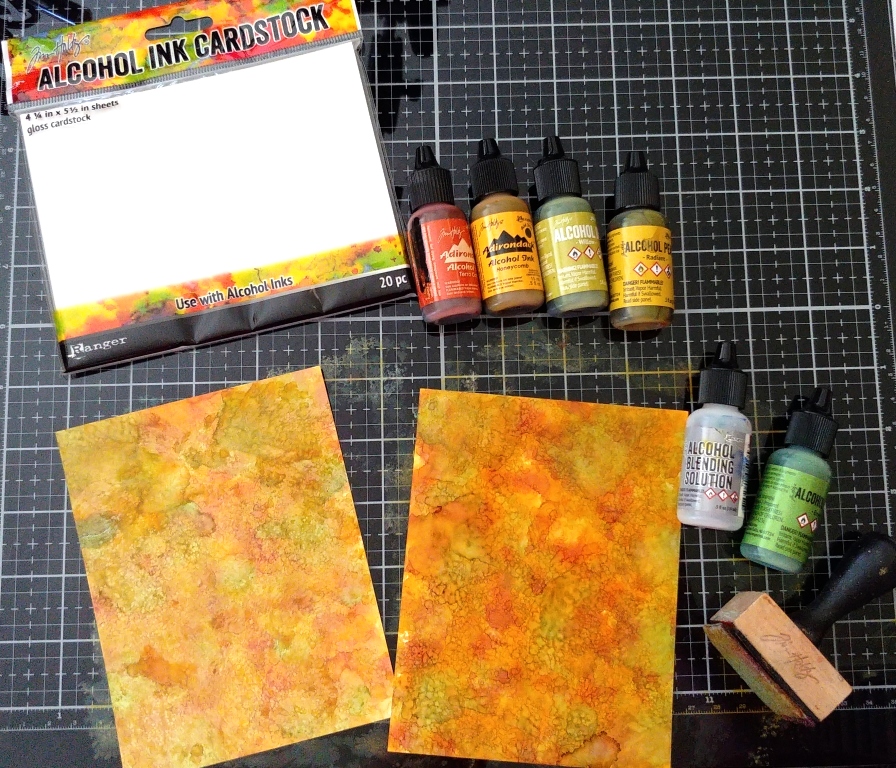
Some of the Droplets were not the color I needed so I dyed them with Alcohol Ink. If I had to do a lot I used a cup with several drops of the ink, if only a little I just colored them directly with a Qtip. I did the same with plain clear rhinestones as well. Then I adhered all the bling with Glossy Accents.

Another picture of using Alcohol Ink to color the bling.

Same as 5 and 6. Alcohol Ink is so versatile.

I mixed 1 ounce of Ice Resin and poured it over the pieces on a baking cooling rack I have designated for Art, with a piece of wax paper underneath. I tried to do as heavy as a coating as I could and I kept these on the rack over night, moving them around every hour using a craft pick so they didn’t get stuck in place. By morning they were dry and not stuck in place. The bottle says they totally cure after 48 hours. 

While the resin hardened I made glassine sacks to house the brooches using the Vault Pillow Box Thinlits, making a window with the pumpkin die, and adding clear packaging material under the pumpkin opening. I had to use the Premium Crease Pad for the sack die with the thin glassine so the folding creases didn’t get cut all the way through.

I used pliers to bend the hook of pin in a little more so that there wasn’t more tension when it gets secured in the closure, hopefully alleviating people from pulling on the pin too much to latch it. Fingers crossed. I added the pins to the back of each brooch so they wouldn’t be seen using lots of Glossy Accents. I also used tiny letter metal stamping punches and a Craft Hammer for my initials onto Metallic Kraftstock, and added those to the back of each piece for my maker marks, and then I coated the whole back with more Glossy Accents for added strength again, and let them dry.

Using the same Vault Pillow Box Thinlits, there is a card to die cut that fits into the sack. I die cut 6 of these, one for each as a holding card for the brooches. I measured and marked where both ends of the back of the pin would be and punch holes for them, and then used scissors to cut a line between the holes. The back of the pin is just pushed through the cut line into the holes and it stays in place perfectly. Then the card with the brooch fits into the sack. 


Supplies:
(Paper Trimmer, Two Sided Tape, Die Cut Machine, Die Pick, Scissors, Standard Premium Crease Pad)
-Tim Holtz Idea-ology: Metallic Kraftstock, Metallic Droplets, Christmas Droplets, Halloween Droplets, Mirrored Hearts, Kraft Glassine
-Sizzix Tim Holtz Thinlits (Autumn Halloween Vault Series 2024): Vault Foliage Wreath, Vault Wicked
-Ranger Tim Holtz Distress Collage Medium: Matte
-Ranger Glossy Accents
-Ranger Tim Holtz Alcohol Ink: Sandal, Latte, Dijon, Ginger, Teakwood, Sunshine Yellow, Valencia, Botanical, Gold Mixative
-Ranger Ice Resin
-Sizzix Tim Holtz Thinlits: Vault Pillow Box & Bag
-1 Inch Brooch Pins, Gold, Silver, Copper Metallic Pens, Microfiber Cloth, Various Sizes Flat Rhinestones and Pearl Halves, Containers to Dye In and for Ice Resin, Metal Letter Stamps and Hammer if Desired, Clear Packaging

Thank you truly for all the comments on the Live and social media. I totally appreciate all of you! I'll be back again next week with the Halloween Brooches. Until then, I hope your hands get creatively dirty soon!

Saturday, August 26, 2023

Tim Holtz Stamper's Anonymous Halloween 2023 - Foreboding and Obscure Autumn Sketchy Leaves Alcohol Ink Lift Cards

Hi Everyone! The Tim Holtz Stamper's Anonymous Halloween Live is just about to finish up, and of course my mind is up in the clouds in awe of all the makes, as I'm sure yours is as well! It's so crazy to see so many different kinds of makes from five stamp sets! If you missed the original Live the replay will be up soon. Here is one of my makes from the show featuring the new Sketchy Leaves Stamp Set along with help from The Obscure and Foreboding Sets using Alcohol Inks from Ranger. These were a cinch to make and just enjoyable to do. Oh how I LOVE Autumn, and cannot wait for it to arrive. Enjoy!
 
Cut a piece of Yupo White Heavystock to 4.5 x 6.5", and another piece that is about 4 x 4". Gather Rust, Sunset Orange, Sunshine Yellow, Dijon, Lettuce, and Turquoise Alcohol Ink from Ranger, and apply a small dot of each onto the felt on an Alcohol Ink Applicator, then pounce the ink onto the paper until covered. You can blow on a few spots to create tiny circles, fyi. Do the smaller paper the same and then set that one aside for now.

 
Place the larger paper into the large stamp platform, and arrange one of the scrolls and the flowers from the Foreboding and The Obscure Stamp Sets onto the bottom of the paper so they will be framing the bottom. Close the lid to secure the stamps. Gather Alcohol Lift Ink, a paper towel,  and cut a piece of Ivory Heavystock to the same size 4.5 x 6.5 inches and have it ready. You need to work fairly quickly to do the lifting. Apply the Lift Ink to the two stamps generously. Close the platform and stamp the images onto the AI paper, and press firmly and for a few seconds. Open the platform and carefully remove the paper and place the Ivory Heavystock in exactly where the other paper was, and then close the platform and stamp to transfer the ink, pressing firmly and for a few seconds. Open platform and remove the paper. You can stamp another paper if you wish to get whatever is left over on the stamps. Place the paper towel in the platform and stamp a few times until all the ink is transferred to  the paper towel, then lightly clean the stamps with the paper towel, but leave the stamps in place on the platform. Take the paper towel and place it over the Alcohol Ink paper and lightly wipe away the ink on the stamped images, revealing the lifted images. Clean all the ink off. Place the AI paper back in the platform but TURN IT so that the lifted images will be at the top, and a clean bottom is ready for more. Repeat all the above steps to lift the ink and transferring it the Ivory. Finally clean and remove the stamps as you are finished with those.


Use sticky notes or scrap paper to cover all the lifted images as best you can on the AI paper. Place the Fractured Layering Stencil over the center and position it so that you can see as much of the stencil parts on the open areas of the paper. Take a clean Ink Blending Foam and add it the tool, dab it onto the Alcohol Lift Ink pad to pick up the ink, and then start dabbing it over the open stencil areas. You will see the ink lifting away. Once all areas are lifted, remove the stencil and sticky notes and use a paper towel to remove any ink. You should have a lifted fractured area in the center. Wash the stencil and the foam with warm water to remove all the ink and let dry for use another day, and have the stencil ready to use on the next part.

 Take the Ivory paper now, and cover the images with the sticky note like before, add the stencil on. Use Gathered Twigs or another brown ink and stencil in the Fractured image over the center of the paper. Clean the stencil and now you are finished with it.  
 
 
Take the 4 x 4" piece with the Alcohol Ink on it and place it into the platform. Select a leaf from the Sketchy Leaves set, and place it on the paper and close the platform to secure it. Cut a piece of Ivory Heavystock the same size about 4 x 4" and have it ready, as well as the Lift Ink again, and a paper towel. Stamp the leave with the Ink, then transfer to the other paper, and repeat the clean up like before. Add two sided to the back of both, and then use scissors to cut the leaves out leaving a small border around. Mount both of these to turquoise color Metallic Kraftstock, and then cut those out again leaving a border.  
 
Cut and fold two Kraft card bases to 5 x 7". Ink the edges of the cards with the Gathered Twigs. Cut two turquoise Metallic pieces to 4.75 x 6.75" and mount to the cards. Stamp the sentiment from the Tiny Frights Stamp Set on the lower right corner of both papers using a dark brown Archival like Ground Espresso. Mount these the cards. Apply foam tape to the back of the leaves and then mount the corresponding one to the card fronts. Shake the Unraveled Distress Mica Stain, and then pour a tiny bit out onto the  white mat. Pick up with the Water Brush and color in some of the images on both cards, like on the scrolls and flowers, and even on the leaves.


Supplies:
(Paper Trimmer, Alcohol Ink Applicator, Large Stamp Platform, Paper Towel, Ink Blending Tool w/Clean Foam, Sticky Note, Two Sided Tape, Scissors, Foam Tape, Detail Water Brush)
-Ranger Tim Holtz Alcohol Ink Yupo White Heavystock
-Ranger Tim Holtz Alcohol Ink: Rust, Sunset Orange, Sunshine Yellow, Dijon, Lettuce, Turquoise
-Ranger Tim Holtz Alcohol Lift Ink
-Stamper's Anonymous Tim Holtz Stamp Set: Foreboding, The Obscure, Sketchy Leaves, Tiny Frights 
-Ranger Tim Holtz Distress Heavystock: Ivory
-Stamper's Anonymous Tim Holtz Layering Stencil: Fractured
-Ranger Tim Holtz Distress Ink:  Gathered Twigs
-Ranger Tim Holtz Distress Archival Ink: Ground Espresso
-Tim Holtz Idea-ology: Metallic Colors Kraftstock
-Ranger Surfaces: Kraft Cardstock
-Ranger Tim Holtz Distress Mica Stain: Unraveled  
 
Thank you so much for stopping by, and of course for the comments. I truly appreciate all of you who do. I'll be back again on Friday with my other Halloween make that was in the show. Until then, I hope your hands get creatively dirty soon!

Saturday, August 12, 2023

Tim Holtz Sizzix Halloween 2023 - Tapestry and Artsy Leaves Autumn Scene Etcetera Mini Tag

Hi Everyone! I hope you were able to watch the Tim Holtz Sizzix Halloween Live today to see the mounds and mounds of inspirational projects. It always blows my mind. If you missed it be sure to watch the replay. This is one of my projects that was shown in the Live, an Alcohol Ink Autumn Scene on a Mini Etcetera Tag made from the new Artsy Leaves Thinlits and Multi Level Texture Fade. I am totally in love with this, and wish it was way way bigger, LOL! Enjoy!

 
I took two of the Gloss Alcohol Ink Cardstock pieces from Ranger and pounced on Terracotta, Honeycomb, and Willow Alcohol Ink with an Alcohol Ink Applicator Tool covering the sheets completely. Then I added Radiant and Envy Alcohol Pearls to the Applicator along with Blending Solution and pounced that on while blowing with my mouth to create tiny marbled bubble looking shapes. 
 
 
I placed one of the pieces into the Multi Level Tapestry Texture Fade and ran through the machine twice, then did the other. I rubbed the pad of Peeled Paint Archival Ink directly over the raised areas, then the pad of Vintage Photo Archival over to bring out the design even more, then set these aside. 
 
 
Using another sheet of Gloss, I pounced on Cloudy Blue Alcohol Ink over the top portion only on a fresh piece of felt on the tool. Then I added Snow Cap Mixative on the Applicator and pounced it over the Cloudy Blue to create cloud looking shapes. I added Aquamarine Alcohol Ink, Tranquil Pearls, and Blending Solution to the same piece of felt, and on the lower end of the Gloss I swiped the tool over to create stripes of color for more of a water look. Then I lightly misted a bit of 91% Rubbing Alcohol in the air and ran the piece through the droplets to create some water bubbles on the stripes of color. 
 
Taking the Tapestry pieces, I tore towards me to reveal the white paper core, about three pieces each, just following the spaces between the round parts. I inked the white edges with Peeled Paint Archival Ink, except the piece that would be the very bottom. Then I tore the blue piece between the sky and water, again towards me to reveal the white core, and inked the water edge only (as the sky edge will be covered up) with Speckled Egg Distress Archival Ink, as well as that last piece, so it looks like the waters edge. I took a Mini Etcetera Tag from Stamper's Anonymous and played with the torn pieces, layering them to make a pattern of sky, hills, and water. Once I knew the pattern I set these aside, and painted the tag hole with Fossilized Amber Distress Paint, to mimic the sun. 
 
 
I took another piece of Gloss Cardstock and added Deception, Scorch, Splendor, Radiant, and Envy Alcohol Pearls to the Applicator with Blending Solution and pounced it on covering the piece completely. Then I took all 9 of the solid leaf (now tree) shapes from the Artsy Leaves Thinlits, and die cut all of them with this piece. I set these aside. 
 
 
I took a piece of Gray Two Tone Woodgrain and added two sided tape to the back. I laid the stem (now trunk) pieces that I wanted to use (two different ones) and die cut them, repeating until I had 9 total. I took a Hickory Smoke Distress Watercolor Pencil and Detail Waterbrush and created lines on each that look like Birch/Aspen tree trunks. I set these aside. 
 
 
Taking another piece of Gloss Cardstock, I pounced on Willow and Everglades Alcohol Ink to half the sheet, and then Envy Alcohol Pearl and Blending Solution over the top. I added two sided tape to the back. I die cut two of the leafy stem looking pieces three times each, so that they might look like pine trees. I set these aside. 
 
 
I decided to paint the background of the Etcetera Tag, so I painted the edges only with Walnut Stain Distress Paint. When dry, I added two sided tape to the back of the sky, hills, and and water and adhere those on the tag, leaving a border, and punch a hole where the tag hole is using a hole punch. I adhered the tag hole over using Collage Medium. Then I added some more Vintage Photo Archival Ink around the sides to further darken the border. I selected phrases from the Clippings Sticker Book, inked the edges with Vintage Photo Archival, and mounted those onto Kraft Cardstock, cut around them and inked those edges the same. I took 6 Tack Nails and nailed each of those onto a corner point on the very edge of the tag around the pieces about half way in, using a Mini Craft Hammer, but first adding a tiny hole with a Craft Pick to make hammering them in a little easier.  
 
 Here is a side view so you can see the nails a little better.
 
 
I shook the Gilded Foundry Wax up well and added a tiny drop to the white mat, and then using my finger, I dotted each nail head with the Wax. Then I heated up the wax with a Heal Tool to melt and set it.
  
 
I inked the edges of the trees with Crackling Campfire Archival Ink and Adhered them in place with two sided tape and foam tape in spots. I added the white trunks on each tucking the ends under the hills. I used Vintage Photo Distress Archival Ink to color in the bottom part of the trunks on the pine trees and then adhered them in place. I adhered the wording on as well with two sided tape. Then taking some Jute String, I wrapped the string around the top part of the nail heads and then went on to another continuing to wrap until I ended up where I started and then I tied a knot. Finally, I added more Jute String to the tag hole.
 

Supplies:
(Alcohol Ink Applicator, 91% Rubbing Alcohol in Sprayer, Die Cut Machine, Die Pick, Scissors, Ink Blending Tool, Paintbrush, Hole Punch, Water Mister, Two Sided Tape, Detail Water Brush, Mini Craft Hammer, Heat Tool, Foam Tape, Jute Twine)
-Ranger Tim Holtz Alcohol Ink Cardstock: Gloss
-Ranger Tim Holtz Alcohol Ink: Terra Cotta, Honeycomb, Willow, Everglades, Cloudy Blue, Aquamarine
-Ranger Tim Holtz Alcohol Pearls: Deception, Scorch, Splendor, Radiant, Envy, Tranquil
-Ranger Tim Holtz Alcohol Blending Solution
-Sizzix Tim Holtz Multi Level Texture Fade (Halloween 2023): Tapestry 
-Ranger Tim Holtz Distress Archival Ink: Peeled Paint, Vintage Photo, Speckled Egg, Crackling Campfire
-Ranger Tim Holtz Alcohol Mixative: Snow Cap
-Stamper's Anonymous Tim Holtz Etcetera Tags: Mini
-Ranger Tim Holtz Distress Paint: Fossilized Amber, Walnut Stain
-Sizzix Tim Holtz Thinlits (Halloween 2023): Artsy Leaves 
-Ranger Tim Holtz Distress Woodgrain: Gray Two Tone
-Ranger Tim Holtz Distress Watercolor Pencils: Hickory Smoke, Black Soot, Vintage Photo
-Ranger Tim Holtz Distress Collage Medium: Matte
-Tim Holtz Idea-ology: Clippings Sticker Book, Tack Nails, Jute String
-Ranger Surfaces: Kraft Cardstock 
-Ranger Tim Holtz Distress Foundry Wax: Gilded

Thank you truly for stopping by today! I will be back soon with a Halloween make from the Live. Until then, I hope your hands get creatively dirty soon!